background image

26       Multi Axis Engraver Operating Manual


of the nose cone touches the engraving material.  Once the nose cone touches the material, press the Z down jog button a 

little bit more.  This will ensure that the depth of cut is consistent.  Press the set surface button.  The spindle will now 

move up approximately 1/8“.  The distance that the spindle moved up is the distance that the spindle will move up and 

down between letters.  If you would like a larger or smaller lift distance between characters, use the z jog up/down 

buttons to move the spindle to the lift position you would like.  Next, press the set surface button a second time.  The 

spindle will move up to the z home position.  The surface is now set.  Screw the cutter back into the spindle.  Send the 

job from the computer to the Vision Series 3 Controller.  You will notice that the light on the start button on the Vision 

Series 3 Controller will be flashing. 
 
Since we are using a rotary cutter, we need to have the spindle rotate.  On the Vision Series 3 Controller, press the 

spindle button until the light on the button turns green.  This will automatically turn the spindle motor on and off as the 

machine is engraving.  Remember to put on your safety glasses.  Now press start.  The job should now engrave.  If there 

are any problems, press the stop button immediately. 
 

Note:

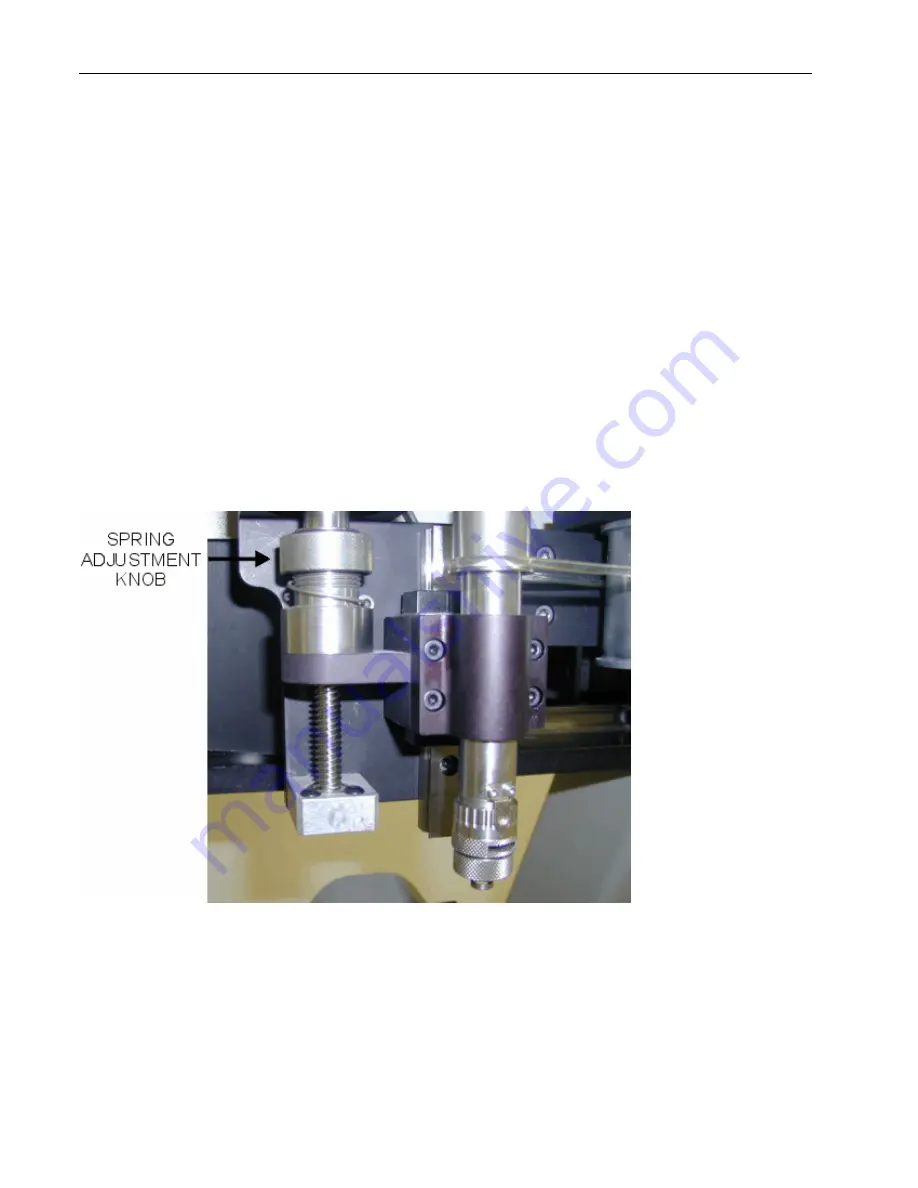
 You can adjust the pressure that the nose cone applies to the material by adjusting the spring adjustment knob 

shown below in figure 3.23.  Turning the knob to the left will increase the pressure and turning the knob to the right will 

decrease the pressure.  If too much pressure is applied, you may see a slight shadow on  the material you are engraving 

which is caused by the nose cone rubbing too hard on the material. 
 

(Figure 3.23) The spindle spring adjustment knob 


Burnish Engraving 

In this section, we will set up to engrave with a burnishing cutter.  Figure 3.24 below shows the spindle with a burnishing 

cutter and an optional ”EZ Rider“ burnishing adapter. 


(Figure 3.24) The MAX Engraver spindle with burnishing cutter


Содержание Multi Axis

Страница 1: ...Multi Axis Engraver Operations Manual Vision Engraving Routing Systems 17621 N Black Canyon Hwy Phoenix AZ 85023 www visionengravers com...

Страница 2: ...d and is believed to be accurate however Vision makes no representations or warranties for this manual and assumes no responsibility for inaccuracies errors or omissions that may be contained within t...

Страница 3: ...ion Terminology 11 DEFINITION OF TERMS 11 Flat Engraving 14 Flat Objects Initial Setup 14 Plates 17 Pens 17 Special Shapes 18 Rotary Engraving 18 Round Objects Initial Setup 18 Level Surface Engraving...

Страница 4: ...iv Multi Axis Engraver Operating Manual CHAPTER 5 MAINTENANCE 35 Removing Chips 35 Lubrication 36 Changing the Motor Belt 38 INDEX 39...

Страница 5: ...r distributor Safety Safety Precautions for the MAX Engraver Keep hands clear of the bottom of the spindle the motor belt and the spindle pulley during operation Always stop the machine before making...

Страница 6: ...g Inventory This area needs to be filled in when we know how the shipping boxes will be Specifications Z Axis Clearance 2 inches 50 8 mm Definition the distance between the bottom of the spindle and t...

Страница 7: ...s 3 Controller For detailed instructions on the connections for the Vision Series 3 Controller please see the controller manual Locate the table cable connection box shown in figure 2 1 below Figure 2...

Страница 8: ...le to the back of the Vision Series 3 Controller as shown in figure 2 4 below The serial cable shown below is the connection to your PC For more information on this please see the Vision Series 3 Cont...

Страница 9: ...Chapter 2 Installation 9 The MAX Engraver is now ready to engrave...

Страница 10: ...10 Multi Axis Engraver Operating Manual...

Страница 11: ...ch pressure the spindle applies on the engraved surface Screwing the knob downward will apply more pressure and screwing the know upward will apply less pressure 3 Z leadscrew This is the screw that d...

Страница 12: ...that may appear in the base of the vice These are adjusted properly at the factory but can be adjusted for wear by the end user 2 Tilt Adjustment Handle This handle allows adjustment of the tilt of t...

Страница 13: ...end where the bottom of your material will be placed This end is free wheeling and will follow the motion of the head stock Different jigs may be used depending on the shape of the object you are eng...

Страница 14: ...material you are engraving To do this the following procedure is required 1 Make sure that the light on the 4th Axis button on the Vision Series 3 Controller is red If not press the 4th axis button a...

Страница 15: ...figure 3 6 Then raise or lower the vice until the spacing is approximately 1 1 2 and tighten the height adjustment screw Figure 3 6 The height adjustment knob 4 Open the vice up so that the spindle no...

Страница 16: ...d around the spindle tighten the vice slide adjustment screw 7 Press the goto home button on the Vision Series 3 Controller The spindle will move up to the z home position 8 Press the 4th Axis button...

Страница 17: ...you can use for quick changing of parts that are the same width Notice that the ruler is marked from the center out to aid in centering the material For help with setting the spindle and cutters plea...

Страница 18: ...ct on the MAX engraver Insert the pins into the holes in the jig that will allow you to tighten the vice Once the pins are aligned tighten the clamp Always center the parts for easy setup Rotary Engra...

Страница 19: ...bject you are engraving should be approximately 1 1 2 If it is not 1 1 2 loosen the height adjustment knob and raise or lower the clamping device See figure 3 13 for height distance Figure 3 13 Settin...

Страница 20: ...raight edge to engrave on you need to make sure that the tilt adjustment is set for straight and not angled at all To do this loosen the tilt adjustment knob as shown in figure 3 15 below Figure 3 15...

Страница 21: ...send the job from Vision Pro make sure that you select the Max Rotary Engraver machine driver Using a driver other than these may result in the object not engraving properly You must enter in the dia...

Страница 22: ...to tilt the clamping assembly up or down to align the edge of the material you are engraving with the spindle See figure 3 19 below Figure 3 19 Levelling the engraved object Once the object is parall...

Страница 23: ...Engraving In this section we will set up the spindle for engraving with a non rotating cutter such as a diamond drag cutter Figure 3 20 below shows the spindle with the optional diamond drag adapter...

Страница 24: ...ve the spindle to the lift position you would like Next press the set surface button a second time The spindle will move up to the z home position The surface is now set Send the job from the computer...

Страница 25: ...ecial cutter wrench Now we must adjust the depth of cut The depth you will need to set depends on the type of material you are engraving You can generally find out how deep to cut engraving plastic fr...

Страница 26: ...re using a rotary cutter we need to have the spindle rotate On the Vision Series 3 Controller press the spindle button until the light on the button turns green This will automatically turn the spindl...

Страница 27: ...Software manual Insert the material you would like to engrave into the MAX Engraver as described in the next section Use the X Y jog keys on the Series 3 Controller to move the spindle out over the m...

Страница 28: ...e cone is to remove the spindle retainer ring and nose cone To do this unscrew the retainer ring shown in the picture above Insert the cutter into the spindle and screw the cutter knob completely in N...

Страница 29: ...arger or smaller lift distance between characters use the z jog up down buttons to move the spindle to the lift position you would like Next press the set surface button a second time The spindle will...

Страница 30: ...30 Multi Axis Engraver Operating Manual...

Страница 31: ...and allow engraving up to the edge of the material without nosecone interference Other uses include holding metal engraving stock name badges or other rectangular shapes The part number for this holde...

Страница 32: ...Seal jig Designed for notary seals of all diameters Rotating the jaw 180 will allow clamping of both large and small sizes The part number for this holder is 200107 00 Figure 4 5 The Universal Pin Ji...

Страница 33: ...ered filters assures that your unwanted chips are whisked away effortlessly The vacuum pump canister uses replaceable filters that can also be reused to assure maximum efficiency and cost effectivenes...

Страница 34: ...34 Multi Axis Engraver Operating Manual...

Страница 35: ...le area The vacuum chip removal system also keeps the nose cone from skipping over letters due to chips on the engraving surface Cleaning The Nose Cone The nose cone around the cutter may accumulate d...

Страница 36: ...it as the filters are reusable Place the filter back inside the canister put the lid back on the canister and then snap the three clips back into place Lubrication Remove the top cover from the MAX En...

Страница 37: ...ies in your engraving machine are sealed and or coated using special low friction methods and should not be lubricated DO NOT attempt to lubricate the spindle or the spindle bearings If you suspect lu...

Страница 38: ...t wears it will stretch and cause the spindle to slip or stall When this happens the motor belt generally needs to be changed Make sure that the Vision Series 3 Controller is turned off before changin...

Страница 39: ...ting 23 Engraving Rotary 24 28 H Hooking up the table 7 I Initial Setup 14 18 L Lubrication 36 M Machine Description Terminology 11 Maintenance 35 N Non Nose Rotary Engraving 28 P Pens 17 Plates 17 R...

Страница 40: ...40 Multi Axis Engraver Operating Manual...

Страница 41: ...Index 41...

Отзывы: