Chapter 3 - Operations 25
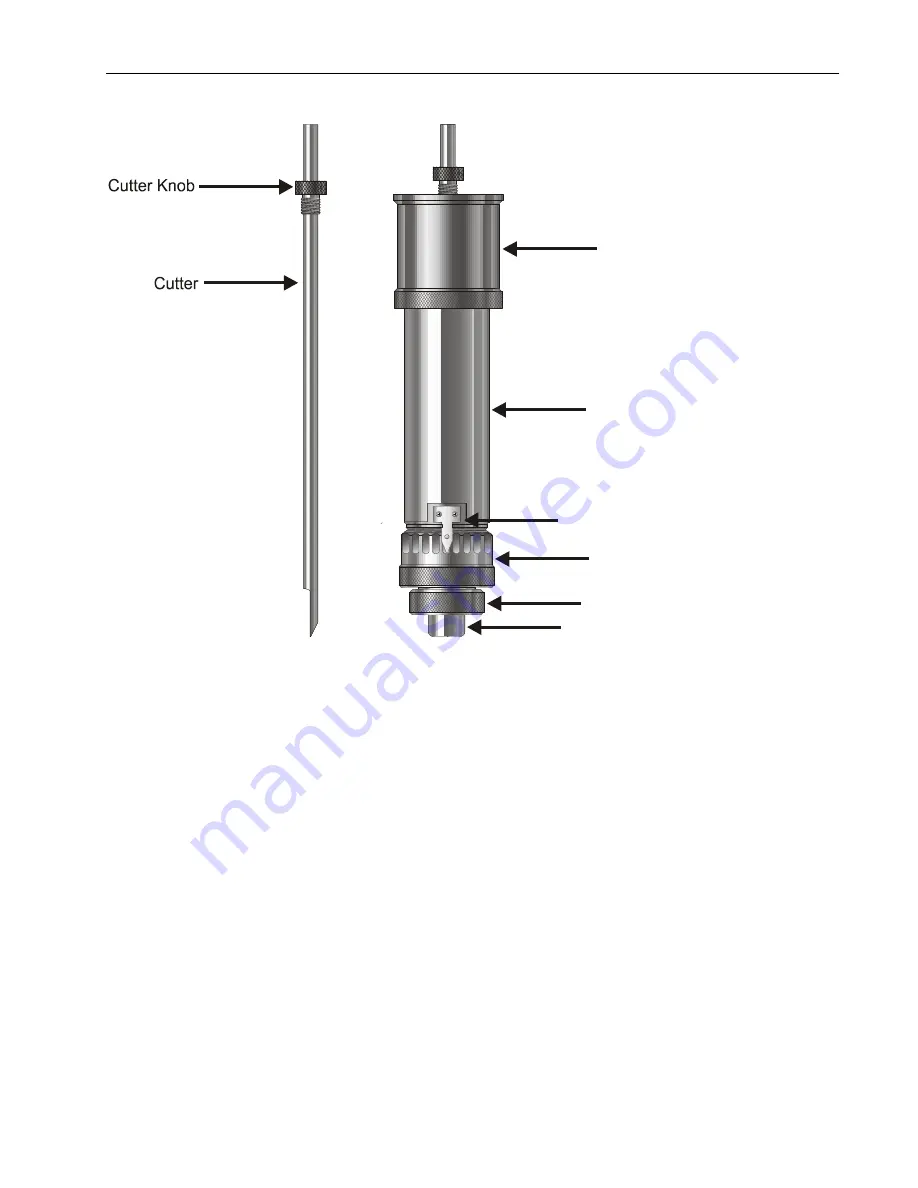
(Figure 3.22) The MAX Engraver spindle with rotary cutter
Spindle Pulley
Spindle Housing
Pointer
Micrometer
Retainer Ring
Nose Cone
The first thing that you need to do when rotary engraving is to zero the cutter. To do this, you must first turn the
micrometer all the way up to the top. Then unscrew the micrometer 3 revolutions and stop it when the spindle pointer
points to 0. Insert the cutter into the spindle and screw the cutter knob completely in. Note that the cutter will screw in
counter-clockwise looking down from the top of the spindle. Take a scrap piece of material and place it flat on the
bottom of the nose cone. There is a small setscrew in the cutter knob. Loosen the setscrew and push the cutter down
until it touches the flat piece of material that you have at the bottom of the nose cone. Tighten the cutter knob set screw.
The cutter is now zeroed.
Note:
Use only the special cutter wrench supplied for adjusting the cutter. The adjusting
screw is not an allen key and requires the special cutter wrench.
Now we must adjust the depth of cut. The depth you will need to set depends on the type of material you are engraving.
You can generally find out how deep to cut engraving plastic from the manufacturer or distributor. As a general rule, you
can start out shallow and increase the depth while you are engraving. Since the cutter is zeroed, we will not get any depth
right now, so let’s set the depth. Turn the micrometer to the right 7 clicks. This will engrave at a depth of .007 of an
inch. If you need more depth, turn the micrometer to the right. If you need less depth, turn the micrometer to the left.
Each click is .001 of an inch.
Turn the Vision Series 3 Controller on by flipping the switch on the back right side of the machine. Set up the job you
would like to engrave in the Vision Software or Vision Pro Software. (For more information on this, see the Vision
Engraving Software manual or Vision Pro Software manual.) Insert the material you would like to engrave into the MAX
Engraver as described in the next section. Unscrew the cutter from the spindle. Use the X & Y jog keys on the Series 3
Controller to move the spindle out over the material. Now press and hold down the Z down jog button until the bottom
Содержание Multi Axis
Страница 9: ...Chapter 2 Installation 9 The MAX Engraver is now ready to engrave...
Страница 10: ...10 Multi Axis Engraver Operating Manual...
Страница 30: ...30 Multi Axis Engraver Operating Manual...
Страница 34: ...34 Multi Axis Engraver Operating Manual...
Страница 40: ...40 Multi Axis Engraver Operating Manual...
Страница 41: ...Index 41...


