Vinotemp Wine-Mate WM-4510HZD Скачать руководство пользователя страница 39

is determined to be faulty and is within the twelve month warranty period 
VINOTEMP will, at its discretion, repair or replace the unit and return it free of 
charge to the original retail customer. If the unit is found to be in good working 
order, or beyond the initial twelve month period, it will be returned freight collect.


2. Limitation of Implied Warranty


VINOTEMP’S SOLE LIABILITY FOR ANY DEFECTIVE PRODUCT IS LIMITED 
TO, AT OUR OPTION, REPAIRING OR REPLACING OF UNIT.


VINOTEMP SHALL NOT BE LIABLE FOR:


DAMAGE TO OTHER PROPERTY CAUSED BY ANY DEFECTS IN THE UNIT, 
DAMAGES BASED UPON INCONVENIENCE, LOSS OF USE OF THE UNIT, 
LOSS OF TIME OR COMMERCIAL LOSS, ANY OUTER DAMAGES, 
WHETHER INCIDENTAL, CONSEQUENTIAL OR OTHERWISE.


THIS WARRANTY IS EXCLUSIVE AND IS IN LIEU OF ALL OTHER 
WARRANTIES, EXPRESSED OR IMPLIED, INCLUDING BUT NOT LIMITED 
TO, IMPLIED WARRANTIES OF MERCHANTABILITY OR FITNESS FOR A 
PARTICULAR PURPOSE.


While great effort has been made to provide accurate guidelines VINOTEMP 
cannot warrant its units to properly cool a particular enclosure. Customers are 
cautioned that enclosure construction, unit location and many other factors can 
affect the operation and performance of the unit. There for suitability of the unit 
for a specific enclosure or application must be determined by the customer and 
cannot be warranted by VINOTEMP.


Protect Your Investment with an Extended Warranty! 


Add a New Leaf extended warranty to your order, and have the security of 
knowing that if there should be a problem, even years in the future, New Leaf will 
be there to assist! Usable for any Wine Cellar or other electronic device 
manufactured by Vinotemp. Add this warranty to purchases made 
from 

vinotemp.com

 or other qualified vendors. Warranty must be registered 

within the first 10 days from original purchase.


Visit 

www.vinotemp.com

 to purchase.


-38-

Содержание Wine-Mate WM-4510HZD

Страница 1: ...w wi in ne em ma at te e c co om m Customizable Wine Cooling System WM 4510HZD WM 6510HZD WM 8510HZD Installation Use Care Manual w ww ww w v vi in no ot te em mp p c co om m Read and save these inst...

Страница 2: ...Safety Information NOTES Do not plug in until 24 hours after delivery Do not use a ground fault interrupter GFI Do not use an electrical extension cord A dedicated 30 AMP circuit is required for WM 4...

Страница 3: ...Contents Cellar Construction 3 Features Specifications 4 Control Panel 7 Temperature Humidity 8 Installation Instructions 12 Care Guide 24 Troubleshooting 25 Electrical Diagrams 28 Customer Support 36...

Страница 4: ...erature surrounding the enclosure shall not exceed the temperature of the cellar by more than 25 F No cellar wall shall receive direct sun or strong wind Lighting shall be of low wattage with a timer...

Страница 5: ...wall through wall with ductworks in cellar with ductworks and remote mount with ductworks Quiet and high speed condenser exhaust fan selection makes it work at both normal and extremely high ambient t...

Страница 6: ...5x0 25x28 375 x1 25x1x22 125 115V 60Hz 16A 140 NOTES See the voltage frequency and current specified on the label at the cooling unit The rated capacity is determined under the cellar and ambient temp...

Страница 7: ...6 NOTE WM 4510HZD is 14 25 wide WM 6510HZD 8510HZD is 17 wide without the front cover Fig 1 2 Feature descriptions Fig 1 3 Exterior wall grille...

Страница 8: ...er to protect your wine from freezing The heater will be turned on when the cellar temperature is below the preset low cellar temperature 4 Alarm call connector option Connect the automatic dialer and...

Страница 9: ...k the keypad SET To enter in the programming mode SET To return to the temperature display 2 Lock and unlock the keys To lock the keys press up down keys until POF is displayed to unlock the keys pres...

Страница 10: ...at 55 F for the optimum aging of wine On initial start up the time required to reach the desired temperature will vary depending on the quantity of bottles temperature setting and surrounding tempera...

Страница 11: ...ress off with probe faulty min 20 CF temperature unit F C F Fahrenheit rES display resolution in integer dLy temperature display delay min 1 ot probe calibration 0 LS minimum set point 50 US maximum s...

Страница 12: ...idity Use a separate hygrometer to monitor the humidity 10 How to set alarm call 1 Speech notice will be sent to your phones when the cellar temperature is ALU higher or ALL lower than the set point S...

Страница 13: ...TE Mounting brackets screws gaskets and other seal materials are not included Filter adapter air filter rear exhaust grille duct hoods and insulated ducts are sold separately 1 General Instructions Fi...

Страница 14: ...3 4 4 4 5 It is the standard installation when the cooling unit can exhaust the hot air to an adjacent space 1 The cooling unit shall be mounted near the ceiling with equal distance from each side of...

Страница 15: ...14 Fig 4 2 Flush to the outside of wall with wall grille Fig 4 3 Flush to the outside of wall with air filter rear exhaust grille...

Страница 16: ...ust with air filter rear exhaust cover Fig 4 5 Flush to the racks or the inside of wall with air filter rear exhaust grille NOTE Insulate any cold surfaces of cooling unit for better performance if ex...

Страница 17: ...quality weather stripping polyurethane spray foam or foam tape Cover the seal with molding and attach the molding to the wall not the unit 6 Attach the duct hoods to the rear of the cooling unit with...

Страница 18: ...o the outside of wall with hot air exhaust duct air filter 4 In cellar installation with hot air exhaust and ambient air intake ducts Fig 4 8 4 9 4 10 4 11 It is the installation when the cooling unit...

Страница 19: ...18 Fig 4 8 In cellar with hot air exhaust ambient air intake ducts Fig 4 9 In cellar with hot air top exhaust duct to attic ambient air intake ducts...

Страница 20: ...ambient air intake duct Fig 4 11 Floor mount with hot air top exhaust duct to attic air filter rear exhaust cover 5 Through wall installation with cold air supply ducts Fig 4 12 It is the installatio...

Страница 21: ...better performance If the air probe is in a return duct the evaporator fans shall be running all the time Meanwhile the set point shall be adjusted accordingly due to the temperature differential bet...

Страница 22: ...e hot air to an adjacent space NOTES The supply and return ducts can be combined maximum 50 ft long The exhaust and intake ducts can be combined maximum 50 ft long Insulate the cold side of cooling un...

Страница 23: ...ted bent and clogged 7 Install an air filter at the rear of the cooling unit 8 Plug the unit into a properly grounded and dedicated outlet of adequate capacity 9 Turn on the high condenser fan switch...

Страница 24: ...23 Fig 4 15 Cold air supply cellar air return and hot air exhaust ducts...

Страница 25: ...reusable 2 Removing Condensate Remove the excessive condensate if it is accumulated on the cooling unit in high humidity conditions 3 Removing Unit When you remove the cooling unit beware water may c...

Страница 26: ...is mainly controlled by the average air temperature If the set point is 55 F with the differential 4F the cooling unit turns on at 59 F of air temperature It may be higher than 59 F if it is in anti...

Страница 27: ...nstallation location d Leave minimum 3 feet clearance for the hot air exhaust side and leave minimum 1 foot clearance for the fresh air intake side e Clean condenser f Check for fan and air short circ...

Страница 28: ...air flow or air TD d Clean the drip tray e Check unit level f Seal the leak using silicone sealant 15 Excessive condensate in wine cellar a Air leak in the wine cellar causing excessive condensate b H...

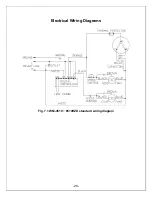
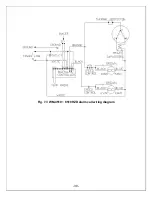
Страница 29: ...28 Electrical Wiring Diagrams Fig 7 1 WM 4510 8510HZD standard wiring diagram...

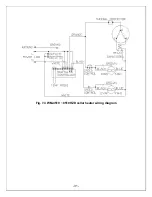
Страница 30: ...29 Fig 7 2 WM 4510 8510HZD crankcase heater wiring diagram...

Страница 31: ...30 Fig 7 3 WM 4510 8510HZD alarm call wiring diagram...

Страница 32: ...31 Fig 7 4 WM 4510 8510HZD cellar heater wiring diagram...

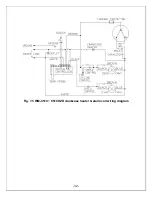
Страница 33: ...32 Fig 7 5 WM 4510 8510HZD crankcase heater alarm call wiring diagram...

Страница 34: ...33 Fig 7 6 WM 4510 8510HZD crankcase heater cellar heater wiring diagram...

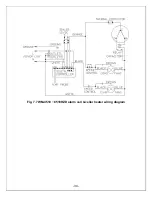
Страница 35: ...34 Fig 7 7 WM 4510 8510HZD alarm call cellar heater wiring diagram...

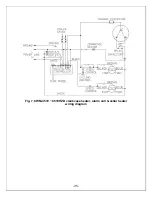
Страница 36: ...35 Fig 7 8 WM 4510 8510HZD crankcase heater alarm call cellar heater wiring diagram...

Страница 37: ...36 Customer Support If you need further assistance please contact us at Vinotemp International 732 South Racetrack Road Henderson NV 89015 Tel 800 777 8466 Fax 310 886 3310 Email info vinotemp com...

Страница 38: ...and is in lieu of all other warranties express or implied including any of fitness for a particular purpose In no event shall VINOTEMP be responsible for any consequential damages what is so ever Any...

Страница 39: ...NOT LIMITED TO IMPLIED WARRANTIES OF MERCHANTABILITY OR FITNESS FOR A PARTICULAR PURPOSE While great effort has been made to provide accurate guidelines VINOTEMP cannot warrant its units to properly...

Отзывы: