


- 13 -
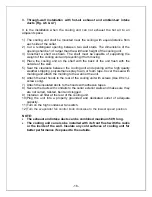
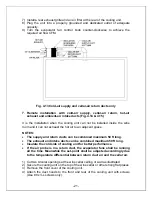
1) The cooling unit produces cooling supplied into the cellar, meanwhile it also
generates heat that must be exhausted outside the cellar. So the cold-air
supply and cellar-air return side must be separated from the hot-air exhaust
and ambient-air intake side. Through-wall or through-duct installations can
separate these two sides.
2) Furthermore, the condenser of cooling unit must intake adequate fresh
ambient-air to work properly. The ambient-air intake and hot-air exhaust must
not be short-circulated. Both of them must remain unobstructed 36” clearance
all around. The area into which the hot air is exhausted must be well
ventilated. If it is not, heat generated by the unit will build up and the unit may
not operate properly.
3) Additionally, cold-air supply from the front grille must remain unobstructed 36”
clearance.
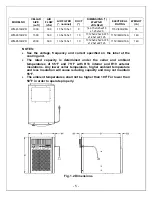
4) The ambient temperatures shall not be above and below what are specified
.
5) If the intake and exhaust are located outdoor, protection guards must be
installed.
6) Secure the ducts with conduits to the walls and make sure they are not
curled, twisted, bent and clogged.
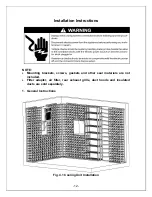
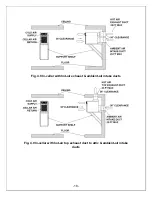
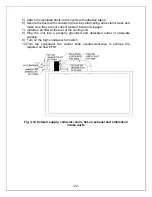
2. Standard through-wall installation (Fig 4.2, 4.3, 4.4 & 4.5)
It is the standard installation when the cooling unit can exhaust the hot air to an
adjacent space.
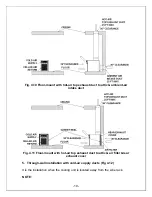
1) The cooling unit shall be mounted near the ceiling with equal distance from
each side of the cellar.
2) Cut a rectangular opening between two wall studs. The dimensions of the
opening shall be 1/4” larger than the width and height of the cooling unit; if top
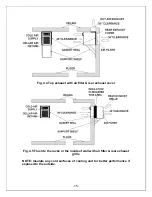
exhaust installation, cut another rectangular opening at the top of the cellar to
the length and width of the top exhaust.
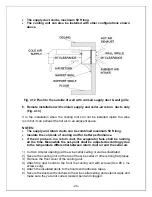
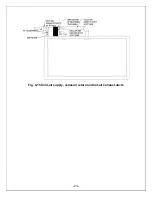
3) Construct a shelf as shown. The shelf must be capable of supporting the
weight of the cooling unit and preventing it from moving.
4) Place the cooling unit on the shelf with the back of the unit flush with the
outside of the wall.
5) Seal the clearance between the cooling unit and opening with a high quality
weather stripping, polyurethane spray foam, or foam tape. Cover the seal with
molding and attach the molding to the wall not the unit. If it is top exhaust
installation, place more gaskets along the top exhaust at the top of the cooling
unit.
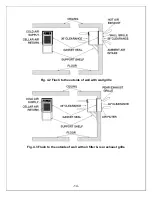
6) Install the wall grille on the cellar exterior wall or install a rear exhaust grille
and an air filter at the rear of the cooling unit.
7) Plug the unit into a properly grounded and dedicated outlet of adequate
capacity.
8)
Turn the evaporator fan control knob clockwise to the lowest speed position.
Содержание Wine-Mate WM-4510HZD
Страница 24: ...23 Fig 4 15 Cold air supply cellar air return and hot air exhaust ducts...
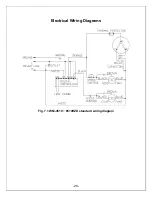
Страница 29: ...28 Electrical Wiring Diagrams Fig 7 1 WM 4510 8510HZD standard wiring diagram...
Страница 30: ...29 Fig 7 2 WM 4510 8510HZD crankcase heater wiring diagram...
Страница 31: ...30 Fig 7 3 WM 4510 8510HZD alarm call wiring diagram...
Страница 32: ...31 Fig 7 4 WM 4510 8510HZD cellar heater wiring diagram...
Страница 33: ...32 Fig 7 5 WM 4510 8510HZD crankcase heater alarm call wiring diagram...
Страница 34: ...33 Fig 7 6 WM 4510 8510HZD crankcase heater cellar heater wiring diagram...
Страница 35: ...34 Fig 7 7 WM 4510 8510HZD alarm call cellar heater wiring diagram...
Страница 36: ...35 Fig 7 8 WM 4510 8510HZD crankcase heater alarm call cellar heater wiring diagram...


