background image

Important Safety Instructions 

3

2

Do not exceed the standard capacity of a multi-plug or power outlet extension when 
using it for the product.


ƒ

There is a danger of electric shock of fire hazard.

To protect this apparatus from a lightning storm, or when it is left unattended and unused 
for long periods of time, unplug it from the wall outlet and disconnect the antenna or 
cable system. This will prevent damage to the set due to lightning and power line surges.

Never insert anything metallic into the open parts of this apparatus.  
Doing so many create a danger of electric shock.

To avoid electric shock, never touch the inside of this apparatus.  
Only a qualified technician should open this apparatus.

Do not touch the power cord with wet hands.


ƒ

There is a danger of electric shock.

Plug the power cord firmly into the power outlet.


ƒ

Failure to do so may cause fire hazard.

Do not unplug the power cord by pulling the cable only.


ƒ

If the cord is damaged, it may cause electric shock.

If this apparatus does not operate normally - in particular, if there are any unusual sounds 
or smells coming from it - unplug it immediately and contact an authorized dealer or 
service center.

Be sure to pull the power plug out of the outlet if the product is to remain unused or if you 
are to leave the house for an extended period of time.


ƒ

Accumulated dust can cause an electric shock, an electric leakage or a fire by causing the power 
cord to generate sparks and heat or the insulation to deteriorate.

Be sure to contact an authorized service center, when installing your product in a location 
with heavy dust, high or low temperatures, high humidity, chemical substances and where 
it operates for 24 hours such as the airport, the train station etc. 


ƒ

Failure to do so may cause serious damage to your product.

Do not allow children to hang onto the product.

Store the accessories (battery, etc.) in a location safely out of the reach of children.

Do not install the product in an unstable location such as a shaky self, a slanted floor or a 
location exposed to vibration.

Do not drop or impart any shock to the product. If the product is damaged, disconnect 
the power cord and contact a service center.

Make sure to pull out the power cord from the outlet before cleaning the product.

IEB_UM_Vidi_Euro.indd   3

2013-03-11   오후 1:26:49

Содержание Interactive Electronic Board

Страница 1: ... to operate the equipment This User s Manual includes detailed usage instructions for your product Please read this manual thoroughly Figures and illustrations in this User Manual are provided for reference only and may differ from actual equipment appearance Equipment design and specifications may be changed without notice IEB_UM_Vidi_Euro indd 1 2013 03 11 오후 1 26 48 ...

Страница 2: ...oth or other materials Do not block the slots and openings by placing this apparatus on a bed sofa rug or other similar surface Do not place this apparatus in a confined space such as a bookcase or built in cabinet unless proper ventilation is provided Do not place this apparatus near or over a radiator or heat resistor or where it is exposed to direct sunlight Do not place heat generating items s...

Страница 3: ... any unusual sounds or smells coming from it unplug it immediately and contact an authorized dealer or service center Be sure to pull the power plug out of the outlet if the product is to remain unused or if you are to leave the house for an extended period of time Accumulated dust can cause an electric shock an electric leakage or a fire by causing the power cord to generate sparks and heat or th...

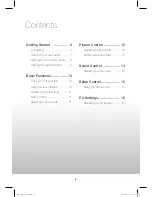
Страница 4: ... on off your IEB 10 Using the touch sensor 10 Adjusting a volume level 11 Mute function 11 Selecting a input mode 11 Picture Control 12 Adjusting picture mode 12 Setting advanced video 13 Sound Control 14 Adjusting sound mode 14 Setup Control 15 Using the Setup menu 15 PC Settings 16 Adjusting the PC screen 16 IEB_UM_Vidi_Euro indd 4 2013 03 11 오후 1 26 49 ...

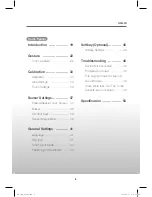
Страница 5: ...Sensor Diagnostics 39 General Settings 41 Language 41 Tray Icon 41 Touch Input Mode 43 Positioning of the Monitor 44 Softkey Optional 45 Softkey Settings 46 Troubleshooting 48 Device Not Connected 48 Firmware Download 48 This program does not support vx xx firmware 49 When More than Two T3k Touch Sensors are Connected 49 Specification 50 Touch Sensor IEB_UM_Vidi_Euro indd 5 2013 03 11 오후 1 26 49 ...

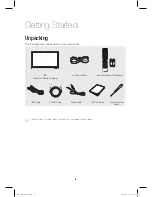
Страница 6: ...ox IEB Interactive Electronic Board AC Power Code Remote Control with Batteries C E A USB Cable D SUB Cable Audio Cable User s Manual 1 5mm Hex Key Driver The illustrations may differ slightly from the items shipped with your product IEB_UM_Vidi_Euro indd 6 2013 03 11 오후 1 26 57 ...

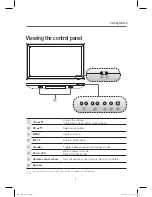
Страница 7: ...NPUT Displays all the inputs 5 Standby Toggles between normal and standby modes 6 Power LED Blue In power on mode Red In standby mode 7 Remote control sensor Aims the remote control towards this spot on the IEB 8 Speaker The illustrations may differ slightly from the items shipped with your product 6 7 1 2 3 4 5 8 IEB_UM_Vidi_Euro indd 7 2013 03 11 오후 1 26 59 ...

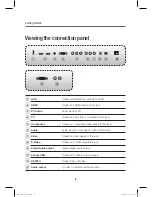
Страница 8: ...nnect a component video device to this jack 6 Audio Audio input for component video and S Video 7 Video Connect a video device to this jack 8 S Video Connect a S Video device this jack 9 Digital Audio output Optical digital audio output 0 Sensor USB Connect PC USB for touch screen RS232C Connect the controller Audio output Connect to external audio amplifier 1 2 3 4 5 6 8 7 9 0 IEB_UM_Vidi_Euro in...

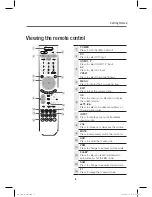
Страница 9: ...play the current mode Press to select on screen menu items or change menu values 7 INPUT Press to display a menu of all available input sources 8 VOL Press to increase or decrease the volume 9 MUTE Press to temporarily switch the sound off 0 ARC Press to adjust the screen size PSM Press to change to a preset picture mode SLEEP Press to select a preset time interval to automatically shut the IEB do...

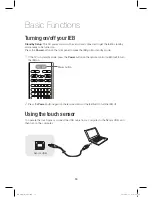
Страница 10: ...o standby mode 1 If the TV is in standby mode press the Power button on the remote control or IEB itself to turn the IEB on Power button 2 Press the Power button again on the remote control or the IEB itself to turn the IEB off Using the touch sensor To operate the touch sensor connect the USB cable from a computer to the Sensor USB and then turn on the computer Sensor USB IEB_UM_Vidi_Euro indd 10...

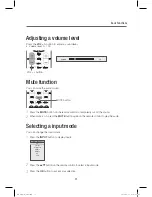
Страница 11: ...ol to temporarily cut off the sound 2 When mute is on press the MUTE button again on the remote control to play the audio Selecting a input mode You can change the input mode 1 Press the INPUT button to display inputs AV S Video Component HDMI1 HDMI2 PC USB INPUT SOURCE 2 Press the button on the remote control to select a input mode 3 Press the OK button to accept your selection IEB_UM_Vidi_Euro i...

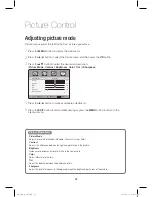
Страница 12: ... Video 4 Press the button to make appropriate adjustments 5 Press the EXIT button to return to IEB viewing or press the MENU button to return to the previous menu Picture Mode items Picture Mode Select a preset Picture Mode Standard Theater Custom Vivid Contrast Adjusts the difference between the light and dark levels in the picture Brightness Increases or decreases amount of white in the your pic...

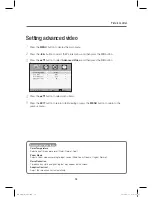
Страница 13: ...ive Contrast On 4 Press the button to select menu items 5 Press the EXIT button to return to IEB viewing or press the MENU button to return to the previous menu Advanced Video items Color Temperature Select one of three color preset Warm Normal Cool Zoom Mode Select a zoom mode according to input source Wide Zoom Cinema Original Normal Noise Reduction To reduce any static and ghosting that may app...

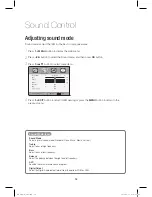
Страница 14: ...AVC Off Digital Output PCM 4 Press the EXIT button to return to IEB viewing or press the MENU button to return to the previous menu Sound Mode items Sound Mode Select a preset sound mode Standard News Music Movie Custom Treble Adjust tones of high frequency Bass Adjust tones of low frequency Balance Adjust the balance between the right and left speakers AVC Equalize the volume level on each progra...

Страница 15: ...ess the EXIT button to return to IEB viewing or press the MENU button to return to the previous menu Setup items Time Press the OK button and then press the button to adjust a sleep timer off 5 10 15 30 45 60 90 120 180 240 minutes Menu Settings Press the OK button and then adjust the transparency of main menu 0 25 50 75 100 and select menu language Restore Default Restore the OSD values from user...

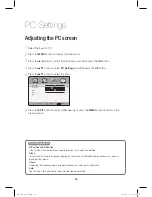
Страница 16: ...to 6 Press the EXIT button to return to IEB viewing or press the MENU button to return to the previous menu PC Settings items H Position and V Position If the screen is skewed towards a specific direction try to adjust the position Clock This function will remove or reduce flickering on the screen unstable boundaries unnecessary noise or blurring of the screen Phase If adjusting the frequency does...

Страница 17: ...17 Notes IEB_UM_Vidi_Euro indd 17 2013 03 11 오후 1 27 13 ...

Страница 18: ...18 Touch Sensor IEB_UM_Vidi_Euro indd 18 2013 03 11 오후 1 27 33 ...

Страница 19: ... Prerequisites for Running T3kCfg The following is the window that comes up when one launches the T3kCfg exe program The left side is where buttons for setting the mouse calibration and settings are located Select each to go to the appropriate menus One can see from the lower right hand side of this window that the software has gotten information from the T3xxx hardware The following is the user i...

Страница 20: ...ntroduction 20 The following is the user interface for Ubuntu a Linux distribution by Canonical The following is some of the features of the T3kCfg program IEB_UM_Vidi_Euro indd 20 2013 03 11 오후 1 27 37 ...

Страница 21: ...uch 4 Sensor Settings Enabling and disabling touch functionality turning the sound on and off shortcut keys for calibrating and enabling disabling touch and a diagnostic tool for the sensors 5 General Settings Language settings and the input mode for touch functionality 6 Softkey Settings Optional Settings for the user defined Softkeys Softkeys need to be installed for this to work Control Buttons...

Страница 22: ...e to use thru Touch Gesture On top of the Touch Gesture window the name of each Profile is listed from left to right Before each Profile is a check box One can check the Mac OS X Profile to select it but also view what the General Profile has to offer The example above shows the General Profile On the horizontal upper strip are the actions whether it is a drag a tap a double tap or a lengthy tap O...

Страница 23: ...Put Tap Place one finger on the screen and tap with another finger Zoom Place two fingers on the plane of the screen and move them farther apart or closer together Zoom in Move the fingers farther apart Zoom out Move the fingers closer together Touch Actions that T3kCfg Touch Sensor Recognizes Drag Place the pointer on the screen and move Tap Press and let go of the screen in a quick fashion Doubl...

Страница 24: ...tionality Good for single touch functionality but also supports some gestures inherent in T3k Touch Sensors Windows 7 Profile The profile best suited for the Microsoft Windows 7 operating system Supports Windows 7 multi touch gestures For example the shortcuts for the Snap functionality are applied in this profile Mac OS X Profile Profile best suited for use on a Mac OS X This is also where the Ma...

Страница 25: ...d actions that one can select from each Profile The following is the detailed editable actions present for the Single Drag Tap and Double Tap type Type Actions Explanation Single Drag Disabled Left Drag Press the left mouse button and drag Single Tap Disabled Left Click Click the left mouse button Single Double Tap Disabled Left Double Click Double click the left mouse button Caveat Selecting Disa...

Страница 26: ...r Defined User defined keys Function key Function keys from F1 to F24 Left Drag Press the left mouse key and drag Right Drag Press the right mouse key and drag Middle Drag Press the middle mouse key and drag Wheel Move the mouse wheel forward or backward Ctrl Wheel Press the Control key and move the wheel Forward Press the Alt key and the left arrow key Back Press the Alt key and the right arrow k...

Страница 27: ...ove forward on Windows Explorer or Internet Explorer Back Press the Alt key and the left arrow key Move backward on Windows Explorer or Internet Explorer Task Switching Switch from the many tasks present on one s desktop Task Switching Aero mode Switch from the many tasks present on one s desktop but with Aero functionality turned on Aero functionality needs to be turned on for this to work on Vis...

Страница 28: ...he Zoom type Actions Explanation Disabled User Defined User defined keys Function Key Any function keys from F1 to F24 Wheel Mouse wheel Ctrl Wheel Pressing of the Ctrl key and turning the mouse wheel Programs in which the Ctrl Wheel is recognized such as Windows Explorer Internet Explorer and Microsoft Word IEB_UM_Vidi_Euro indd 28 2013 03 11 오후 1 27 49 ...

Страница 29: ...ure these two items Editing a User Defined key is as follows Choose the Ctrl Alt Shift Win buttons and type in the character that one wants to select a combination of The key is the Clear key Example Ctrl C Example Window key Example Ctrl Shift Esc One can simply type in the sequence or select from above IEB_UM_Vidi_Euro indd 29 2013 03 11 오후 1 27 52 ...

Страница 30: ... and press the function key on the keyboard is the Clear key Example Ctrl F1 Example Ctrl Alt F3 Example F20 Expanding the Profiles On the bottom of the Mouse menu is four features that are related to each Profile They go on and off as one goes from General to Windows 7 to Games etc One can also turn them on and off by toggling them IEB_UM_Vidi_Euro indd 30 2013 03 11 오후 1 27 56 ...

Страница 31: ...ode is set to multi touch Windows 7 mode refer to 5 3 Touch Input Mode one cannot use all of the gestures specified in a profile If the Hybrid Multi Touch is selected in addition to the gestures provided by the Windows 7 operating system a subset of gestures inherent in T3k is applied Mac OS X Margin When using the Mac OS X there is a difference in the coordinates of the Mac against that of a PC S...

Страница 32: ...ame Multi Touch Mode but with Hybrid Multi Touch turned on As one can see the user can drag tap double tap and long tap with the palm in addition to the Windows 7 s multi touch features IEB_UM_Vidi_Euro indd 32 2013 03 11 오후 1 27 58 ...

Страница 33: ...nce set in the Sensor Settings window of the T3kCfg exe program When one uses the former one is taken to the Calibration screen below When one uses the latter the mouse pointer changes positions to indicate where to place one s pointer Calibration If the Calibrate button is pressed the following calibration window appears Click on each blinking red cross Follow the blinking red cross A beep will s...

Страница 34: ...ction Use it at one s own discretion When a person taps on a surface there are two things that she does One is that she touches the surface or simply Touch and the other is she lifts the finger from the surface or Lift Click Area This is the area where the user Touches and Lifts If the area where the user Touches and Lifts is not within the bounds set touch is not recognized Touch Lift A Valid Cli...

Страница 35: ...le Click Put Tap Area This is the minimum percent area within which the Put Tap action should be performed If the area in which one performs the Put Tap is less than the limits of the box Put Tap is not recognized Touch Lift Touch Hold Put Tap Area Palm Area This is the area that the palm is recognized If the surface is any smaller than this it recognizes it as a finger or multiple fingers Touch A...

Страница 36: ...ity setting for the wheel If it is on the positive side as the pointer goes down the page goes down with it If on the negative side the page goes down as the pointer goes up The closer it is to 0 the less receptive it is to the touch of the wheel The farther it is to 0 it is quicker to the touch Zoom This setting sets the zoom sensitivity of the sensors As the settings for the mouse wheel it is mo...

Страница 37: ...does not respond to touch One would need a mouse keyboard to interact when disabled When one presses the Disable button the following pop up appears Press the Timer Button to disable touch Otherwise it reverts back to Enabled This is to limit the disabling of the touch feature when there is no other pointing device present To continue one needs another pointing device for example a mouse to click ...

Страница 38: ... on the right to calibrate the device Press the Scroll Lock Num Lock Caps Lock or the Escape key once to exit out of the Calibration screen In the above figure the Calibration key is set up so that when the user presses the Caps Lock key six times the pointer goes to appropriate position and one is in the Touch Coordinate Calibration mode Press on the Caps Lock key once to exit out of the Calibrat...

Страница 39: ...use the default settings and follow the technician s instructions The following two figures are the Detection Graph and the Sideview tabs that appears when one presses the Continue button above The Default key changes the settings to the manufacturer s defaults The Refresh key gets fresh data from the sensors The Close key closes the screen and one is back in the T3kCfg window IEB_UM_Vidi_Euro ind...

Страница 40: ...en of the Sensor Diagnostics window by clicking on the Sideview tab One will be provided with a snapshot of the Sideview One can press the Snapshot button on the lower left to refresh these images IEB_UM_Vidi_Euro indd 40 2013 03 11 오후 1 28 10 ...

Страница 41: ...n select from English Korean Traditional Simplified Chinese French Spanish Portuguese and Japanese Tray Icon This is the setting to use the tray icon to store profile mappings If selected one can change from General Windows 7 Mac OS X Linux Gnome or User Defined from the tray icon rather than opening T3kCfg exe IEB_UM_Vidi_Euro indd 41 2013 03 11 오후 1 28 12 ...

Страница 42: ...r of Microsoft Windows 7 When the user selects Use Tray Icon the program does not terminate when one presses Exit but stays on until she selects Exit from the Taskbar The following is what appears on Mac OS X Here is how it appears on Ubuntu 10 10 Maverick Meerkat IEB_UM_Vidi_Euro indd 42 2013 03 11 오후 1 28 14 ...

Страница 43: ...odes mouse and multi touch Mouse This mode is for basic mouse input Using the Mouse mode one can use all the gestures prevalent with the T3k Touch Sensor Even if the operating system does not support multi touch one can use T3k Touch Sensor gestures Multi Touch This mode is for operating systems that already support multi touch i e Windows 7 When one selects Multi Touch mode it is the operating sy...

Страница 44: ...Windows 7 Mouse Multi Touch Input Multi Touch Input Android Mouse Multi Touch Input Multi Touch Input Positioning of the Monitor This is for the rare cases that one has set the calibration in a certain position but would like to change the position The calibration data is automatically translated to the desired position Horizontal Horizontal 180 Clockwise Vertical 90 Clockwise Vertical 270 Clockwi...

Страница 45: ...sing the Internet or disable touch Initially they are set by the manufacturer When the Softkey functionality is present the user can manipulate some features to one s own liking For users that have this option they will see an icon to the lower right of the Main screen of T3kCfg Press on it and one will be presented with the following menu IEB_UM_Vidi_Euro indd 45 2013 03 11 오후 1 28 20 ...

Страница 46: ...Task Manager Opens the task manager Windows Explorer Opens the Windows Explorer Minimize All Minimize all the tasks at hand and view the background image on one s desktop Input User Defined Key From the Softkey Settings menu select the number one would like to use and choose User Defined One can choose from the keys Ctrl Alt Shift Win buttons and press the specific key to make a user defined combi...

Страница 47: ...ress the middle mouse button One can select from a combination of key sequences or choose from two different states A combination of key sequences could be from a simple Escape key to the more complex Ctrl C Ctrl V or Ctrl Alt Del The aforementioned two states are the Enable Disable Touch and Entering Exiting Calibration In the above figure one is in the process of selecting a key sequence One alr...

Страница 48: ...ted to the computer in question the following screen comes up Check if the USB connector from the T3k Touch Sensor is properly connected to the computer Firmware Download During a firmware download one cannot set the sensor IEB_UM_Vidi_Euro indd 48 2013 03 11 오후 1 28 26 ...

Страница 49: ...firmware One can change the software program and run it again or upgrade the firmware of the touch sensors When More than Two T3k Touch Sensors are Connected When more than two T3k Touch Sensors are detected the following Sensor Selector comes up Select the appropriate sensor and press on Open Model The name of the T3k Touch Sensor Device Path The device path on the host computer Check Pressing th...

Страница 50: ...y Touch Method Pointer including fingers PC Interface USB 1 1 compatible full speed using VID 0x2200 and PID 0x3100 HID compliant Plug Play compatible USB2 0 Operating Systems Windows XP Windows Vista Windows 7 Linux Mac OSX Software No driver required for USB Software provided for factory setup and for user Touch Type Multi Touch Gesture VOD consult I O Port HDMI 2 Ports Display Port 1 port Optio...

Страница 51: ...51 Notes IEB_UM_Vidi_Euro indd 51 2013 03 11 오후 1 28 28 ...

Страница 52: ...IEB_UM_Vidi_Euro indd 52 2013 03 11 오후 1 28 28 ...

Отзывы: