background image

3

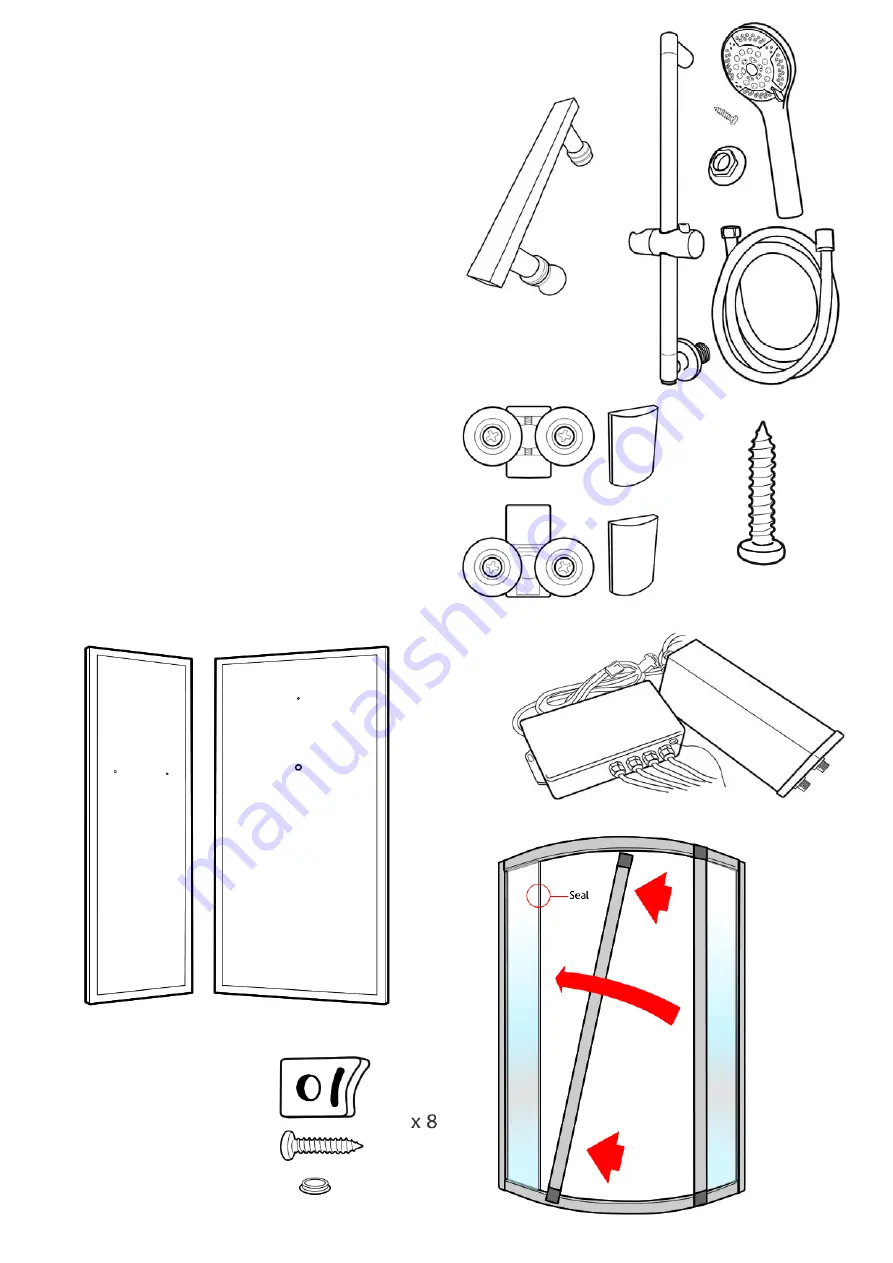
1.

Tray/Base with Waste assembly and fl exible waste pipe
pre-fi tted (shape and size vary according to model).

2.

Two Curved polished Aluminium frame sections.

3.

Thermostatic shower valve

4.

Roof/Ceiling with Ozone, Monsoon and light fi ttings.

5.

Glass shelf and fi ttings.

6.

Two longer and two slightly shorter Flapped seals and a
pair of Magnetic door seals.

7.

Tower with and Body Jets , control panel and steam pod
pre-fi tted.

8.

Two Curved clear glass doors. Two fl at clear glass side
pieces.

9.

Frame Uprights. Two polished straight metal sections.

10. Back Glass Panels. Pair of glass with Polished Aluminium

frames.

11.

. 8 Door stops, short fi xing screws and cover caps.

12.

. Two pairs of door handles.

13.

. Hand Shower, riser bar, chrome hose and fi xings.

14.

. Eight Door wheel cams/runners. 4 x Quick Release, 4 x

twin for upper rail fi tting and 8 cover caps.


15.

.

  Fixing Screws

16.

.


Steam Generator and Electronics

10

11.

12

13

16

15

14

17

17.

.

2 Front Colums And Posts

Содержание Essence Range

Страница 1: ...TALLATION AND OPERATING MANUAL Technical Support 0871 526 5926 INSTALLERS PLEASE NOTE THESE INSTRUCTIONS ARE TO BE LEFT WITH THE CUSTOMER Essence Range Warranty Claims Or Delivery Damage www Vidalux co uk ...

Страница 2: ......

Страница 3: ...ot fully tightened Pack contents 1 x Tray base with pre fi tted waste assembly 1 x Central tower panel with pre fi tt ed body jets 1 x Shower Valve 2 x Upright Front Towers 2 x Framed rear glass panels marked left and right 2 x Clear glass curved doors 2 x Clear glass fi x ed side panels 2 x Curved polished frame sections 2 x Straight polished frame sections 1 x Monsoon rain shower 1 x White Acryl...

Страница 4: ...ion of your shower Please note that several parts may be pre fitted in place such as the monsoon shower head etc Please note the design and shape of parts may change occasionally but will always offer the same or greater functionality Steam Shower Contents 1 2 3 4 5 6 7 8 9 ...

Страница 5: ... Body Jets control panel and steam pod pre fitted 8 Two Curved clear glass doors Two flat clear glass side pieces 9 Frame Uprights Two polished straight metal sections 10 Back Glass Panels Pair of glass with Polished Aluminium frames 11 8 Door stops short fixing screws and cover caps 12 Two pairs of door handles 13 Hand Shower riser bar chrome hose and fixings 14 Eight Door wheel cams runners 4 x ...

Страница 6: ...test any bath tub before fitting and ensure that you ZPVS fitter fully tests the unit upon completion and attends to any leaks and faults before he leaves 5 All hoses such as to the valve assembly shower outputs and air switches and waste are fitted for transport purposes and need to be properly sealed and tightened before use During transportation some connections can become dislodged and therefo...

Страница 7: ...essary as a minimum Shower pumps MUST be properly sited installed and commissioned Incorrectly installed shower pumps will cause adverse affects to your showering and bathing resulting in pulsing or starting and stopping of the pump If a pump is installed a separate Mains Cold supply must be fitted and directed to supply the Steam Generator separately bypassing the pump Isolating Valves You MUST f...

Страница 8: ...NCING ASSEMBLY OF THIS SHOWER YOU ACCEPT THAT THE PARTS HAVE ALL BEEN CHECKED AND ARE UNDAMAGED This product is fitted with toughened safety glass The glass is stronger than regular glass and if it breaks it will form small pieces of cubed glass not dangerous shards of glass These small pieces are still sharp so care must be taken to handle broken glass with care If the glass is put under stress o...

Страница 9: ...preferred height Drill the holes in the central tower to the measurements shown in the diagram below Remove the three fixing nuts from the threaded ends on the rear of the seat fixing plate Pass the threads of the seat through the holes from the front of the tower panel At the rear pass the threads though the white support piece white plastic and then fasten the bolts to hold Ensure the bolts are ...

Страница 10: ... with a spirit level laid across the tub ensure the tub is level Now fill the base with some water and check that the water flows adequately to the plug and exits satisfactorily If the water does not flow to the plug fully then you will need to increase the fall on the tray by adjusting the legs If the water does not exit the waste section fast enough then ensure there is suitable fall in the wast...

Страница 11: ...er curved rail The screws pass through the holes in the side of the upright and fasten into the curved rail as shown in the digram below A power driver is advised for this process DO NOT FULLY TIGHTEN THE SCREWS ALLOW SOME MOVEMENT IN THE FRAME FOR INSTALLING THE FIXED GLASS Repeat the process on the other upright Finally join the lower curved rail to the other ends of the uprights using a single ...

Страница 12: ...g the full length Now position this glass panel up to the frame pushing the long edge of the glass into the upright of the frame until FULLY bedded into the frame upright This MUST be done from the inside of the frame The glass will sit within a lip on the inner surface of the curved rail both top and bottom DO NOT HIT GLASS WITH HARD OBJECTS TO PUSH INTO THE FRAME Fit another U shaped seal to the...

Страница 13: ...e central tower DO this on both long sides of the tower NOTE A bead of sealant can be run between the joining faces of the back panels and Center Tower to provide an extra level of water protection You should consider doing this on all panels with meeting faces then simply wipe off any excess so non will be on show CAUTION WHEN DRILLING ONLY DRILL THROUGH THE INNER SINGLE LAYER OF FRAME Re fix the...

Страница 14: ...ully lift the three joined sections onto the tray into position A bead of sealant along the tray where the panels will sit will provide a watertight barrier Remember to remove any excess sealant once the panels have been seated into position DO NOT SCREW THE PANELS TO THE TRAY JUST YET Above 8 x Short Screws used to join rear glass panels to tower panel viewed from rear ...

Страница 15: ...wer tray and align the uprights with the rear glass panels so that the fixing holes line up From behind the side panel front edge locate a screw hole into the front frame screw through the lip of the white framework of the rear glass panels into the frame to secure in place 8 x short screws The help ease this process you may need to use the supplied drill bit in the holes to ensure they are wide e...

Страница 16: ...crewing up through the re drilled holes in the rear panel into the ceiling Fixing requires 4 of the short screws two along each flat side of the ceiling Now ensure all the cables for the ozone light fan and speaker are hanging down the back of the shower ready to connect REPLACING THE CEILING LIGHT Your shower is fitted with an LED Halo Ring light This light should provide a long service life if u...

Страница 17: ...w where upon it re activates the steam production again The steam sensor should be fitted from the rear of the shower Just below the control panel you will see a small silver gromit This is where the head of the sensor will project into the shower From the rear of the shower locate the black cable of the temperature sensor It has a silver tip Push the silver tip into the rear of the gromit so that...

Страница 18: ...DO NOT OVER TIGHTEN AS YOU MAY BREAK THE GLASS With the cam fixed in position slide on the Chrome finished cover Repeat this process of all of the cam wheels TO HANG THE DOORS From inside the shower position the upper wheels into the running tracks on the inside curve of the upper curved rail and then let the door hand down From outside the shower move the door to what would be a closed position a...

Страница 19: ...nd is watertight You may wish to use some PTFE tape or other suitable products to provide the best water tight seal on this joint OVERHEAD MONSOON SHOWER The overhead shower is fitted into the ceiling from the inside The overhead shower first passes though the light diffuser cover inside the shower so that the threaded end of the overhead shower passes out through the ceiling Fit the FIXING NUT on...

Страница 20: ...ass panel Fit the rear fixing nut from the rear of the shower to hold in place Secure the upper part of the riser bar with the screw provided Tighten both until secure Connect the silver hand shower hose to the lower part of the riser bar and the other end to the hand shower head At the rear of the shower locate the grey water supply hose coming from the shower valve and connect to the water inlet...

Страница 21: ...silver caps and fit them over the ends of the washer and bolt to provide a clean finish The upper rail pushed over the glass from the front Using a flat head screwdriver tighten up the fixing point of the front rail which is located on the underside Position the two fixing brackets onto the inside of the rear panel of the shower in the holes provided Fix the brackets at the rear of the shower with...

Страница 22: ... lower part of the valve has three connections to be made The HOT and COLD water supplies from you property connect to the outermost connections ENSURE THE FEEDS ARE THE CORRECT WAY ROUND The third connection is a cold water supply from the valve and connects to the WATER IN on the steam generator REMOVE THE WHITE PLASTIC BOX SECTION THAT MAY BE COVERING THE VALVE ACCESS AT THE REAR THIS IS FOR TR...

Страница 23: ...trailing edges of the doors The seals are not designed to touch the glass but when the doors are closed they meet so that water is unlikely to escape MAGNETIC The magnetic seals fit onto the doors where they meet Ensure all seals are fully fitted onto the glass especially the magnetic seals so that they form an even seal SHOWER SEALS ...

Страница 24: ... of higher specification can be fitted to supply multiple showers within the property When choosing a pump a twin impeller pump is recommended as this will ensure both the hot and cold water is of the same pressure You must seek further advise from a plumber to correctly spec the right shower pummp for your set up Always refer to the manufacturers instructions regarding shower pump installations a...

Страница 25: ......

Страница 26: ......

Страница 27: ......

Страница 28: ...S FAN OZONE Etc Each component needs to be connected to the Electronic Control Unit Each component Fan Ozone Speaker etc has a thin12v cable with a plug on the end You will also see that each cable has a sticker with an Icon to indicate what it is The electronic control unit behind the showers central tower panel has a large number of cables Again each of these cables has a similar plug and a labe...

Страница 29: ...test the shower and check for signs of water leaking please attend to them as required All sealant should be placed on the inside of the shower with a good quality Anti Moulding Sealant PLEASE NOTE The shower is made up of solid parts glass metal Acrylic Any leaks found during testing will be down to incorrect sealing you should spend a good amount of time water testing the shower before signing i...

Страница 30: ... per minute flow and over 2 bar water pressure Water is pulsing If a pump has been used to supply water under pressure and the back jets or hand shower cause the pump to start and stop PULSING WATER remove the NON RETURN VALVES Remove the Braided hoses at the rear of the shower Look inside the valve where the hoses connected and you will see a silver coloured C clip Remove this and this will enabl...

Страница 31: ... than 38 degrees simply press the knob on the dial in toward the main dial and then turn the dial past the 38 degree mark Turning the temperature dial past 30 degrees MUST be done with care to prevent scaling Safety Precautions On models fitted with Steam functions it is normal for the steam generator to get quite hot during use Please allow up to half an hour for the generator to cool before touc...

Страница 32: ...vated to draw air steam inside the cabin out This may be used in conjunction with the steam OZONE Close the shower doors and press the Ozone button Leave the shower to carryout the process which takes approximately 10 minutes then open the doors and allow the shower to fully air dry This device does not make any audible or visual notification other then the panel display but the aroma of Ozone may...

Страница 33: ...music at any time to the shower Only once device can be Paired at any time Cleaning and third party product use This shower should be cleaned after every use to remove the build up of dirt and bacteria We would recommend that after normal showering use that the cabin doors are left open until the inside is fully dry This will help prevent the build up of soap scum dirt and bacteria The shower cabi...

Страница 34: ... to infuse the steam in the steam pod only products that are designed for such use should be used The use of products not designed for infusing of steam may lead to damage to this product inducing but not exclusively discoloration to the pod tray base and or cabin walls Products such as but not exclusive to Olbas Oil is an example of this Essential Oils whilst no noted damaging effects have ever b...

Страница 35: ...n the Cartridge Other reasons might be age of the Cartridge or even dirt or debris collecting in the Cartridge from the pipes BEFORE STARTING ENSURE THAT THE WATER SUPPLIES ARE DISCONNECTED OR ISOLATED It is imperative that the water supply to your shower in between 1 and 3 bar as exceeding this may damage the Thermostatic Cartridge From inside the shower on the lower of the three dials remove the...

Страница 36: ...te down the position the ring is placed in Pull the plastic ring Temperature safety lock towards you to remove Keep this part safe You will now see the head of the Thermostat clearly visible Turn the head of the cartridge counter clockwise to remove To fit your new Thermostat simple reverse this process ...

Страница 37: ...FOR TECHNICAL ASSISTANCE PLEASE CALL 0871 526 5926 ...

Страница 38: ...nvoice No Install Date Install Information Water Supply Type Combi Mega Flow Pressurised Pumped Gravity Fed Cold Water Pressure LPM or BAR Hot Water Pressure LPM or BAR PEV or PRV fitted PEV PRV Details Details of pressure testing flow rate equipment used Plumbing Installation Installer Name Company Address Town City Post Code Contact Tel Credentials Certificates held Reg number Signature Date Ele...

Отзывы: