background image

Basic Adjustments 

cont’d


NOTE — This manual is only meant to act as a guide.  KETTLER recommends that your bike 
be regularly serviced by a qualified bike mechanic 

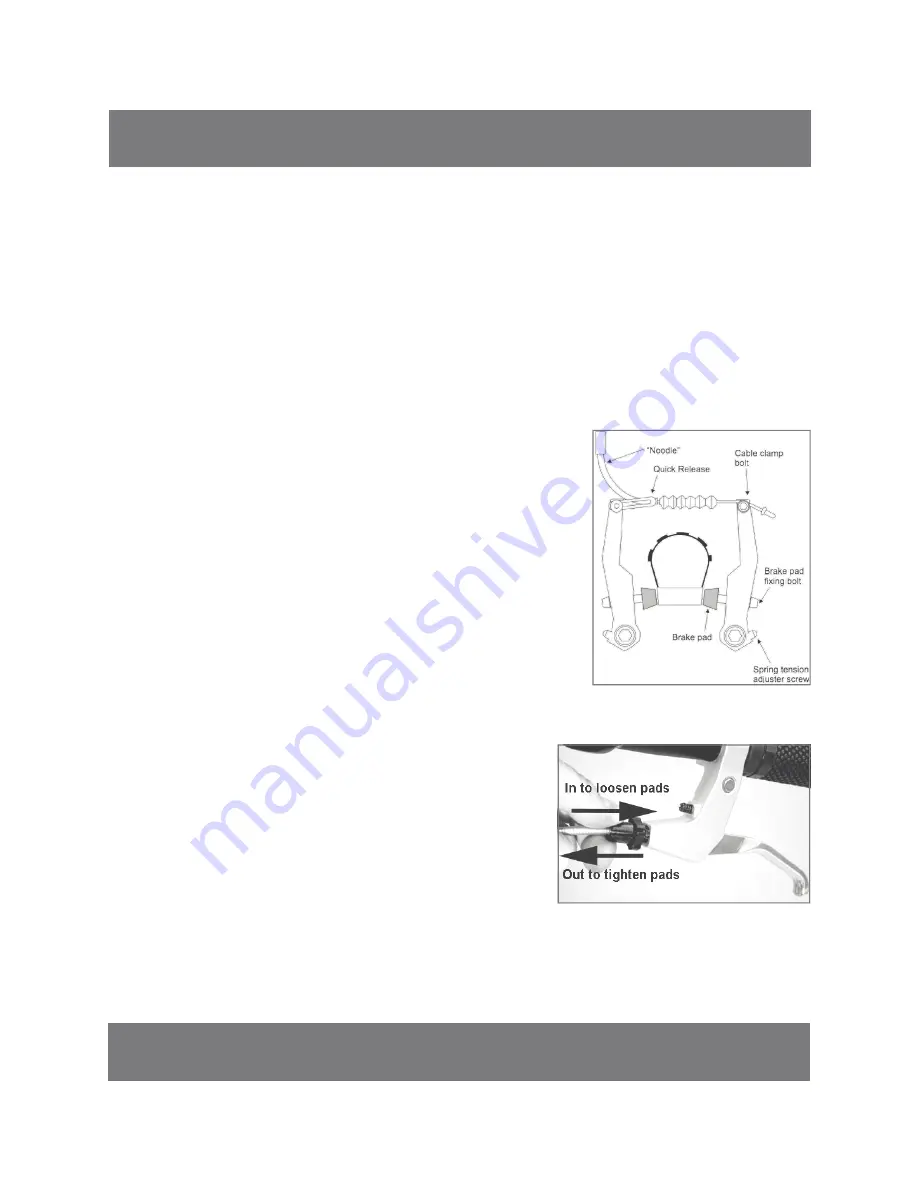
Direct-pull Cantilever Brakes  


Adjust Brake Arm Tension 

Now check your brake arm tension. The brake arms should have good spring tension, 

which makes them release when you let go of the brake lever. If there isn’t much tension, 
you may have to increase it on both sides. Undo both bolts one at  a  time,  but  don’t        
remove them completely. 
You’ll notice a small piece of metal poking out the backside of the brake. This is the 

spring, and it slides into one of three holes on your frame or fork. Most brakes work fine 
in the middle hole. To increase your brake tension, move the spring into the top hole. To 
decrease the brake tension, move the spring into the bottom hole. Then tighten the 
mounting bolt. 


Lever Adjustment 

First you’ll need to loosen off your brake cable bolt. You don’t 
need to remove it completely. This will   allow you to adjust 

the brake lever’s reach. On the lever you should see a screw 
or bolt on the inside close to the handlebar. This is the reach 
adjustment screw. As you turn this screw you’ll notice the  
lever move closer to the handlebar grip. Turn it just enough 

so the rider can easily reach the lever, but not too far, as it 
still needs to be able to move enough to pull the brake. 
 
Now re-adjust and tighten your brake cable. This is where the 

4th hand tool comes in handy, as it will grip and pull the    
cable for you while you tighten the bolt. 
 

Reach Adjustment 

Once the reach is set up and the brakes are working, 
your child may find the lever is close enough but hard to 
pull. This is caused by high spring tension on the back of 

the brake caliper. To relieve some of this tension, you 
can push the spring in toward the wheel on both sides. I 
use an old screwdriver that I’ve ground down to a have a 
concave end just for this purpose, so it doesn’t slip and 

gouge my knuckles. Push just enough so it gives a tiny 
bit. You don’t want to push the springs too much as they still need some  tension to pull 
the brakes back outward. 

Содержание KC720-220

Страница 1: ...e Picture Similar Printed on 100 recycled paper Adjustment Tools KETTLER International Inc 1355 London Bridge Road Virginia Beach Virginia 23453 USA www KETTLERusa com DO NOT RETURN TO STORE Contact K...

Страница 2: ...TLER Bike Manual supplied separately from this bicycle Contact our Parts Department to obtain a comprehensive KETTLER Bike Manual NOTE This manual is only meant to act as a guide KETTLER recommends th...

Страница 3: ...levers E Folding Pedals F Luggage Rack G Carrying Storage Bag H Reflectors 1 red 1 white I Seat Post J Rear Wheel K Front Wheel L Rear Derailleur M Crank Set N Fork O Brake front P Fender front Q Bell...

Страница 4: ...afety lock to secure the frame locking lever 1d Note Always ensure the frame connection is properly and tightly secured before riding Check Frame Locking Lever regularly and if loose adjust as needed...

Страница 5: ...ffectively adjust the lever could result in the Stem Locking Lever being too tight or too loose If the stem locking lever does not snap closed it is in need of adjustment Unfolding For Riding 5 NOTE T...

Страница 6: ...al 2 Unlock and fold the handlebar assembly With the stem locking lever in the closed position rotate the secondary safety lock to unsecure the stem locking lever 2a Pull stem locking lever away from...

Страница 7: ...il it opens 1d Then swing the front half of the bike away from the rear half of the bike Note To save additional space you can lower the seat assembly all the way down to the frame or completely remov...

Страница 8: ...just the height of the stem to fit almost any rider Locate the Quick Release seat lever Lift the lever and flip open Adjust the stem as desired Flip the lever back over to tighten Make sure lever is a...

Страница 9: ...e it completely This will allow you to adjust the brake lever s reach On the lever you should see a screw or bolt on the inside close to the handlebar This is the reach adjustment screw As you turn th...

Страница 10: ...from shifting any further past the lowest gear and into the wheel spokes Shift down to the lowest gear step behind the bike and check how the chain rides on the sprocket If it looks like it wants to r...

Страница 11: ...ation which if not avoided could result in serious damage to the bicycle or the voiding of your warranty Many of the Warnings and Cautions say you may lose control and fall Because any fall can result...

Страница 12: ...ollow the helmet manufacturer s instructions for fit use and care Do you have all the other required and recommended safety equipment It s your responsibility to familiarize yourself with the laws of...

Страница 13: ...lated Check by putting one hand on the saddle one on the intersection of the handlebars and stem then bouncing your weight on the bike while looking at the tire deflection Compare what you see with ho...

Страница 14: ...s section of this manual D First Ride When you buckle on your helmet and go for your first familiarization ride on your new bike be sure to pick a controlled environment away from cars other cyclists...

Страница 15: ...arly a BMX or mountain bike can be fun but it can put huge and unpredictable stress on the bicycle and its compo nents Riders who insist on jumping their bikes risk serious damage to their bicycles as...

Страница 16: ...d in the moving parts of the bicycle Never hitch a ride by holding on to another vehicle Don t do stunts wheelies or jumps If you intend to do stunts wheelies jumps or go racing with your bike despite...

Страница 17: ...safely in wet conditions ride more slowly and apply your brakes earlier and more gradually than you would under normal dry conditions E Night Riding Riding a bicycle at night is much more dangerous th...

Страница 18: ...o ride in traffic often ask a certified dealer about traffic safety classes or a good book on bicycle traffic safety F Extreme Stunt or Competition Riding Whether you call it Aggro Hucking Freeride No...

Страница 19: ...ility or safety on your bicycle Before installing any component or accessory including a different size tire make sure that it is compatible with your bicycle by contacting KETTLER s Parts Service Dep...

Страница 20: ...andover height clearance And a bike that you ll use off road should give you four inches 10cm or more of clearance Step through Frame Bicycles Standover height does not apply to bicycles with step thr...

Страница 21: ...e with the tip of your finger without inserting your finger beyond its first knuckle see NOTE above and fig 5 2 Front and back adjustment The saddle can be adjusted forward or back to help you get the...

Страница 22: ...ght and Angle Your bike is equipped either with a threadless stem which clamps on the outside of the steerer tube or a quill stem which clamps inside the steerer tube by way of an expanding binder bol...

Страница 23: ...he headset If the stem is extended beyond the Minimum Insertion mark the stem may break or damage the fork s steerer tube which could cause you to lose control and fall WARNING On some bicycles changi...

Страница 24: ...s a certified bike mechanic can either adjust the reach or fit shorter reach brake levers WARNING The shorter the brake lever reach the more critical it is to have correctly adjusted brakes so full br...

Страница 25: ...for easier transportation and for repair of a tire puncture In most cases the wheel axles are inserted into slots called dropouts in the fork and frame but some suspension mountain bikes use what is...

Страница 26: ...ring method for the front wheel than for the rear wheel Discuss the wheel securing method for your bicycle with your local certified bike mechanic It is very important that you understand the type of...

Страница 27: ...d the cam and cup system fig 8b Both use an over center cam action to clamp the bike s wheel in place Your bicycle may have a cam and cup front wheel retention system and a traditional rear wheel cam...

Страница 28: ...g 8b squeeze the cup and cam lever together while removing the wheel No rotation of any part is necessary with the cam and cup system You may need to tap the top of the wheel with the palm of your han...

Страница 29: ...ystem tighten the fasteners to the correct torque specifications or the hub manufacturer s instructions NOTE If on a traditional cam action system the lever cannot be pushed all the way to a position...

Страница 30: ...ght in the frame and the chain has about 1 4 inches of up and down play 6 With a cam action system move the cam lever upwards and swing it into the CLOSED position fig 8a b The lever should now be par...

Страница 31: ...are three general types of bicycle brakes rim brakes which operate by squeezing the wheel rim between two brake pads disc brakes which operate by squeezing a hub mounted disc between two brake pads a...

Страница 32: ...1 Riding with improperly adjusted brakes worn pads or wheels on which the rim wear mark is visible is dangerous and can result in serious injury or death 2 Applying brakes too hard or too suddenly ca...

Страница 33: ...ront wheel hub which could send you flying over the handlebars A wheel with more weight on it will accept greater brake pressure before lockup a wheel with less weight will lock up with less brake pre...

Страница 34: ...called an upshift Whether upshifting or downshifting the bicycle derailleur system design requires that the drive chain be moving forward and be under at least some tension A derailleur will shift onl...

Страница 35: ...echanism will consist of A 3 5 7 8 12 speed or possibly an infinitely variable internal hub One or sometimes two shifters One or two control cables One front sprocket called a chainring A drivetrain a...

Страница 36: ...anic can show you a number of options and make suitable recommendations 3 Toeclips and straps are a means to keep feet correctly positioned and engaged with the pedals The toeclip positions the ball o...

Страница 37: ...d dealer or contact the manufacturer directly F Bicycle Suspension Many bicycles are equipped with suspension systems There are many different types of suspension systems too many to deal with individ...

Страница 38: ...um pressure or as a pressure range How a tire performs under different terrain or weather conditions depends largely on tire pressure Inflating the tire to near its maximum recommended pressure gives...

Страница 39: ...or other appropriate object The Presta valve fig 18b has a narrower diameter and is only found on bicycle tires To inflate a Presta valve tube using a Presta headed bicycle pump remove the valve cap...

Страница 40: ...bike mechanic before riding it again If you want to learn to do major service and repair work on your bike 1 Contact the KETTLER Parts Service Department for copies of the manufacturer s installation...

Страница 41: ...nd rock the bike forward and back Everything feel solid If you feel a clunk with each forward or backward movement of the bike you probably have a loose headset and should check it Lift the front whee...

Страница 42: ...warranty Please be sure to read the Intended Use Of Your Bicycle and The Lifespan Of Your Bike and Its Components 5 As Required If either brake lever fails the Mechanical Safety Check don t ride the b...

Страница 43: ...intend to use your bike High Performance Road Condition 1 Bikes designed for riding on a paved surface where the tires do not lose ground contact Intended To be ridden on paved roads only Not Intended...

Страница 44: ...ing areas where momentary loss of tire contact with the ground may occur NOT jumping All mountain bikes without rear suspension are condition 3 and so are some lightweight rear suspension models Inten...

Страница 45: ...omponents that fit the intermediate intended use 5 cover a fairly wide range of intended use and within this range are models that are more or less heavy duty Not Intended For use in extreme forms of...

Страница 46: ...problems inappropriate use or abuse These are important safety checks and very important to help prevent accidents bodily injury to the rider and shortened product life 2 Perspective Today s high perf...

Страница 47: ...s bending buckling and stretching before breaking Generally speaking of the common bicycle frame building materials steel is the most ductile titanium less ductile followed by aluminum Metals vary in...

Страница 48: ...point the crack becomes visible to the naked eye Eventually it becomes so large that the part is too weak to carry the load that it could carry without the crack At that point there can be a complete...

Страница 49: ...he end of its useful life When your car tires wear down to the point that the tread bars are contacting the road those tires are not defective Those tires are worn out and the tread bar says time for...

Страница 50: ...provides a smooth outer surface Why Are Composites Used Unlike metals which have uniform properties in all directions engineers call this isotropic carbon fibers can be placed in specific orientation...

Страница 51: ...reas will look opaque and cloudy 2 Bulging or deformed shape If delamination occurs the surface shape may change The surface may have a bump a bulge soft spot or not be smooth and fair 3 A difference...

Страница 52: ...ponsible for the changes A useful slogan to remember when contemplating changing components is Strong Light Cheap pick two Original Equipment Components Bicycle and component manufacturers test the fa...

Страница 53: ...pply the more braking force up to the point where the rear wheel stops rotating and begins to skid Adjusting Your Coaster Brake Coaster brake service and adjustment requires special tools and special...

Страница 54: ...Notes 54...

Страница 55: ...Limited Warranty is void if the product is damaged by accident unreasonable use improper service failure to follow instructions provided modification from its original state or other causes determined...

Страница 56: ...ER International Inc 1355 London Bridge Road Virginia Beach Virginia 23453 USA Parts Service 866 804 0440 Parts KETTLERusa com Please visit our website for further assembly help www KETTLERusa com DOC...

Отзывы: