


1
—
Installation of the VX-MD4024
6 / 44
1.2.4 Mounting the VX-MD4024
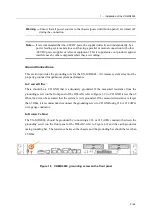
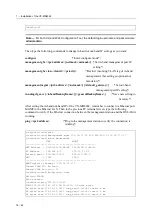
The position and orientation of the brackets depends on the rack used for mounting. The DSLAM
can be front-mounted in a standard channel rack (5-inch projection); and it can be shipped with
the mounting brackets installed in one of three mounting positions or shipped loose (see Figure
The mounting brackets can be rotated for use in wall mounting. Optional adhesive feet may be
attached to the bottom of the chassis so that it can be placed on a desk or other smooth surface.
STANDARD
FRONT MOUNT
FRONT
MOUNTING
BRACKET
MOUNTING
BRACKET
Figure 1-6 Mounting Bracket Orientation (Top View)
After the site requirements have been verified, the chassis may be installed at the specified
location.
When mounting the chassis, practice good safety habits. Use two or more people to
secure the chassis. Relay rack mounting normally requires at least two people.
Step
Action
1
Locate the chassis and obtain the appropriate chassis mounting hardware.
2
Determine and obtain the tools required for the chassis mounting hardware.
3
From the front of the relay rack, position the chassis in its relay rack mounting
location.
4
Using the appropriate rack mounting hardware, secure the chassis in its relay location
on both left and right side of mounting bracket (see Figure 1-7).
Note
—
The chassis should be empty during the chassis mounting procedures. Remove any unit
in the chassis, and store them according to static-sensitive device storage procedures.
Warning
—
Hazardous voltages may exist on the chassis. Always practice good safety habits
when wiring a live circuit or performing maintenance.