background image


030-300554 Rev. A 

103 

    June 2008 


Verizon FiOS Router (Model 9100EM) 

User Guide

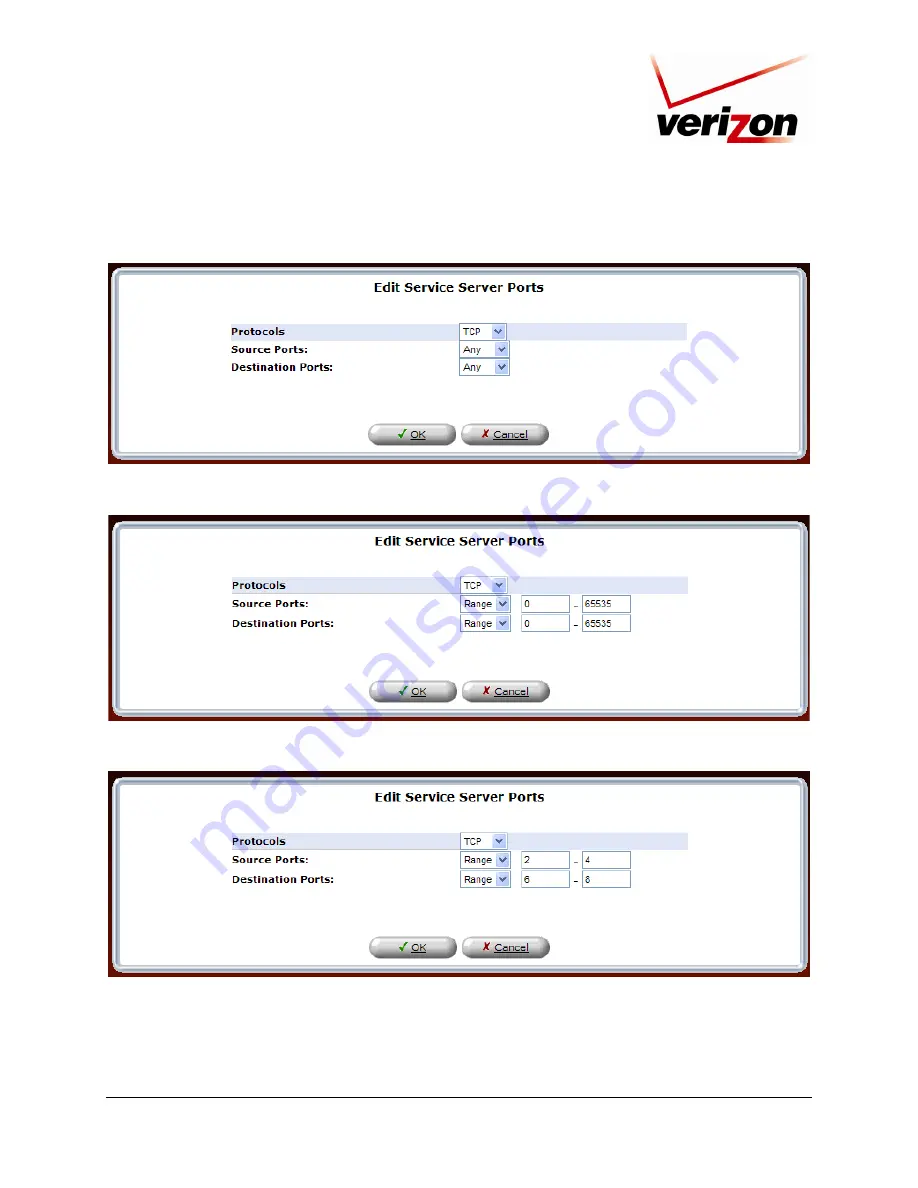
For example, if you selected 

TCP

, from the drop-down list, the following screen will appear. Select the desired 

source and destination port settings from the drop-down lists.  


To set up a range of ports, select “Range” from the 

Source Ports

 and 

Destination Ports

 drop-down lists. 


Next, enter the desired port range values in the fields provided, and then click 

OK

 to continue. 


Содержание FiOS 9100EM

Страница 1: ...User Guide www verizon com fios Verizon FiOS Router Model 9100EM ...

Страница 2: ...4 5 2 Connecting Ethernet Devices to Your Router 14 5 3 Connecting Wireless Devices to Your Router 15 6 ACCESSING YOUR ROUTER 16 6 1 Logging on to Your Router 16 7 CONFIGURING YOUR BROADBAND CONNECTION 19 7 1 Confirming Your Coax Connection 19 7 2 Connecting to the Internet 19 7 3 Logging Out of the Router s Web Pages 24 8 SETTING UP MACINTOSH OS X 25 8 1 Opening the System Preference Screen 25 8 ...

Страница 3: ... 1 General Firewall Security Settings 89 13 2 Access Control 90 13 3 Port Forwarding 95 13 4 DMZ Host 109 13 5 Port Triggering 110 13 6 Remote Admin 119 13 7 Static NAT 120 13 8 Advanced Filtering 126 13 9 Security Log 129 13 10 Connections 131 14 PARENTAL CONTROLS 132 15 ADVANCED 137 15 1 Diagnostics 138 15 2 Restore Defaults 140 15 3 Reboot 141 15 4 MAC Cloning 141 15 5 ARP Table 142 15 6 Users ...

Страница 4: ...er Table 191 15 18 Editing Clock Set 192 15 19 Scheduler Rules 192 15 20 Firmware Upgrade 195 15 21 Routing 196 15 22 IGMP Configuration 199 15 23 PPPoE Relay 202 15 24 IP Address Distribution 203 16 SYSTEM MONITORING 204 16 1 Gateway Status 204 16 2 Gateway Status 205 16 3 System Log 206 17 TECHNICAL SUPPORT INFORMATION 207 18 PRODUCT SPECIFICATIONS 207 19 SOFTWARE LICENSE AGREEMENT 208 20 PUBLIC...

Страница 5: ...red and wireless connection options This flexibility allows for the connection of a wide range of network enabled devices such as desktop computers laptop computers digital media players and network attached storage NAS units Hereafter the Verizon FiOS Router will be referred to as the Router Key Features Multimedia over Coax interface MoCA 4 Port 10 100 BaseT Ethernet LAN switch Integrated 802 11...

Страница 6: ... in order to meet the FCC RF exposure guidelines Making changes to the antenna or the device is not permitted Doing so may result in the installed system exceeding RF exposure requirements This device must not be co located or operated in conjunction with any other antenna or radio transmitter Installers and end users must follow the installation instructions provided in this guide Modifications m...

Страница 7: ...s allowed to be connected to a telephone interface The termination on an interface may consist of any combination of devices subject only to the requirement that the sum of the Ringer Equivalence Numbers of all the devices does not exceed five Before installing this equipment users should ensure that it is permissible to be connected to the facilities of the local Telecommunication Company The equ...

Страница 8: ...r 7 x or higher or Firefox 1 0 7 or later Computer Operating System CD ROM Requirements for Wireless Pentium or equivalent class machines or higher Microsoft Windows XP 2000 ME 98 SE installed 64 MB RAM 128 MB recommended 10 MB of free hard drive space Internet Explorer 5 5 or later or Netscape Navigator 7 x or higher or Firefox 1 0 7 or later IEEE 802 11b g PC adapter Computer operating system CD...

Страница 9: ...he device in either direction Amber Internet link not established or attempting to establish INTERNET OFF Router power is OFF or the Router does not have a WAN address Solid Green LED currently disabled WIRELESS SETUP OFF LED currently disabled Solid Green Powered device is connected to the associated port Flashing Green 10 100 Base T LAN activity is present traffic in either direction 1 2 3 4 LAN...

Страница 10: ...connector Four LAN Ethernet connectors RJ 45 WAN Ethernet connector RJ 45 Power connector 12 VDC barrel OFF ON power switch Wireless 802 11b g SMA connector and antenna Verizon FiOS Router Rear Panel Off On Switch Power Connector Ethernet Switch E1 through E4 LAN Reset Button MoCA COAX Connector Wireless Antenna and Connector USB Connector Ethernet WAN ...

Страница 11: ...3 Front Panel LEDs Power WAN Coax WAN Ethernet Internet Wi Fi Protected SETUP Currently Disabled USB LAN Ethernet 1 2 3 4 LAN Coax Wireless Verizon FiOS Router Front Panel Wireless LAN Ethernet 1 through 4 WAN Coax Power Internet USB LAN Coax WAN Ethernet Wi Fi Protected SETUP ...

Страница 12: ... be enabled in all UltraLine Series3 units LAN 8 pin RJ 45 modular jack Connects the the Router s 10 100 Base T Ethernet swtich to a local computer or other Ethernet enabled device WAN 8 pin RJ 45 modular jack Connects the Router to a broadband modem or router enabling access to the Internet or Wide Area Network WAN POWER Barrel connector Connects to the Router s DC 12V power supply Only use the p...

Страница 13: ...ugh white Verizon CD ROM containing User Guide in PDF format Wireless antenna Router Stand Before you install your Router please read the following notes NOTE 1 It is recommended that you use a surge suppressor to protect equipment attached to the power supply Use only the power supply provided with your kit 2 If the Ethernet card in your PC does not auto negotiate set it to half duplex Refer to t...

Страница 14: ...ces to your broadband Router 5 2 Connecting Ethernet Devices to Your Router To connect PCs to your Router using 10 100 BaseT Ethernet installation please follow the steps below 1 Connect your Router to your broadband service as explained in section 5 1 2 Connect the yellow Ethernet cable provided with your kit from any one of the four Ethernet jacks marked 1 2 3 4 on the back of the Router to the ...

Страница 15: ... or WPA You can configure the settings in the advanced properties of the PC s wireless network adapter To network your Router to PCs in your home or office using a wireless installation follow the steps below 1 Connect your Router to your broadband service as explained in section 5 1 5 Ensure that each PC on your wireless network has an 802 11b g wireless network adapter installed 6 Ensure that ap...

Страница 16: ...for DHCP Refer to your Windows help screen for information on configuring your computer for DHCP At your PC click Start then click Help to access the Windows help screen To log on to the Router start your Web browser and then type the following IP address in the browser s address bar http 192 168 1 1 After you type the IP address press Enter on your keyboard The following screen will display the m...

Страница 17: ...in the New Password fields Your password must be 6 or more characters long and contain at least 1 numeral As you type your password asterisks will appear for security purposes NOTE Please write down your user name and password and save them for future use After you have entered your password select the desired option from the Time Zone drop down menu Then click OK to continue Enter your password h...

Страница 18: ...the following icons are used to indicate clicking actions that you can take with your mouse to configure your Router s settings Icon Description Edit Clicking this icon allows you to edit the assocaiated entry setting Add New Clicking this icon allows you to add a new entry setting Delete Clicking this icon deletes the associated entry setting from your Router View Clicking this icon allows you to...

Страница 19: ...ablish an Internet connection To determine if the Router has established coax link at the Router s front panel check to see if the Router s COAX WAN LED is solid green or flashing amber this indicates that a coax link is established After confirming your coax link proceed to section 7 2 to configure your Router s Internet connection settings 7 2 Connecting to the Internet After you have logged on ...

Страница 20: ...e left submenu click Network Connections In the Network Connections screen click the Quick Setup button The Quick Setup page allows you to select the protocol type for your Internet connection or choose to configure a static IP address Verizon will inform you of which protocol to use to establish your Internet connection ...

Страница 21: ...lly detect the correct connection type to the network If you need to change the configuration to only use DHCP protocol to connect to Internet at the Quick Setup screen do the following 1 From the Broadband Detect Default drop down menu select Automatic IP DHCP Note DHCP is the Router s default protocol type If you use this protocol you do not need to enter a Login User Name or Login Password 2 Cl...

Страница 22: ...s designed to automatically detect the correct connection type to the network If you need to change the configuration to only use PPPoE protocol to connect to Internet at the Quick Setup screen do the following 1 From the Broadband Detect Default drop down menu select PPP over Ethernet 2 Enter your Login User Name and Password provided by Verizon in the fields provided 3 Click Apply to save the se...

Страница 23: ...n the left submenu If you change any settings in these screens click Apply to save the settings After you have selected your protocol and clicked OK in the preceding screen click Main to return to the home page In the My Router panel the message Go Your gateway is ready for Internet access should now be displayed In addition the Internet Address field will display the WAN IP address of your Router...

Страница 24: ...s web pages click the Logout link in the left submenu in any of the Web screens NOTE If you want to close the Router s Web page simply click the X in the upper right corner of the window Logging out or closing the window does not affect your Internet connection However you will need to log in to the Router again when you are ready to access the Router s pages ...

Страница 25: ...intosh computers must use the Router s Ethernet installation Refer to section 5 Installing the Hardware for details 8 1 Opening the System Preference Screen After you have connected the Router to the Ethernet port of your Macintosh the screen below will appear Click the Apple icon in the upper left corner of the screen and select System Preferences 8 2 Choosing the Network Preferences After select...

Страница 26: ...ng screen will appear In the field labeled Name your new location change the text from Untitled to Westell Click OK 8 5 Selecting the Ethernet Configuration After clicking OK in the preceding screen the Network screen will appear The Network screen shows the settings for the newly created location From the Configure field in the Network screen select Built in Ethernet Click Save to save the settin...

Страница 27: ...references 2 In the System Preferences screen click the Network icon The Network screen will appear 3 In the Configure field in the Network screen select Built in Ethernet 4 View the IP address field An IP address that begins with 192 168 1 should appear NOTE The Router s DHCP server provides this IP address If this IP address is not displayed check the Router s wiring connection to the PC If nece...

Страница 28: ... 8 7 Accessing Your Router In your Internet Explorer Web browser s address bar type http 192 168 1 1 and then press Enter on your keyboard The Login screen will appear Please refer to the Login screen in section 6 1 of this User Guide for logon instructions http 192 168 1 1 ...

Страница 29: ... to allow the changes to take effect in the Router NOTE 1 If you need help go to the Quick Links section in the home page and then click the Verizon Help link Clicking this link takes you to Verizon s Online Help site where you can find additional information about your Router 2 If you click OK or Apply in a screen and then experience a delay you may need to refresh the screen press the Refresh bu...

Страница 30: ...ction with Verizon click Main in the top navigation menu The following home page will appear The home page allows you to view connection information reported by your Router and quickly access Internet services provided by Verizon The following sections discuss each panel in the Main page The Main page will be referred to as the home page throughout this User Guide ...

Страница 31: ... Games Web Cams Instant Messaging Others Click this link to open a tunnel between remote Internet computers and a specific device port inside your local area network LAN Verizon Help Click this link to access Verizon s Online Help site Logout Click this link to log out of the Router s Web pages 10 3 Network Status In the home page the Network Status pane allows you to view information about device...

Страница 32: ...in the top navigation menu and then select Wireless Status in the left submenu the following screen will appear This screen allows you to view details about your wireless connection NOTE If you change the Router s wireless settings wireless access to the Router may be interrupted and wireless stations may require reconfiguration ...

Страница 33: ...he wireless network adapter must be identical to the Router s SSID The default SSID and WEP key for the Router are both located on the right hand side of the label which is located on the bottom of the router Locate and run the utility software provided with the wireless network adapter and then enter the identical SSID and WEP encryption security settings displayed in the Router into the wireless...

Страница 34: ...030 300554 Rev A 34 June 2008 Verizon FiOS Router Model 9100EM User Guide ...

Страница 35: ...lected it means that current wireless security setting is configured using advanced options See Advanced Security Settings for additional security options Selecting NO SECURITY will disable wireless security and is not recommended WEP Key Length A WEP encryption key is used to protect your wireless transmissions These keys are of varying lengths The key can include the numbers 0 9 and letters a b ...

Страница 36: ...m this menu you can change your wireless security level by selecting the desired choice WEP WEP 802 1x or Wireless Protected Access WPA You can also enable disable the SSID broadcast feature for the product If you want to limit connected wireles dievces to only the 802 11g 54Mbps standard chose the 802 11 b g mode link and select the desired mode For full access to all wireless and secuity setting...

Страница 37: ...By disabling the SSID broadcast your Router will no longer send out messages indicating that it is in place Disabling the SSID broadcast does not disable the wireless interface and clients configured with the correct SSID and wireless security key when enabled will still be able to connect If you enable or disable SSID Broadcast you must click Apply to save the change ...

Страница 38: ...ton link the following screen will appear Set up your MAC Filtering settings and then click Apply to save the settings For example if you select Allow from the MAC filtering Mode drop down list this option will allow only the devices whose MAC Addresses are active in the list to connect to the Router To add a MAC address click the New MAC Address link ...

Страница 39: ...y Settings screen will display all the MAC addresses that have been added to the MAC filtering table Be sure to select the desired option from the MAC Filtering Mode drop down list Then click Apply to allow the settings to take effect in the Router To edit a MAC address click the pencil icon next to the address you want to edit To delete a MAC Address click the X icon next to the address you want ...

Страница 40: ... the following screen will appear Access to the Router s wireless network can be controlled by designating a wireless LAN technology specification 802 11b 11 Mbps or 802 11g 54 Mbps Use an option that is most compatible with your wireless clients Select the desired mode from the drop down list and then click Apply to save the settings ...

Страница 41: ...dvanced Wireless Options If you clicked the Other Advanced Wireless Options link the following screen will appear Click Yes to proceed The following screen will appear Enter the desired values and then click Apply to save the settings The following table explains the details of this screen ...

Страница 42: ...e same channel as the Router the wireless card can scan all channels and look for a Router to connect to In the United States use channels 1 through 11 Network Authentication Open System Authentication If Open System authentication is selected this will allow any station to associate with the wireless network but only stations with a valid WEP key can send or receive data from the Router Shared Ke...

Страница 43: ...erformed for any data or management MPDU containing a number of bytes greater than the threshold If this value is larger than the MSDU size typically set by the fragmentation threshold no handshaking will be performed A value of zero will enable handshaking for all MPDUs Maximum Multicast Data Rate The maximum rate in kb s at which multicast packets are transmitted over your network Wireless Secur...

Страница 44: ...11 3 5 Configuring the Stations Security Type To configure the Router s wireless security type for the wireless network in the Advanced Security Settings screen select an option from the Stations Security Type drop down list The following sections describe each security type ...

Страница 45: ... wireless security will be deactivated Stations Security Type Factory Default Non 8 2 1x WEP Set the type of security for the Router s wireless network Choose from the following options Details on these options are discussed later in this section WPA Allows stations that support WPA v 1 to connect to the Router WPA2 Allows stations that support WPA v 2 to connect to the Router WPA and WPA2 Allows ...

Страница 46: ...ck mark will appear in the box WPA Pre Shared Key The WPA key can be either 8 to 63 text ASCII characters or 64 hexadecimal Hex characters The only allowable hexadecimal characters are A F and 0 9 Encryption Algorithm Factory Default TKIP Select the encryption algorithm you want to use TKIP AES or TKIP and AES TKIP Select this option to enable the Temporal Key Integrity Protocol for data encryptio...

Страница 47: ...acters are 0 9 and A F To configure the WPA Pre Shared Key do the following 1 Select the string type ASCII or HEX in the Pre Shared Key drop down list 2 Enter the desired pre shared key values in the field provided 3 Select the desired option from the Encryptoin Algorithm drop down list TKIP Select this option to enable the Temporal Key Integrity Protocol for data encryption AES Select this option...

Страница 48: ...ect this option to enable the Temporal Key Integrity Protocol for data encryption AES Select this option to enable the Advanced Encryption Standard for data encryption TKIP and AES Select this option to enable the Router to accept either TKIP or AES encryption 2 Enter the desired Group Key Update Interval and confirm that the box contains a check mark By factory default Group Key Interval is enabl...

Страница 49: ... 2 If you select WPA2 in the Stations Security Type drop down list the following screen will appear This option allows stations that support WPA v 2 to connect to the Router The configuration settings for WPA2 are similar to the settings in WPA Please refer to section 11 3 5 1 for instructions on configuring WPA2 ...

Страница 50: ...in the Stations Security Type drop down list the following screen will appear This option allows stations that support both WPA v 1 and WPA v 2 to connect to the Router The configuration settings for this feature are similar to the settings in WPA Please refer to section 11 3 5 1 for instructions on configuring WPA and WPA2 ...

Страница 51: ...If 802 1x WEP is used any station can connect to the Router as long as its SSID and WEP key values match the Router s values NOTE Client PCs can use any Wireless 802 11b g card to communicate with the Router By default your Router is configured enabled for 802 1X WEP Wired Equivalent Privacy security Whenever WEP is configured the PC s wireless card must use the same WEP security code type as the ...

Страница 52: ...nfigure 802 1x WEP with manual encryption keys do the following 1 Clear the Generate Keys Automatically check box The Key Encryption table will appear in the screen NOTE Disable clear the Generation Keys Automatically check box to allow 802 1x MD5 stations to connect to the Router 2 At the Key Encryption table select a key 1 through 4 that you want to activate 3 Enter the desired encryption key NO...

Страница 53: ...e the Router for Non 802 1x WEP do the following 1 At the Key Encryption table select a key 1 through 4 that you want to activate 2 Enter the desired encryption key NOTE A WEP encryption key is treated as either a string of text ASCII characters or a set of hexadecimal Hex characters The number of text characters must be either 5 for 40 bit encryption or 13 for 104 bit encryption The number of Hex...

Страница 54: ...u select Authentication Only in the Stations Security Type drop down list the following screen will appear This feature allows you to enable wireless security in your Router without using encryption keys or a RADIUS server However a station s SSID must match the Router s SSID in order to connect to the Router ...

Страница 55: ...uters on your network that are not being displayed check the firewall setting on the PCs to ensure that the firewall is disabled Status The status of the Inernet connection IP Address The IP address assigned to the computer IP Address Source The method by which the computer receives its IP address MAC Address The Media Access Controller the hardware address assigned to the device by the manufactur...

Страница 56: ...ng screen will appear In the Restricted Website field enter the URL of the website to which you want to restrict access From the Local Host drop down list select the local host device to which you want to apply this restriction Select Always to allow the rule to be active all the time Select User Defined to allow the rule to be active only at certain time as defined by the rules you set up If desi...

Страница 57: ...iOS Router Model 9100EM User Guide After you have entered the desired values in the preceding Restricted Website screen and click OK the following screen will appear To edit an entry click the pencil icon To delete an entry click the X icon ...

Страница 58: ...uters within the local network or even the entire network from accessing certain services on the Internet For example one computer can be prohibited from surfing the Internet another computer from transferring files using FTP and the whole network from receiving incoming email To configure Access Control click the New Entry link If you clicked New Entry the following screen will appear Enter the d...

Страница 59: ... Selecting an Address From the Address drop down list select the desired computer for which you want to apply access Your detected computers should appear in the list After you have selected a computer the following screen will appear Proceed to section 12 1 2 2 to select a protocol ...

Страница 60: ...elect the desired option that you want to prohibit the computer from using You can opt to redirect the user to a browser message HTML page by clicking the check box To disable this feature click to clear the check box After you have selected the protocol the following screen will appear Proceed to section 15 19 to configure a schedule rule ...

Страница 61: ...chedule from the drop down list or define your own schedule If you select User Defined refer to the procedure explained in section 15 19 Scheduler Rules to set up a schedule rule Otherwise select Always to always enforce the rule and then click OK to continue 12 1 2 4 Completing the Access Control Rule Configuration After you have entered the desired values in the Access Control Rule screen and cl...

Страница 62: ... Resolve Now button will translate the rule from the computer name to the correct IP address all rules are actually controlled by the IP address If you clicked Resolve Now the following screen will appear The rule has been added to the list of security rules To disable the security rule for an entry click the adjacent check box and then click Apply To add additional access control rules click the ...

Страница 63: ... Files In the Network Status page click the Access Shared Files link to access files from a device on your local network The device from which you will access files must have file sharing enabled If the device has a firewall turned on you will not be able to access shared files from the device ...

Страница 64: ...Guide 12 1 4 View Device Details In the Network Status page click the View Device Details link The following screen will appear Click Refresh to refresh the details on this screen After you have finished viewing this screen click OK to return to the Network Status page ...

Страница 65: ...Application link to set up applications for your service profile such as port forwarding services This feature enables applications Games Webcams IM Others by opening a tunnel between remote Internet computers and a specific device port inside your local area network LAN Details on this screen are discussed later in section 13 3 Port Forwarding ...

Страница 66: ...me Device In the Network Status page click the Rename Device link This screen allows you to rename a device on your network In the following screen type the desired name in the Name field Next click OK to allow the changes to take effect Click Cancel to return to the Network Status page ...

Страница 67: ...o configure the various parameters of the Router s network and Internet connections and to create new connections To edit your connection settings from the top navigation menu select My Network Next select Network Connections in the left submenu The following screen will be displayed First determine which screen you are viewing by looking at the buttons on the bottom of the page If the third butto...

Страница 68: ... viewing the advanced Network Connections screen To go to the basic screen click the Basic button The advanced Network Connections screen displays links that allow you to access various connection settings in your Router The following sections describe different network connections available on the Router as well as the connection types that can be created ...

Страница 69: ...twork For example a home office network can be created that includes your Ethernet Switch as well as your Wireless computers Network Home Office is the Router s default setting At this screen do any of the following Click the Ethernet Switch link to edit the Router s Ethernet Switch properties Click the Coax link to edit the Router s Coax properties Click the Wireless 802 11g Access Point link to ...

Страница 70: ...w the properties in this screen If you change the connection name click Apply to save the changes Then click OK to return to the Network Connections screen 12 2 1 2 COAX If you click the Coax link in the Network Home Office Properties screen the following screen will appear View the coax properties in this screen If you change the connection name click Apply to save the changes Then click OK to re...

Страница 71: ...n from the left submenu the following screen will appear In this screen you can do any of the following Enter the desired properties for the coax connection and then click Apply to save the settings Click the View Coax Node Detailed Stats link to view the Coax statistics page Click the Go to Coax Stat link to view the coax statistics ...

Страница 72: ...llowing screen appears This screen displays information on the Router s MoCA stats Go to Coax Stats If you clicked the Go to Coax Stats link in the Configure Coax screen the following screen appears This screen displays the Tx Rx rate between the Router and other devices or nodes in a MoCA network View the information in this screen and then click Close to return to the Configure Coax screen ...

Страница 73: ... the wireless access properties in the Network Home Office Properties screen click the Wireless 802 11g Access Point link The following screen will appear View the wireless properties in this screen If you change the connection name click Apply to save the changes Then click OK to return to the Network Connections screen ...

Страница 74: ...ve the settings Please refer to section 11 Wireless for details on the following wireless features listed in the left submenu of this screen Wireless Status Basic Security Settings Advanced Security Settings Device List Advanced 12 2 1 4 IP Address Distribution If you click the IP Address Distribution link in the Network Home Office Properties screen the following screen appears This screen allows...

Страница 75: ...port labeled WAN on the back of the Router to connect your Router to the Internet In this setup you will install the Router so that it connects via Ethernet to another Internet device that provides WAN access If you use the Router s WAN port you will also need to change the Router s network connection settings To change the Router s network connection settings in the Network Connections screen cli...

Страница 76: ...utton The following screen appears Select Ethernet from the WAN Interface drop down list Selecting Ethernet means that the WAN Ethernet port on the rear of the Router will be Enabled ready for connection to another device through which you will connect to the Internet Click Apply to save the settings NOTE Verizon provides the protocol mode for your connection to the Internet Depending on your conn...

Страница 77: ...on of service If you select QoS in the left submenu of the Broadband Connection Ethernet Properties screen the following screen appears You may use this section to remove VLAN tags to your incoming Ingress packets or allow specific tagged packets to enter To add a new entry click the New Entry link The following screen appears Enter the desired port in the VLAN ID in the field and then select an E...

Страница 78: ...t by checking the rate limit check box and you may also enable the pass through of standard QoS classifiers These are 802 1p DSCP and port tags Note that any changes to your egress setting will likely result in a disruption of your FiOS service 12 2 2 3 Advanced Broadband Connection Ethernet If you select Advanced in the left submenu of the Broadband Connection Ethernet Properties screen the follo...

Страница 79: ...er Model 9100EM User Guide The following screen appear Enter the desired IP Address and Subnet Mask in the fields provided Then click Apply to allow the settings to take effect The entry will be added to the list of broadband connection IP addresses ...

Страница 80: ... describes the hardware used to connect the Router to the Internet This screen displays Ethernet and Coax as broadband connection options In this setup Coax is Connected and Ethernet is Disabled This means that Coax is the hardware used to connect the Router to the Internet To view the Router s broadband connection properties in the preceding Network Connections screen click the Broadband Connecti...

Страница 81: ...12 2 3 1 Configure Connection Broadband Connection Coax To configure the Router s Coax settings click Configure Connection in the left submenu The following screen appears Enter the desired settings for your broadband connection coax and then click Apply to save the settings ...

Страница 82: ... Coax Node Detailed Stats link in the Configure Broadband Connection Coax screen the following screen appears View the information in this screen and then click Close to return to the Configure Broadband Connection Coax screen NOTE This screen is only intended for use by Verizon technicians Any errors indicated do not necessarily indicate a problem with your service ...

Страница 83: ...wing screen appears View the information in this screen and then click Close to return to the Configure Broadband Connection Coax screen 12 2 3 2 QoS Broadband Connection Coax NOTE This section is only intended to be modified by a Verizon technician Any changes to this section may result in a disruption of service If you select QoS in the left submenu of the Broadband Connection Coax Properties sc...

Страница 84: ...he VLAN ID in the field and then select an Egress Policy from the drop down list Click OK The following screen appears The VLAN ID displays the port that you added Click Apply to save the settings For outgoing Egress packets you may enable a Rate Limit by checking the rate limit check box and you may also enable the pass through of standard QoS classifiers These are 802 1p DSCP and port tags Note ...

Страница 85: ...nu of the Broadband Connection Coax Properties screen the following screen appears To add a new IP address click the New IP Address link The following screen appear Enter the desired IP Address and Subnet Mask in the fields provided Then click Apply to allow the settings to take effect The entry will be added to the list of broadband connection IP addresses ...

Страница 86: ...ing the protocol used for your Internet connection If you are configuring your Router s protocol setting for WAN PPPoE in the Network Connections screen select the WAN PPPoE link The following screen will appear View the details in this screen If you change the name click Apply to save the changes Select the menu option in the left submenu to access the desired configuration page Select Configure ...

Страница 87: ...rties screen The following screen appears Enter the desired settings and click Apply to save the settings PPP WAN PPPoE NOTE The settings in the screen are provided by Verizon Do not change the settings unless instructed by Verizon To configure the Router s PPP properties click PPP in the left submenu screen The following screen appears If you change the settings in this screen click Apply to save...

Страница 88: ...ation for devices connected to your Router At this screen do any the following Turn off Automatic Refresh by clicking the Automatic Refresh Off button When Automatic Refresh is enabled the screen will be updated automatically to display the most current statistics Manually refresh this screen by clicking the Refresh button Click the links in this screen to access the Router s connection settings C...

Страница 89: ...er s firewall security settings allow you to reduce the risk of unauthorized access to your network by prohibiting certain types of inbound and outbound network traffic and by allowing you to configure specific firewall rules IMPORTANT If you need help click Main in the top navigation menu to go to the home page In the Quick Links section of the home page click Verizon Help Clicking this link take...

Страница 90: ...s and this feature may need to be disabled If you have questions about this feature check with Verizon technical support It is disabled by default 13 2 Access Control If you select Firewall Settings in the top navigation menu and then select Access Control in the left submenu the following screen will appear Access Control is used to block specific computers within the local network or even the wh...

Страница 91: ...nt this rule applied If your computer or device is not listed in the drop down you may create a new Network Object manually by choosing the User Defined option Please see the Network Object section for more details on setting up a network object Section 15 11 After you have selected a computer the following screen will appear Next proceed to section 13 2 2 to select a protocol ...

Страница 92: ...f this blockage via an HTML Web page click the check box a check mark will appear in the box Note This feature only works for HTTP services To see more than the basic listed services choose Show All Services from the Protocols drop down This will show you many pre defined services such as games and IM clients After you have selected the protocol the following screen will appear Proceed to section ...

Страница 93: ...If you select User Defined refer to the procedure explained in section 15 19 Scheduler Rules to set up a schedule rule Otherwise select Always and then click OK to continue Select Always to allow the rule to be active all the time Select User Defined to allow the rule to be active only at certain time as defined by the rules you set up If you clicked OK in the preceding screen the following screen...

Страница 94: ...e Access Control Rule Configuration If you clicked OK the following screen will appear The rule has been added to the list of security rules To disable the security rule for an entry click the adjacent check box and then click Apply To add additional access control rules click the New Entry link ...

Страница 95: ... By default the Router blocks all external users from connecting to your network However you can configure specific applications on your network to be accessible from the Internet Port Forwarding allows the Router to enable applications Games Webcams IM Others by opening a tunnel between remote Internet computers and a specific device port inside your local area network LAN Services on the LAN wil...

Страница 96: ...clicked New Entry the following screen will appear In the Local Host field enter a local host name or IP address of the computer providing the service If you will use a public IP address click the check box next to Specify Public IP Address NOTE Only one computer can be assigned to provide a specific service or application If you use public IP addresses in your Router s configuration you must firs...

Страница 97: ...nce the Router provides predefined protocols for applications games and VPN specific programs The screen below displays the protocols of basic services provided in the Router If you select Show All Services from the Protocol drop down list all available services will be displayed in the drop down list Select a predefined service from the protocol drop down list ...

Страница 98: ...predefined service the following screen will appear Next select an option from the Forward to Port drop down list to indicate the port to which traffic will be forwarded If you selected Same as Incoming Port from the Forward to Port drop down list the following screen will appear Click OK to continue ...

Страница 99: ...ule rule using the instructions explained in section 15 19 Configuring a Schedule After you have set up a schedule enter the address of the local Host and then click OK to save the settings If you clicked OK the following screen will appear The predefined port forwarding rule has been assigned ...

Страница 100: ...he Specify Public IP Address check box and enter a specific external IP address such as the WAN IP address of the router or a Static NAT IP address Optionally you can specify a remote network to forward packets to this is a network that it outside the control of your Router This is common in a small business or advanced configuration that uses multiple routers Select the Specify Network IP Address...

Страница 101: ...is provided of many common applications If you need to define your own select User Defined If you selected User Defined the following screen will appear Give your service a name using the text box and then define the ports that define your newly created service NOTE At least one server port entry must be defined before you can enter a service name ...

Страница 102: ...User Guide Clicking the New Server Ports link will bring up the following screen that allows you to define your ports Next select the desired protocol from the Protocol drop down list This information should be provided by your application developer or documentation ...

Страница 103: ...op down list the following screen will appear Select the desired source and destination port settings from the drop down lists To set up a range of ports select Range from the Source Ports and Destination Ports drop down lists Next enter the desired port range values in the fields provided and then click OK to continue ...

Страница 104: ...ign the rule to a public IP address click the Specify Public IP Address check box NOTE Only one computer can be assigned to provide a specific service or application If you use public IP addresses in your Router s configuration you must first obtain them from Verizon At the Add Port Forwarding Rule screen you can enter the name of a local host or click the Specify Public IP Address check box to in...

Страница 105: ...priate IP address From the Forward to Port drop down list select the desired option to indicate the port to which traffic will be forwarded This is almost always the same as the incoming port You may define a custom port map by specifying a new port to send this traffic to For example you could forward all the incoming traffic to an external IP address coming in on Port 80 to your internal compute...

Страница 106: ...en the following screen will appear The user defined rule has been added to the port forwarding table and the status is Active You may need to click Resolve Now while the Router is attempting to save the rule to the local host If you want to disable a port forwarding rule clear the check box next to the host name or IP address Then click Apply to save the setting ...

Страница 107: ...le drop down menu If you select User Defined refer to the procedure explained in section 15 19 Scheduler Rules to set up a schedule rule Otherwise select Always and then click OK to continue Select Always to allow the rule to be active all the time Select User Defined to allow the rule to be active only at certain time as defined by the rules you set up ...

Страница 108: ...nd clicked OK in the Port Forwarding screen the following screen will appear Enter the domain name in the Local Host field or click the check box to specify a public IP address or to specify a network IP address Then click OK to continue If you clicked OK the following screen will appear Click Apply to save the settings ...

Страница 109: ...gard to firewall security or restrictions Use this feature in cases where you want to use Internet services that are not available in the Port Forwarding list such as Web games or video conferencing WARNING The computer that is configured as a DMZ Host will not have security or firewall protection To configure a computer for DMZ Host click the DMZ Host IP Address check box and then enter the IP Ad...

Страница 110: ... rules to dynamically open the firewall for specific protocols or ports The specified ports will be opened for incoming traffic Port triggering can be used for dynamic port forwarding configuration By setting port triggering rules you can allow inbound traffic to arrive at a specific LAN host using ports different than those used for the outbound traffic This is called port triggering because the ...

Страница 111: ...up a user defined port triggering rule in the Add drop down list select User Defined 13 5 1 1 Configuring Outgoing Trigger Ports If you selected User Defined in the preceding screen the following screen will appear Enter the desired name in the Service Name field Next click the New Trigger Ports link to configure outgoing trigger ports ...

Страница 112: ...ed New Trigger Ports the following screen will appear Select the desired protocol from the Protocol drop down list For example if you selected TCP from the Protocol drop down list the following screen will appear Select the desired source and destination settings from the drop down lists ...

Страница 113: ...ill appear Enter the desired source port and destination port values and then click OK to save the settings If you entered source and destination port values clicked OK in the preceding screen the following screen will appear If you desire to configure incoming trigger port proceed to section 13 5 1 2 Otherwise click OK to continue ...

Страница 114: ...y to save the settings If you want to edit a rule click the pencil icon next to the rule that you want to edit To delete a rule click the X icon next to the rule that you want to delete 13 5 1 2 Configuring Incoming Trigger Ports To configure incoming trigger ports in the Edit Port Triggering Rule screen click the New Opened Ports link ...

Страница 115: ...Guide If you clicked New Opened Ports the following screen will appear Select a protocol from the Protocol drop down list For example if you select UDP the following screen will appear Select the desired source port and destination port settings from the drop down lists ...

Страница 116: ... 2008 Verizon FiOS Router Model 9100EM User Guide Next enter the desired source and destination port values in the fields provided and click OK to continue If you clicked OK the following screen will appear Click OK to continue ...

Страница 117: ... screen will appear This screen shows that the triggering rule has been added to the list of triggering services Click Apply to save the settings If you want to edit a rule click the pencil icon next to the rule that you want to edit To delete a rule click the X icon next to the rule that you want to delete ...

Страница 118: ...ting Up a Predefined Port Triggering Rule To set up a predefined port triggering rule in the Add drop down list select a predefined service After you have selected a service the following screen will appear The service that you selected will be displayed Click Apply to save the settings ...

Страница 119: ...our service provider to change settings or help you troubleshoot functionality or communication issues from a remote location Remote access to your Router is blocked by default to ensure the security of your network However your Router supports the following services and you can use the Remote Administration screen to selectively enable these services if they are needed WARNING With Remote Adminis...

Страница 120: ...ded to specific devices With Static NAT devices that are behind the firewall and that are configured with private IP addresses appear to have public IP addresses on the Internet This allows an internal host such as a Web server to have an unregistered private IP address and still be reachable over the Internet This section also allows you to perform port translations NAPT There are three steps to ...

Страница 121: ...he Network Objects section For example if you select IP Address as the network object type you must specify a single WAN IP address to add to the pool Enter a valid WAN IP address then click OK to continue If you have entered an IP Address and clicked OK in the Add Item screen you are directed back to the main screen and your network address is shown in the pool You now must create the NAT NAPT Ru...

Страница 122: ...nation Address The specific destination address of packets coming from the above Source address You will want to keep this set at Any in most cases to allow any remote destination to receive packets from the Source Address Protocol You may also specify a specific protocol Selecting the Show All Services option in the combo box will expand the list of available protocols Select a protocol or add a ...

Страница 123: ...ress as NAPT is port specific NAPT Ports Specify the port s of the IP address into which the original IP address will be translated Enter a single port or select Range in drop down list The screen will refresh enabling you to enter a range of ports Log Packets Matched by This Rule Check this check box to log the first packet from a connection that was matched by this rule Schedule By default the r...

Страница 124: ...o this from another internet connection or by using one of many public websites that display your external IP address Note this only works if you have specified Any or one of the HTTP protocols After setting up your NAT NAPT rule set you must also setup a Port Forwarding entry so that all incoming traffic is directed to the LAN computer you setup in the above steps Click on Port Forwarding in the ...

Страница 125: ...own filled in below NOTE When setting up your Port Forwarding setting please ensure that you enter in the same external IP address information as well as match what protocols were defined in the NAT NAPT rule you just created Clicking OK will take you back to the main port forwarding page and it will show your newly created rule Refer to the Port Forwarding Section for more information on other op...

Страница 126: ...sets of rules and make a distinction between rules that apply to WAN and LAN devices This screen is divided into two sections one for Input Rule Sets and the other for Output Rule Sets which are for configuring inbound and outbound traffic respectively Each section comprises subsets which can be grouped into three main subjects Initial rules rules defined here will be applied first on all gateway ...

Страница 127: ...settings Select Drop to drop packets Select Reject to drop packets and to send TCP Reset or ICMP Host Unreachable packets to the sender Select Accept Connection to accept all packets related to this session Select Accept Packet to accept packets matching this rule only Do not use Stateful Packet Inspection SPI to automatically accept packets related to this session After you have entered the desir...

Страница 128: ...f the rules appearance represents both the order in which they were defined and the sequence by which they will be applied By clicking the Move Up and Move Down action icons you can change this order after your rules are already defined without having to delete and then re add them After you click the desired icon the screen will refresh and display the change ...

Страница 129: ...t a time Once 1000 entries have been logged the oldest entry is removed to make space for the new entries as they occur In this screen do any of the following Click Close to close the security log screen Click Clear Log to remove all entries from the log Click Save to save the settings to a syslog server Click Settings to configure the security settings Clicking this button opens a new window that...

Страница 130: ...to establish an inbound connection to the home network or vice versa You can enable logging of blocked packets of specific types by disabling this option and enabling some of the more specific options below it Specific Events Specify the blocked events that should be monitored Use this to monitor specific event such as SynFlood A log message will be generated if either the corresponding check box ...

Страница 131: ...ports it uses and the direction of the secured traffic Active Connections this value represents the number of active concurrent connections Approximate Max Connections this value represents the amount of additional concurrent connections possible Connections Per Page use this drop down list to select the number of connections to display at once Click the Advanced button to display a more detailed ...

Страница 132: ...een will appear This feature allows you to block LAN access to certain hosts on the Internet or to certain Web sites To configure a website restriction click the New Entry link If you clicked New Entry the following screen will appear In the Restricted Website field enter the desired website to which you want to restrict access You can enter a valid IP address or domain name Next select a host fro...

Страница 133: ...er you have selected a local host the following screen will appear Click OK to continue To add a user defined host to your list of restricted access click User Defined in the Add drop down list If you selected User Defined the following screen will appear Click the New Entry link ...

Страница 134: ...t the desired object type from the Network Object Type drop down list NOTE You can select any option from the Network Object Type drop down list and then configure the screen accordingly For example if you selected IP Address the following screen will appear Enter the desired IP address in the field provided and then click OK to continue ...

Страница 135: ...0EM User Guide If you clicked OK the following screen will appear Enter the desired description in the Network Object Description field and then click OK to continue Next select the desired schedule from the Schedule drop down list and then click OK to continue ...

Страница 136: ...ssing the specified Web site NOTE If the Status field displays Resolving this means that the Router is attempting to locate the restricted Web site Click Resolve Now the restricted Web site will be resolved into the IP address that you have specified and the Status field will display Active To disable the website restriction click to clear the check box adjacent to the IP address Then click Apply ...

Страница 137: ...section of this User Guide is intended to provide assistance with configuring the Advanced features of your Verizon FiOS Router and assumes the user has an in depth understanding of computers routing and internet networking Click Yes to proceed to the Router s Advanced screen Clicking the links in the Advanced screen allows you to access various configurable settings in your Router ...

Страница 138: ... the Advanced screen the following screen will appear Using this screen you can run the following diagnostics tests To run a PING test type the appropriate IP address or host name in the field provided and then click Go To run a Traceroute test type the appropriate IP address or host name in the field provided and then click Go ...

Страница 139: ...FiOS Router Model 9100EM User Guide For example if you enter a host name in the Destination field and then click Go the following screen will appear This screen shows that the Ping test succeeded Click Close to return to the Advanced screen ...

Страница 140: ...n the Advanced screen the following screen will appear Click OK to allow the Router to be reset to factory default settings After the Router has rebooted you will need to log in to the Router IMPORTANT If you click OK any settings that you have configured in the Router will be erased and any data that the Router has reported will be lost ...

Страница 141: ...ink in the Advanced screen the following screen will appear A Media Access Control MAC address is a hexadecimal code that identifies a device on a network such as a router All networking devices have a MAC address and in some cases your service provider may need you to provide the MAC address of your network device If you use MAC Cloning you can simply enter the MAC address of the old Router into ...

Страница 142: ...owing screen will appear Enter the appropriate values in the fields provided and then click OK to continue NOTE You can have a total of 253 static LAN devices connected to your Verizon Router Enter a host name for this connection Enter the fixed IP address to assign to the computer Enter the MAC address of the computer s network card NOTE A device s fixed IP address is actually assigned to the spe...

Страница 143: ...een added to the list of static DHCP connections To run a diagnostics test on a DHCP connection click the diagnostics icon adjacent to the connection you want to test To remove a host from the table click the appropriate X icon in the Action column If you clicked the diagnostics icon the following screen will appear Review the status of the diagnostics test and then click Close to return to the DH...

Страница 144: ... 144 June 2008 Verizon FiOS Router Model 9100EM User Guide 15 6 Users If you click the Users link in the Advanced screen the following screen will appear This feature allows you to configure user settings in the Router ...

Страница 145: ... password protected and you are not an authorized user you will not be allowed to change and save the values in this screen The Router cannot be configured unless the user is logged in Contact your network administrator for further instructions Full Name Enter the user s full name User Name Enter the name a remote user will use to access the home or office network This field is case sensitive New ...

Страница 146: ...missions in the Router To configure User Settings enter the appropriate values and then click OK to save the changes NOTE The User Name and Password values must be at least 6 characters and should consist of standard characters only ASCII 32 126 excluding the special character space and any of these characters Also user names containing capital letters are not recommended It might cause connectivi...

Страница 147: ...EM User Guide After you have entered the appropriate values and click OK the following screen will appear The user information has been added to the Router If desired repeat the preceding instructions to add additional users to the administrator permissions list ...

Страница 148: ...0 300554 Rev A 148 June 2008 Verizon FiOS Router Model 9100EM User Guide 15 6 3 Users Removing a User To remove a user from the list click the X icon The following screen will appear Click OK to continue ...

Страница 149: ...the following screen will appear Using this screen you can configure additional groups in the Router At this screen do the following 1 Enter a Group Name of your choice 2 Enter a description of your choice 3 If you want to assign administrative permissions to the group click the Group Members Administrator check box otherwise leave this box empty 4 Click OK to save the settings ...

Страница 150: ...A 150 June 2008 Verizon FiOS Router Model 9100EM User Guide After you have entered the desired values and clicked OK the following screen will display the group attributes Click Close to return to the Advanced screen ...

Страница 151: ...n users to a designated group At this screen do the following 1 Enter a User name of your choice 2 Enter a description of your choice 3 If you want to assign administrative permissions to the user click the Group Members Administrator check box otherwise leave this box empty 4 Click OK to save the settings After you have entered the desired values and clicked OK the following screen will display t...

Страница 152: ...a new QoS profile will cause all previous QoS settings to be lost Before selecting the QoS profile that mostly suits your needs select your bandwidth from this combo box If you do not see an appropriate entry select User Defined and enter your Tx and Rx bandwidths manually Enter your Tx bandwidth in Kbits per second Enter your Rx bandwidth in Kbits per second Select the profile that mostly suits y...

Страница 153: ...030 300554 Rev A 153 June 2008 Verizon FiOS Router Model 9100EM User Guide ...

Страница 154: ...ce Source destination ports Limit the rule for specific days and hours The Router supports two priority marking methods for packet prioritization DSCP 802 1p Priority The matching of packets by rules also known as Stateful Packet Inspection is connection based and uses the Router s firewall mechanism Once a packet matches a rule all subsequent packets with the same attributes receive the same QoS ...

Страница 155: ...range a MAC address or a host name Destination Address The destination address of packets sent or received from the network object This address can be configured in the same manner as the source address This entry enables further filtration of the packets Protocols You may also specify a traffic protocol Selecting the Show All Services option in the drop down list will expand the list of available...

Страница 156: ...dth limit for classes of rules Prioritization policy TCP serialization on a device Additionally QoS traffic shaping rules can be defined for a default device These rules will be used on a device that has no definitions of its own This enables the definition of QoS rules on the default WAN for example and their maintenance even if the PPP or bridge device over the WAN is removed The matching of pac...

Страница 157: ...ortion is known as a Shaping Class When not used by its predefined traffic type or owner for example VoIP the class will be available to all other traffic However when needed the entire class is reserved solely for its owner Moreover you can limit the maximum bandwidth that a class can use even if the entire bandwidth is available Configure the following fields Tx Bandwidth This parameter limits t...

Страница 158: ...mitted will be fragmented to smaller sections This avoids transmission of large bursty packets that may cause delay or jitter for real time traffic such as VoIP If you insert a delay value in milliseconds the delay in number of bytes will be automatically updated on refresh For example if you click the New Entry link in the Tx Traffic Shaping section of the Edit Device Traffic Shaping screen the A...

Страница 159: ... distributed among queues based on priority This priority is defined according to packet s priority which can be defined explicitly by a DSCP value or by a 802 1p value FIFO The First In First Out priority queue This queue ignores any previously marked priority that packets may have Fairness The fairness algorithm ensures no starvation by granting all packets a certain level of priority RED The Ra...

Страница 160: ... action icon in the Action column The Edit Policing Class screen will appear Configure the following fields Name The name of the class Bandwidth The reserved reception bandwidth in kilo bits per second You can limit the maximum allowed bandwidth by selecting the Specify option in the combo box The screen will refresh adding yet another Kbits s field Schedule By default the class will always be act...

Страница 161: ...opriate for voice calls video playback or other delay sensitive applications via priority queuing or bandwidth allocation or by choosing dedicated routes for specific traffic flows Diffserv defines a field in IP packet headers referred to as the Differentiated Services Codepoint DSCP Hosts or routers passing traffic to a Diffserv enabled network will typically mark each transmitted packet with an ...

Страница 162: ...e If you clicked New Entry the following screen will appear Enter your hexadecimal value and then set the priority for this value Click Apply to continue If you clicked Apply the following screen will appear Click OK to confirm Value will be added to the DSCP Settings screen ...

Страница 163: ...traffic Values five and six may be applied to delay sensitive applications such as interactive video and voice Data classes four through one range from controlled load applications down to loss eligible traffic Zero is the value for unassigned traffic and is used as a best effort default invoked automatically when no other value has been set A packet can match more than one rule This means the fol...

Страница 164: ...ear The Router provides accurate real time information on the traffic moving through the defined device classes For example the amount of packets sent dropped or delayed are just a few of the parameters monitored per each shaping class NOTE Class statistics will be available only after defining at least one class otherwise the screen will not display any values If you do not want the screen to ref...

Страница 165: ...u to allow Verizon to change settings or help you troubleshoot functionality or communication issues from a remote location Remote access to your Router is blocked by default to ensure the security of your network However your Router supports the following services and you may use the Remote Administration Security screen to selectively enable these services if they are needed WARNING With Remote ...

Страница 166: ...cally be added to the DNS server s table of local hosts Do any of the following To rename the domain name click a host name link To add a host name click the New DNS Entry link To add a new entry click the New DNS Entry link The following screen will appear Enter the desired host name and then enter the appropriate IP address Next click OK to continue NOTE Names may not contain spaces Only letters...

Страница 167: ...the service provider assigns an unused IP address from a pool of IP addresses and this address is used only for the duration of a specific connection Dynamically assigning addresses extends the usable pool of available IP addresses while maintaining a constant domain name This allows to user to access a device from a remote location since the device will always have the same IP address When using ...

Страница 168: ... NOTE Your service provider will provide you with the appropriate values to use in this screen If you click the Click Here to Initiate and Manage your Subscription link the following screen will appear Enter the user name and password provided by your service provider in the fields provided to access your account NOTE The screen displayed in this document may differ from the actual screen ...

Страница 169: ...n order to apply security rules based on host names instead of IP addresses This may be useful since IP addresses change from time to time Moreover it is possible to define network objects according to MAC addresses making rule application more persistent against network configuration settings If you click Advanced in the top navigation menu and then select the Network Objects link the following s...

Страница 170: ...ddress drop down menu IP Address IP Subnet IP Range MAC Address Host Name DHCP Option After you select the desired method the screen will refresh Enter the appropriate values in the fields provided and then click OK to save the settings If you have entered the desired values in the preceding screen and clicked OK the following screen will appear The network object has been configured Click OK to s...

Страница 171: ...54 Rev A 171 June 2008 Verizon FiOS Router Model 9100EM User Guide If you clicked OK the following screen will appear The network object has been saved to the Router Click Close to return to the Advanced screen ...

Страница 172: ...ink the following screen will appear For your convenience the Router supports protocols for Applications Games and VPN specific programs The following chart provides port protocol information for the supported services The Protocol screen allows you to select the desired view Basic Service and Advanced Service The following sections explain the features of each service ...

Страница 173: ...030 300554 Rev A 173 June 2008 Verizon FiOS Router Model 9100EM User Guide 15 12 1 Basic Service To access the basic service Protocols screen if you are in the Advanced screen click the Basic button ...

Страница 174: ... following screen will appear At this screen you can Configure ports for predefined protocols by clicking the desired link Configure a new user defined port for a protocol by clicking the New Entry link 15 12 1 1 Configuring a Predefined Protocol Service To configure the Router for a predefined protocol service click the desired link ...

Страница 175: ...xample if you clicked FTP in the preceding screen the following screen will appear Next click the TCP link to configure the service protocol values If you clicked TCP in the Edit Service screen the following screen will appear Enter the desired values and then click OK to continue ...

Страница 176: ...ave entered values and clicked OK in the preceding screen the following screen will appear A protocol service has been configured Click OK to save the settings If you clicked OK in the preceding screen the following screen will appear The protocol service has been saved to the Router ...

Страница 177: ...nfiguring a User defined Protocol Service To configure the Router for a user defined protocol service click the New Entry link If you clicked New Entry the following screen will appear Enter a service name and service description in the fields provided Next click the New Server Ports link ...

Страница 178: ...9100EM User Guide If you clicked New Server Ports the following screen will appear Select a protocol from the drop down list and then enter a protocol number Click OK to continue If you clicked OK the following screen will appear Click OK to save the settings ...

Страница 179: ...030 300554 Rev A 179 June 2008 Verizon FiOS Router Model 9100EM User Guide If you clicked OK the following screen will appear The protocol settings have been saved to the Router ...

Страница 180: ...asic screen click the Advanced button The following advanced Protocols screen will appear At the Advanced screen you can Configure predefined application by clicking the desired link Configure a new user defined application by clicking the New Entry link 15 12 2 1 Configuring a Predefined Application To configure the Router for a predefined application click the desired link ...

Страница 181: ...d Next click the desired TCP or UDP link If you selected TCP Any 2300 4000 the following screen will appear Select the desired source port and destination port values from the drop down lists and then click OK NOTE For the Source and Destination ports you can select a single port or a range of ports In this example the range for the Source port can be any value from 0 through 65535 And the range f...

Страница 182: ... entered the desired values and click OK in the preceding screen the following screen will appear The TCP protocol values have been configured Next click OK to save the settings If you clicked OK the protocol values will be saved to the Router and the following screen will display the entry ...

Страница 183: ...ng a New User Defined Application To configure new user defined application click the New Server Ports link in the Edit Service screen If you clicked New Server Ports the following screen will appear Select the desired protocol from the Protocol drop down list and then enter the protocol number ...

Страница 184: ...zon FiOS Router Model 9100EM User Guide For example this screen shows appropriate values click OK to continue If you clicked OK the following screen will appear The UDP port values have been configured Next click OK to save the settings ...

Страница 185: ...030 300554 Rev A 185 June 2008 Verizon FiOS Router Model 9100EM User Guide If you clicked OK the following screen will appear The user defined UDP port settings have been saved to the Router ...

Страница 186: ...Router on the LAN Universal Plug and Play is a networking architecture that provides compatibility among networking equipment software and peripherals Products that have UPnP can seamlessly connect and communicate with other Universal Plug and Play enabled devices without the need for user configuration centralized servers or product specific device drivers To configure UPnP enter the desired valu...

Страница 187: ...Domain Specify your network s local domain Wireless Broadband Router Management Console Automatic Refresh of System Monitoring Web Pages select this check box to enable the automatic refresh of system monitoring web pages Warn User Before Network Configuration Changes select this check box to activate user warnings before network configuration changes take effect Session Lifetime this value repres...

Страница 188: ...et the size of the system log buffer in Kilobytes Remote System Notify Level select one of the following remote system notification level from the drop down list None Error Warning Information Security Logging configure security logging parameters Security Log Buffer Size set the size of the security log buffer in Kilobytes Remote Security Notify Level select one of the following remote security n...

Страница 189: ...Model 9100EM User Guide 15 15 Configuration File If you click Advanced in the top navigation menu and then select the Configuration File link the following screen will appear IMPORTANT Do not change the settings in this page unless instructed by Verizon ...

Страница 190: ...heck box to enable daylight saving time a check mark will appear in the box Start Enter the date and time when daylight saving starts End Enter the date and time when daylight saving ends Offset Enter the time amount daylight saving time changes Automatic Time Update Click the check box to activate automatic time update a check mark will appear in the box Protocols Click the radio button for the p...

Страница 191: ...y link under Time Server the following screen appears Enter a server IP address or domain name in the field provided and then click OK to continue The entry will be added to the time server table To remove server address from the Time Server table click the X icon next to the server to want to remove Then click Apply to save the changes ...

Страница 192: ...ropriate values from the month day and year drop down lists Next enter your local time starting with hours minutes and seconds in the fields provided Click Apply to save the settings Then click OK to return to the Date and Time screen 15 19 Scheduler Rules If you click Advanced in the top navigation menu and then select the Scheduler Rules link the following screen will appear To configure a sched...

Страница 193: ...n FiOS Router Model 9100EM User Guide The following screen appears Click the New Time Segment Entry link or alternatively click the plus icon If you clicked New Time Segment Entry the following appears Click the New Hours Range Entry link ...

Страница 194: ... in the time segment a check mark will appear in the box Click OK to continue After you have set up the desired time segment and clicked OK the following screen will appear If desired you can enter a name for the schedule rule in the Name field Under Rule Activity Settings be sure to click the setting that you want assigned to the rule Click the first radio button to allow the rule to be active at...

Страница 195: ...rop down list You can choose to perform an automatic check at the specified number of hours and URL Or you can disable automatic check NOTE The URL must be in the format protocol user password host port path where protocol is one of http https ftp or tftp Either user or password or both may be left out The port number is also optional Click Check Now to retrieve the firmware update file and displa...

Страница 196: ...en will appear You can choose to setup your Router to use static or dynamic routing Dynamic routing automatically adjusts how packets travel on the network whereas static routing specifies a fixed routing path to neighboring destinations 15 21 1 Basic Routing Settings To create a new route click the New Route link If you change any settings in this screen click Apply to save the settings ...

Страница 197: ...nation is the destination host subnet address network address or default route The destination for a default route is 0 0 0 0 Netmask Enter the network mask is used in conjunction with the destination to determine when a route is used Gateway Enter the Router s IP address Metric Enter the desired measurement of the preference of a route Typically the lowest metric is the most preferred route If mu...

Страница 198: ... Guide 15 21 2 Advanced Routing Settings To configure advanced routing settings click the Advanced button in the Routing screen If you clicked the Advanced button the following screen will appear If you change any settings in this screen click Apply to save the settings ...

Страница 199: ...d to a network to be updated whenever an important change occurs in the network A multicast is simply a message that is sent simultaneously to a predefined group of recipients Each member of the multicast group will receive all messages addressed to the group IGMP proxy enables multicast packets to be routed according to the IGMP requests of local network devices requesting to join multicast group...

Страница 200: ...100EM User Guide 15 22 1 New Membership Filter If you clicked the New Membership Filter link in the preceding screen the following screen will appear Select the desired settings for the membership filter you want to create Then click Apply to save the settings ...

Страница 201: ... Guide 15 22 2 New Multicast Address If you clicked the New Multicast Address link in the preceding screen the following screen will appear Enter multicast address and then click Apply If you clicked Apply the address will be displayed in the list of Multicast Addresses ...

Страница 202: ... enabled the IGMP Proxy Status panel will be empty 15 23 PPPoE Relay If you click Advanced in the top navigation menu and then select the PPPoE Relay link the following screen will appear PPPoE Relay enables the Router to relay packets on PPPoE connections while keeping its designated functionality for any additional connections To activate PPPoE Relay click the check box check mark will appear in...

Страница 203: ... network configuration parameters to such hosts The Router s default DHCP server is the LAN bridge A client host sends out a broadcast message on the LAN requesting an IP address for itself The DHCP server then checks its list of available addresses and leases a local IP address to the host for a specific period of time and simultaneously designates this IP address as taken At this point the host ...

Страница 204: ...n about your Router click Close Gateway Status Software Version Router s software version Release Date Router s software release date Platform Router manufacturer s model name Model Number Router manufacturer s model number INI File Name Router s INI file name INI File Version Router s INI file version Hardware Version Router s hardware version Hardware Serial Number Router s serial number Upgrade...

Страница 205: ...connection information for devices connected to your Router At this screen you can do any of the following Turn off Automatic Refresh by clicking the Automatic Refresh Off button When Automatic Refresh is enabled the screen will be updated automatically to display the most current statistics Manually refresh this screen by clicking the Refresh button Click the links in this screen to access the Ro...

Страница 206: ...ick System Monitoring in the top navigation menu and then click System Log in the left submenu the following screen will appear This screen displays the details of your system s logged events To save the system log click Save Log and then follow the instructions to save the log to the desired location ...

Страница 207: ...7 x or higher Computer operating system CD ROM IEEE 802 11b g PC adapter System Requirements for Coax Pentium or equivalent class machines or higher Microsoft Windows XP 2000 ME 98 SE installed 64 MB RAM 128 MB recommended 10 MB of free hard drive space Internet Explorer 5 5 or later or Netscape Navigator 7 x or higher or Firefox 1 0 7 or later Computer operating system CD ROM LEDs Power Coax WAN ...

Страница 208: ...yright and other proprietary notices Except as authorized under this paragraph no copies of the SOFTWARE or any portions thereof may be made by you or any person under your authority or control 2 Licensor s Rights You acknowledge and agree that the SOFTWARE and the User s Manual are proprietary products of Licensor protected under U S copyright law You further acknowledge and agree that all right ...

Страница 209: ...st the other party regarding the subject matter hereof the prevailing party shall be entitled to recover in addition to any other relief granted reasonable attorney fees and expenses of litigation 8 Severability Should any term of this License Agreement be declared void or unenforceable by any court of competent jurisdiction such declaration shall have no effect on the remaining terms hereof 9 No ...

Страница 210: ...Router Model 9100EM User Guide 20 PUBLICATION INFORMATION Verizon FiOS Router Model 9100EM Document Part Number 030 300554 Rev A 2008 Verizon All rights reserved All trademarks and registered trademarks are the property of their respective owners ...

Отзывы: