


22
6 Set up with the display and adjustment module PLICSCOM
VEGACAL 69 • Two-wire 4 … 20 mA/HART
31178-EN-200929
6 Set up with the display and adjustment
module PLICSCOM
6.1 Short description
The display and adjustment module is used for measured value
display, adjustment and diagnosis. It can be mounted in the following
housing versions and instruments:
•
All sensors of the plics
®
instrument family, in the single as well as
in the double chamber housing (optionally in the electronics or
connection compartment)
•
External display and adjustment unit VEGADIS 61
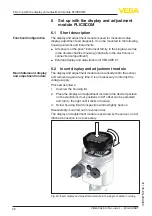
6.2 Insert display and adjustment module
The display and adjustment module can be inserted into the sensor
and removed again at any time. It is not necessary to interrupt the
voltage supply.
Proceed as follows:
1. Unscrew the housing lid
2. Place the display and adjustment module in the desired position
on the electronics (four positions in 90° offset can be selected)
and turn to the right until it clicks into place.
3. Screw housing lid with inspection window tightly back on
Disassembly is carried out in reverse order.
The display and adjustment module is powered by the sensor, an ad-
ditional connection is not necessary.
Fig. 20: Insert display and adjustment module in the single chamber housing
Function/Configuration
Mount/dismount display
and adjustment module
Содержание VEGACAL 69
Страница 14: ...14 4 Mounting VEGACAL 69 Two wire 4 20 mA HART 31178 EN 200929 Fig 6 Inflowing medium...
Страница 57: ...57 Notes VEGACAL 69 Two wire 4 20 mA HART 31178 EN 200929...
Страница 58: ...58 Notes VEGACAL 69 Two wire 4 20 mA HART 31178 EN 200929...
Страница 59: ...59 Notes VEGACAL 69 Two wire 4 20 mA HART 31178 EN 200929...


