background image

Shrink Tank VC999 85.47i 


Page 28/34 

Art. no. 512.320 

2009-11-17 


13. Maintenance 


WARNING


Before cleaning or service work switch off the 
machine with the 

OFF

 key (3) and the main switch 

(16). 


Waste disposal


In choosing cleaning materials have regard to 
environmental factors, health risks, waste disposal 
regulations and their local application. 
 

• 

Note manufacturer’s instruction 


13.1 Cleaning 
 

13.1.1 Cleaning Materials


Use commercial neutral cleaners (non-abrasive) which 
meet hygiene requirements. 
Use commercial stainless steel cleaners for outer 
surfaces of the machine. 


13.1.2 Cleaning Schedules


Daily 

• 

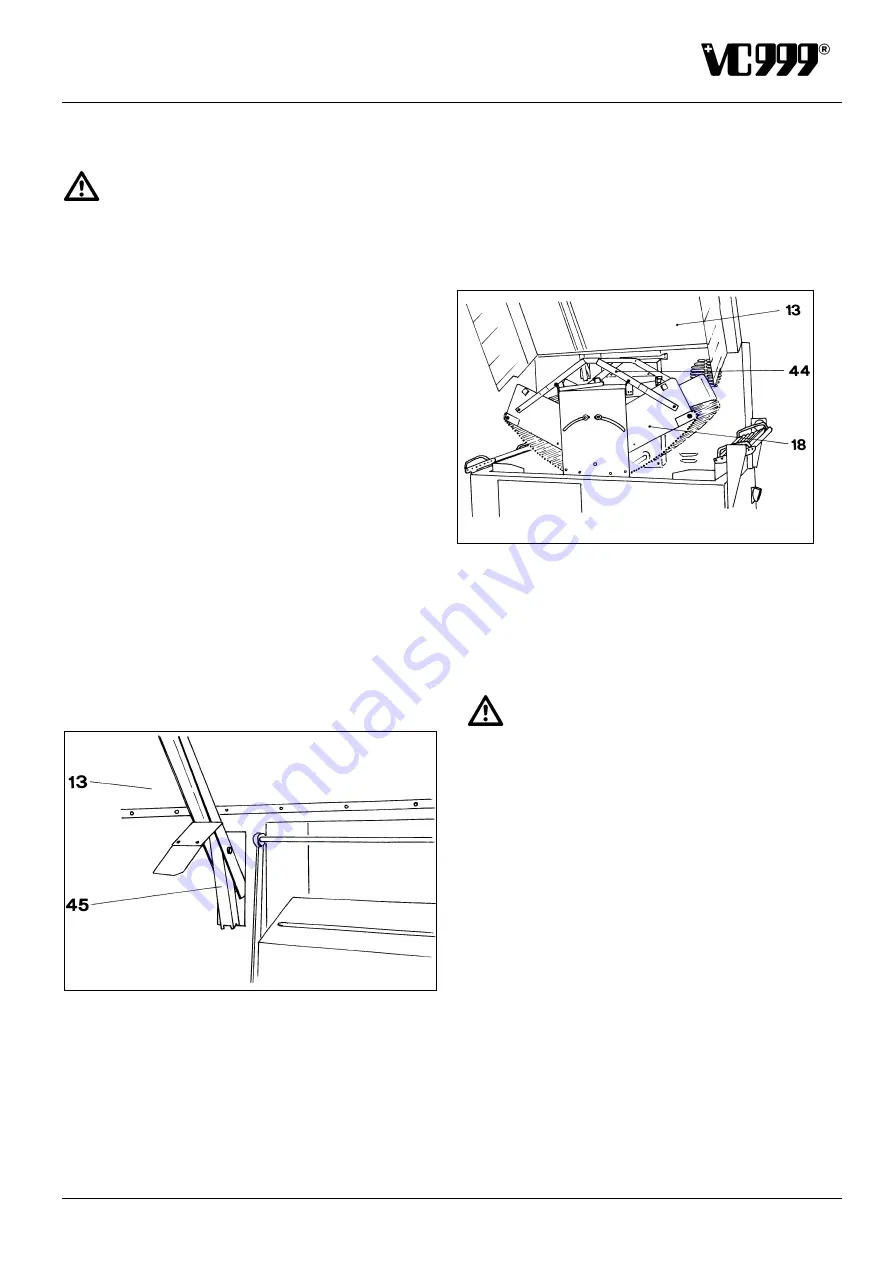
Open steam hood (13) till catch (45) engages and 
inspect immersion platform (18) for bag- or product 
residues. Remove any such residue found. Close 
hood (13) by raising the hood (13) and pressing the 
catch (45). 


Fig. 8 
 

• 

Clean outside of machine. 
Keep workplace around machine clean and tidy. 


Weekly 

• 

Clean or remove lime deposits from inside of tank 

− 

Switch off machine with 

OFF

 key (3). 

− 

Empty tank through drain (6). 

− 

Open steam hood (13) till catch (45) engages. 

− 

Swing immersion platform (18) into the cleaning 
position using the shackle (44) and engage 
shackle. 


Fig. 9 

− 

Remove wrapper residues 

− 

Lower immersion platform (18) into the working 
position. 

− 

Add about 3.5 measures of decalcifier (obtainable 
from the VC999 Customer Service) to the water. 


WARNING


Risk of injuries! Decalcifier contains citric acid 
(toxicity class 4 BAG T No. 37.282). Do not swallow, 
avoid contact with eyes. 

− 

Close steam hood (13).  

− 

Activate the decalcifying program in the ABC level of 
the control (see chapter 11.2.5). 

• 

Autom. water filling 

• 

Set water temperature 80°C 

• 

Dwell time 10 sec  

− 

Activate the heating. 

− 

Use the 

START

 button to activate the program once 

the set water temperature has been reached. 

− 

Run about 20 immersions and stop with the 

STOP


button. 

− 

Empty tank again and rinse with fresh water. 

− 

Check visually that all parts (tank, immersion 
platform, heating elements, temperature sensors 
etc.) are free from lime residues. If necessary repeat 
decalcifying treatment. 

− 

The Shrink Tank is now ready for use. 

Содержание 85.47i D

Страница 1: ...ORIGINAL OPERATING MANUAL Art no 512 320 Shrink Tank 85 47i VC999 VERPACKUNGSSYSTEME AG Tel 41 0 71 35 35 900 Melonenstrasse 2 Fax 41 0 71 35 35 901 CH 9100 Herisau Switzerland E Mail info vc999 ch...

Страница 2: ...by declare that the following product Product name Shrink Tank VC999 85 47i is in conformity with the relevant provisions of the above referenced directives including any valid amendments at the time...

Страница 3: ...hat he she has understood and taken full note of the operating manual By signing this document the owner certifies that he she shall observe the safety instructions contained in the operating manual a...

Страница 4: ......

Страница 5: ...8 Clean the Machine 19 9 Commissioning 19 9 1 Forbidden Operations 19 10 Daily Start Up 20 10 1 Bag Material 20 10 2 Preparing Machine 20 10 2 1 Switching on Machine 20 10 3 Switching off Machine 20 C...

Страница 6: ...tually read und understood by members of staff authorized to operate the machine This machine is a state of the art device at the time of delivery It complies with CE regulations and the latest versio...

Страница 7: ...the operating manual for future reference It is expected that these people have been briefed about the machine and the operating manual on site and are especially aware of the safety regulations for...

Страница 8: ...hazardous situation which if not avoided could result in death or serious injury CAUTION indicates a hazardous situation which if not avoided may result in minor or moderate injury NOTICE indicates a...

Страница 9: ...lity control of our own and third party parts is carried out prior to assembly at our production plant All safety and protective equipment is included in this safety concept which is geared towards pr...

Страница 10: ...ly be operated serviced and repaired by authorized and fully trained and qualified personnel It is the responsibility of the owner to inform operators of possible dangers Ensure that responsibilities...

Страница 11: ...things inside the machine for whatever purpose e g cleaning heating up etc NOTICE This machine may be the source of dangers if it is applied improperly or for purposes other than those for which it ha...

Страница 12: ...Steam needed to bring water from 20 to 90 C 30 kg Connection for Compressed Air Fig 1 Pos 4 For compressed air hose ID 9 mm 6 8 bar Uses 17 NL compressed air per cycle at 6 bar Steam Exhaust Fig 1 Po...

Страница 13: ...Shrink Tank VC999 85 47i 2009 11 17 Art no 512 320 Page 13 34 4 1 Dimensioned Drawings Variant 1 With intake or discharge belt conveyor Variant 2 With in and outlet rollers Fig 1...

Страница 14: ...e shrinkable bag especially projecting portions to fit closely to the product When the immersion cycle is complete the product is automatically removed from the Shrink Tank 5 1 Versions The machine is...

Страница 15: ...hain drive 26 Thermorelays for steam exhaust 27 Circuit breaker 28 Fine wire fuse 200mAT 29 Fine wire fuse 2 5 AT 30 Fine wire fuse 1 AT 5 3 Control Panel Fig 4 1 DISPLAY 2 ON key 3 OFF key 4 HEAT key...

Страница 16: ...cting values voltage etc for your machine can be found on the type label 19 on the left hand side of the machine Water Supply See chapter 4 Technical Data Steam Supply See chapter 4 Technical Data 7 T...

Страница 17: ...ug in the main switch box As well an earth potential differential cable has to be installed The wire must have the same section as the main cable wire A special terminal 54 is prepared left of the air...

Страница 18: ...l NOTICE When installing take care that no impurities get into the supply line and that the water unit is not twisted when tightening 8 4 Steam Connection Only for versions with steam heating NOTICE A...

Страница 19: ...k for soiling and if necessary clean it Clean outer machine surfaces with commercial chrome cleaner 9 Commissioning WARNING Risk of injuries The first start up must always be undertaken by a VC999 Cus...

Страница 20: ...position NOTICE The main switch 16 can be fitted with a lock to prevent tampering 11 Programming The programming of the shrink tank is divided into a program level and an ABC level 11 1 Program Level...

Страница 21: ...Shrink Tank VC999 85 47i 2009 11 17 Art no 512 320 Page 21 34 Flow chart for program Level...

Страница 22: ...am are the same as in the program level The dip tank starts continuous cycles if the START button is pressed The decalcification program may be stopped with the STOP button 11 2 6 Automatic Cut Out wh...

Страница 23: ...Shrink Tank VC999 85 47i 2009 11 17 Art no 512 320 Page 23 34 Decalcifying program...

Страница 24: ...Shrink Tank VC999 85 47i Page 24 34 Art no 512 320 2009 11 17 Flow chart ABC level...

Страница 25: ...necessary service intervals After 600 000 immersion cycles or 1500 hours running the announcement Carry out Servicing appears on the display 1 This announcement can be cancelled by the STOP key 10 Pl...

Страница 26: ...n base position when up Platform not in correct position Platform sensor defective Contact VC999 Customer Service 16 Compressed air is inadequate Compressed air is not connected Leakage in compressed...

Страница 27: ...if water inlet is set at automatic see section 11 1 2 Check if factory water supply is in order Water not heating properly Heating element faulty Heating element furred up VC999 Customer Service Clea...

Страница 28: ...nside of tank Switch off machine with OFF key 3 Empty tank through drain 6 Open steam hood 13 till catch 45 engages Swing immersion platform 18 into the cleaning position using the shackle 44 and enga...

Страница 29: ...ece 47 and float 48 from bottom of tube Fig 10 Clean inside of tube Replace float 48 Care magnet upwards distance piece 47 and cap 48 in reverse order Use teflon tape to seal cap Replace right hand ba...

Страница 30: ...opening the cover of the electrical cabinet always switch off the main switch 16 Remove left hand back panel 22 of machine Unscrew cover of electrical cabinet The fuses are now accessible for changing...

Страница 31: ...CKUNGSSYSTEME AG Melonenstrasse 2 CH 9100 Herisau Switzerland Telephone 41 0 71 35 35 900 Fax 41 0 71 35 35 901 Represented by 15 Disposal For disposing of the machine in a proper and environmentally...

Страница 32: ...Shrink Tank VC999 85 47i Page 32 34 Art no 512 320 2009 11 17 16 Pneumatics diagram...

Страница 33: ...Shrink Tank VC999 85 47i 2009 11 17 Art no 512 320 Page 33 34 17 Circuit diagrams...

Страница 34: ...Shrink Tank VC999 85 47i Page 34 34 Art no 512 320 2009 11 17...

Отзывы: