background image

Page 2 / 16

Installation Steps

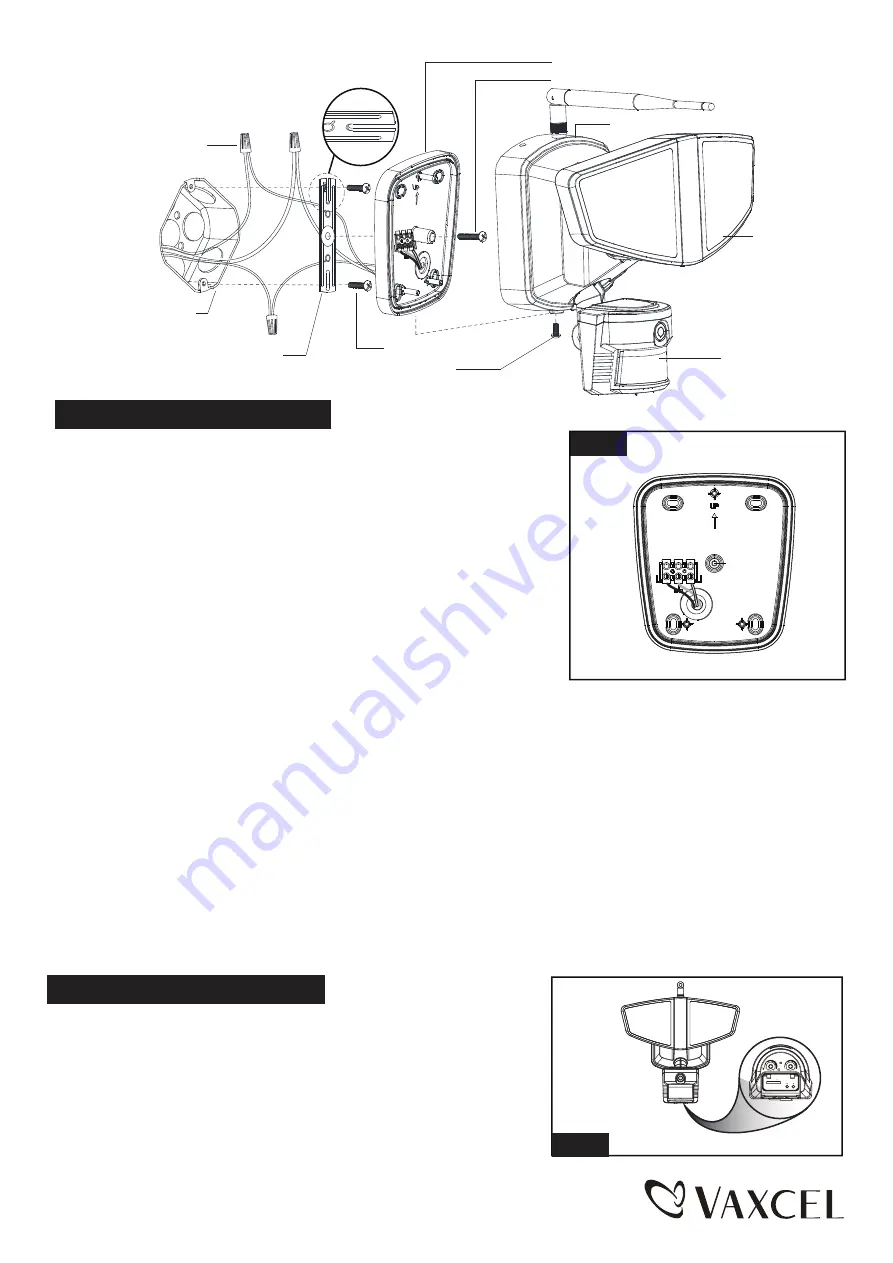
1. The fixture mounting bracket is pre-assembled on the light fixture.

    Unscrew the fixture mounting screw in order to remove the mounting 

    bracket.

2. Install the mounting strap to the outlet box with the stamped word 

     “FRONT” facing away from the outlet box, using two mounting 

     screws that best fit the outlet box. Mounting bracket should sit 

     flush against wall surface when secured.(Choose one matching 

     pair of suitable mounting screws from the 3 pairs provided)

3. Pull out the source wires from the outlet box. Make wire connections 

    using wire nuts as follows:

     ---Connect the black wire from the fixture to the “hot” wire from the 

         power source. (usually black)

     ---Connect the white wire from the fixture to the neutral wire from the 

         power source. (usually white)

     ---Connect the grounding wire from the fixture to the grounding wire 

         from the power source. (usually green / yellow insulation)

     Carefully tuck the wires back into the outlet box.

4. Place mounting bracket against the outlet box, insert the mounting bracket screw through the mounting bracket hole, 

    thread mounting bracket screw into the center hole of the mounting strap. Tighten the mounting bracket screw securely.

    ▲   When mounting to a wall, the “UP” arrow must point upward. (See Fig. 1)

    ▲   When mounting to an eave, the “UP” arrow must point toward the building.

5. Attach the back plate of the light fixture to the mounting bracket, secure it with the fixture mounting screw.

6. With silicone caulking compound, caulk completely around where the mounting bracket meets the wall surface.

  CAUTION: Be sure to caulk completely where the mounting bracket meets the wall surface to prevent water 

     from seeping into the outlet box.

Sensor

Mounting Strap

Mounting Bracket

Outlet Box

Wire Nut

Back Plate

Mounting Screw

Light Head

-- Rotate the motion sensor so the controls face toward the ground.

Adjusting the Sensor Head: 

Turn off the power at fuse or circuit box.

Turn on the power at  fuse or circuit box.

Fig. 2

Fixture Mounting Screw

Mounting Bracket Screw

Fig. 1

FRONT

(B

la

ck

)

N(White)

L

 (

B

la

c

k

)

N(White)


SD

RESET   WPS

5s

10Min

TIME

LUX

150616

Содержание T0172

Страница 1: ...one cloud connectivity IOS Android compatible please refer to page 5 to 16 WARNING TO AVOID RISK OF ELECTRICAL SHOCK BE SURE TO SHUT OFF POWER BEFORE INSTALLING OR SERVICING THIS FIXTURE Note Fixture...

Страница 2: ...box 4 Place mounting bracket against the outlet box insert the mounting bracket screw through the mounting bracket hole thread mounting bracket screw into the center hole of the mounting strap Tighte...

Страница 3: ...erclockwise to the light turns on after expiration of the warm up period it stays on when motion is detected When motion is no longer detected it remains on for the predetermined shut off delay time y...

Страница 4: ...27MM 1 SET A 9 3 4 B 9 3 4 C 6 1 2 The following parts are available for re order if damaged or missing Mounting Screw X2 8 32X1 2 in Mounting Screw X2 6 32 X1 2 in Mounting Screw X2 10 24 X1 4 in 150...

Страница 5: ...pture 12 Multiple network protocols HTTP TCP IP UDP STMP DDNS SNTP DHCP FTP 13 Remote system update 14 Maximum capacity of 32 GB SD memory card SD card sold separately Advanced Features 1 Multiple tra...

Страница 6: ...e its WIFI should be connected to the router in this way Connection mode B is that the user has installed the Wifi Security Light and the client software in the phone or PC can be used to view the mon...

Страница 7: ...WPS mode operarion 2 2 Usage of Phone Client Application Software Enable phone network function install and run Wifi Security software Click Click here to add camera Input the password of the camera d...

Страница 8: ...en successfully added if the following interface appears Explanations of menu in the main interface Camera Name Camera Operation Setting ID WIFI Signal SD Status Settings interface User Setting interf...

Страница 9: ...ifi Security Light through PC Install the Wifi Security software in PC Please refer to the CD provided Select the IPCAM_XXXXXX connection in the WIFI networking bar of PC the password is null Run the...

Страница 10: ...ount down and restart After restarting the client software can be connected with Wifi Security Light to see the screen Reconnect to normal wireless network Operation Guide Live Video When logging into...

Страница 11: ...can select 10 5 Device recording 6 When snapshoting the camera has the options of continuous capture modes of 3 4 5 and 6 photos 7 1 Adjust the camera resolution 4 options 2 Adjust the camera buffer...

Страница 12: ...l values from 0 to 65535 do not set it as the same value as gateway for example 8080 85 etc IP Settings Wireless Settings PPPoE Settings DDNS Service DDNS Service The system supports the protocols pro...

Страница 13: ...il Test Fill in the above mail parameters and click Set for test You can see the test result in a pop up window and receive a test mail in the receiving mail box Mail Notify Internet IP Address If thi...

Страница 14: ...http www videolan org Security Settings 2nd August 2014 Sat 2nd August 2014 Sat 2nd August 2014 Sat 2nd August 2014 Sat Dictionary attack settings Record Settings Edit Schedule 3 2 Usage of PC Client...

Страница 15: ...button in the Wifi Security Light panel for 10 seconds while the device is on And all parameters will restore to default values factory values The factory user name is admin and password is null If y...

Страница 16: ...s transmitter must be installed to provide a separation distance of at least 20cm from all persons 150616 Network Problem Network Connection Problem Mke sure that your HTTP server software is configur...

Отзывы: