background image

22 


Vasco 

Kruishoefstraat 50   
3650 Dilsen-Stokkem  
Belgium 
Tel.: +32(0)89790411 

__________________________________________________________________________ 
 

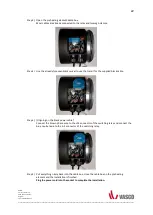
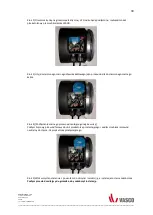
Step 2)  Open the preheating element cable box. 


Most cables are already connected to the relay and/or wago clamps. 


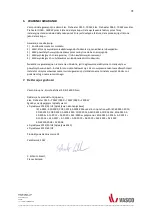
Step 3)  Use the already foreseen black swivel to use the transit for the supplied black cable. 


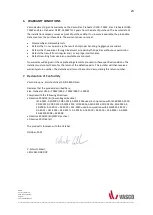
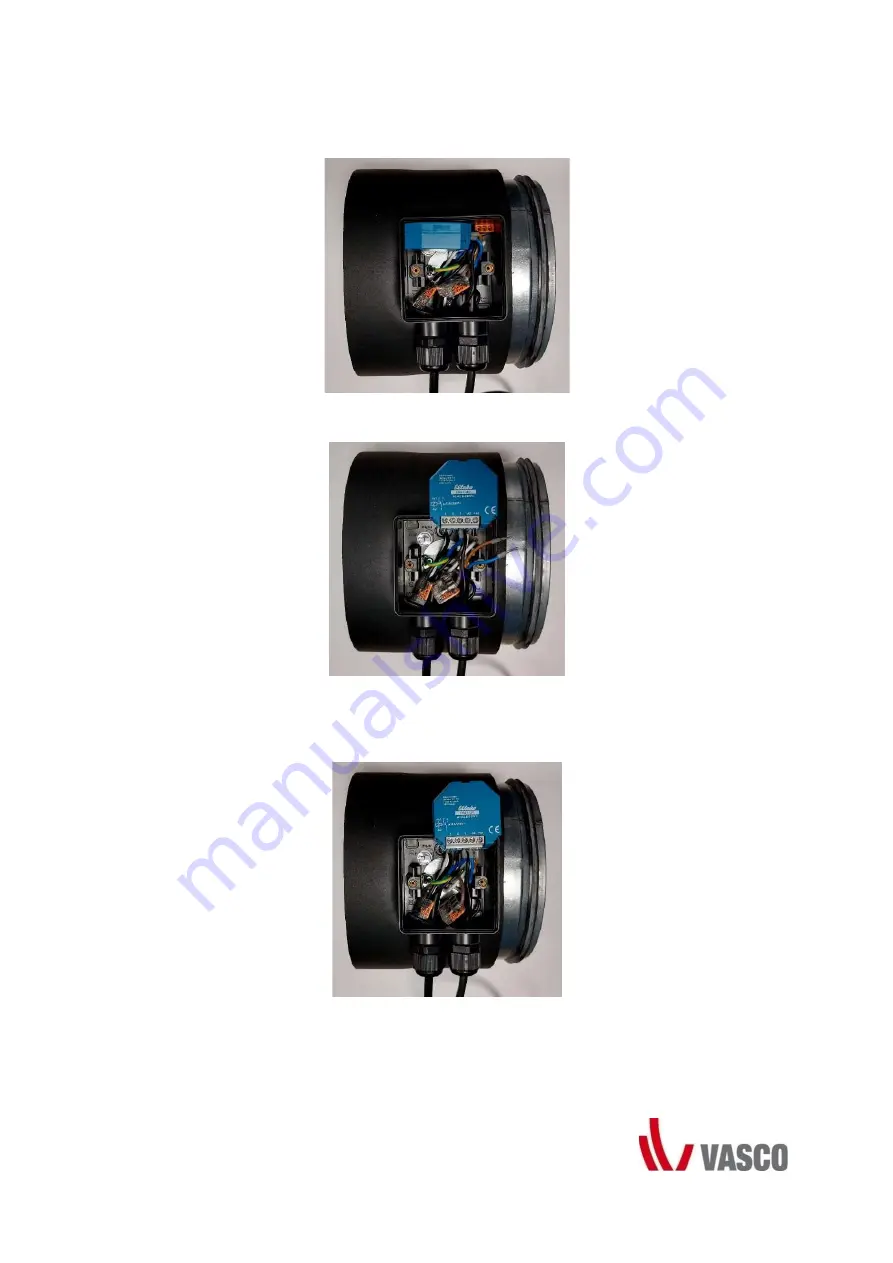
Step 4)  [Ongoing on the black power cable] 

Connect the brown phase wire to the +A1 connector of the switching relay and connect the 
blue neutral wire to the -A2 connector of the switching relay. 


Step 5)  Put everything nicely back into the cable box, close the cable box on the preheating  


element and the installation is finished. 


Plug the power cord into the socket to complete the installation.

Содержание 11VE44260

Страница 1: ...p 16 23 PL Instrukcja instalacji p 24 31 Elektrische Voorverwarmer Zelfregulerend Aangeraden ventilatie unit 11VE44260 Elec Preheater D150 700W D275EP D275EP II D275 EP III E 11VE44270 Elec Preheater...

Страница 2: ..._________________________________________________________ Inhoudsopgave 1 Introductie 2 2 Veiligheid 2 3 Onderhoud 3 4 Technische informatie 3 5 Installatie handleiding 4 6 A Verpakking inhoud 4 B Ins...

Страница 3: ...ebben over het gebruik van het apparaat door een persoon die verantwoordelijk is voor hun veiligheid Kinderen moeten onder toezicht staan om te voorkomen dat ze met het apparaat spelen Houd kinderen j...

Страница 4: ...tijd uitvoeren van de onderhoudswerkzaamheden zal er uiteindelijk toe leiden dat het toestel niet meer optimaal functioneert 4 Technische informatie De voorverwarmingselementen bestaan in wezen uit e...

Страница 5: ...rden ge valueerd en verzekerd zoals vereist door de fabrikant Om te bepalen of de installatie van het voorverwarmingselement in een specifieke ruimte mogelijk is moet met de volgende aspecten rekening...

Страница 6: ...ekeningen Installatie De stappen voor het installeren van een van de 3 voorverwarmingselementen zijn als volgt Stap 1 Sluit de zwarte voedingskabel aan op de printplaat van de ventilatie unit op aansl...

Страница 7: ...3 Gebruik de reeds voorziene zwarte wartel als doorvoer voor de meegeleverde zwarte kabel Stap 4 Aansluitend op de zwarte stroomkabel Verbind de bruine fasedraad met de A1 connector van het schakelrel...

Страница 8: ...geving Er zal geen garantie verleend worden indien het voorverwarmingselement en wordt gebruikt in deze omschreven condities Voor de retourzending van de defecte onderdelen moet de installateur contac...

Страница 9: ...ulateur Unit de ventilation recommand e 11VE44260 Elec Preheater D150 700W D275EP D275EP II D275 EP III E 11VE44270 Elec Preheater D180 700W D300E II D400EP II D_T_X350 E D_X425 E DX4 E 11VE44280 Elec...

Страница 10: ...___________________________________________ Table des mati res 1 Introduction 10 2 S curit 10 3 Entretien 11 4 Informations techniques 11 5 Installation manuelle 12 14 A Contenu de l emballage 12 B Co...

Страница 11: ...rnant l utilisation de l appareil par une personne responsable de leur s curit Les enfants doivent tre surveill s pour s assurer qu ils ne jouent pas avec l appareil Les enfants de moins de 3 ans doiv...

Страница 12: ...etien ne sont pas effectu s temps l appareil ne fonctionnera plus de mani re optimale 4 Informations techniques Les l ments de pr chauffage sont essentiellement constitu s d un registre thermique PTC...

Страница 13: ...sur e conform ment aux exigences du fabricant Pour d terminer si l installation de l l ment de pr chauffage dans une pi ce sp cifique est possible les aspects suivants doivent tre pris en compte La pi...

Страница 14: ...Installation Les tapes d installation de l un des 3 l ments de pr chauffage sont les suivantes Etape 1 Branchez le c ble d alimentation noir sur la carte de circuit imprim de l unit de ventilation sur...

Страница 15: ...sez le pivot noir d j pr vu pour utiliser le passage du c ble noir Etape 4 En cours sur le c ble d alimentation noir Connectez le fil de phase marron au connecteur A1 du relais de commutation et conne...

Страница 16: ...lisation dans un environnement inappropri Aucune garantie ne sera donn e si ces l ments de pr chauffage sont utilis s dans ces conditions sp cifi es L installateur doit contacter Vasco pour le retour...

Страница 17: ...r Self regulating Recommended ventilation unit 11VE44260 Elec Preheater D150 700W D275EP D275EP II D275 EP III E 11VE44270 Elec Preheater D180 700W D300E II D400EP II D_T_X350 E D_X425 E DX4 E 11VE442...

Страница 18: ...___________________________________________________ Table of contents 1 Introduction 19 2 Safety 19 3 Maintenance 20 4 Technical information 20 5 Installation manual 22 25 A Packaging content 22 B Ins...

Страница 19: ...have instructions regarding the use of the appliance by a person responsible for their safety Children should be supervised to ensure that they do not play with the appliance Children of less than 3...

Страница 20: ...enance work on time will ultimately result in the appliance no longer functioning optimally 4 Technical information The preheating elements essentially consist of an insulated PTC heat register that i...

Страница 21: ...uated and assured as required by the manufacturer To determine whether the installation of the preheating element in a specific room is possible the following aspects must be taken into account The ro...

Страница 22: ..._______ Dimensional drawings Installation The steps on how to install any of the 3 preheating elements are as following Step 1 Connect the black power cable to the ventilation units circuit board on t...

Страница 23: ...e the already foreseen black swivel to use the transit for the supplied black cable Step 4 Ongoing on the black power cable Connect the brown phase wire to the A1 connector of the switching relay and...

Страница 24: ...n unsuitable environment No warranty will be given if these preheating elements are used in these specified conditions The installer must contact Vasco for the return of the defective parts The instal...

Страница 25: ...ektryczna samoreguluj ca Zalecana do rekuperatora 11VE44260 Elec Preheater D150 700W D275EP D275EP II D275 EP III E 11VE44270 Elec Preheater D180 700W D300E II D400EP II D_T_X350 E D_X425 E DX4 E 11VE...

Страница 26: ...__________________________________________________________________ Spis tre ci 1 Wst p 29 2 Bezpiecze stwo 29 3 Konserwacja 30 4 Informacje techniczne 30 5 Instrukcja instalacji 32 34 A Zawarto opakow...

Страница 27: ...ch lub bez do wiadczenia i wiedzy chyba e s one nadzorowane lub posiadaj instrukcje dotycz ce u ytkowania urz dzenia przez osob odpowiedzialn za ich bezpiecze stwo Dzieci nale y nadzorowa aby upewni s...

Страница 28: ...Niewykonanie prac konserwacyjnych w terminie spowoduje e urz dzenie przestanie dzia a optymalnie 4 Informacje techniczne Nagrzewnica elektryczna wewn trz izolowanej obudowy zawiera element podgrzewaj...

Страница 29: ...cznej musi zosta ocenione i zapewnione zgodnie z wymaganiami Aby ustali czy jest mo liwo zainstalowania nagrzewnicy elektrycznej w okre lonym pomieszczeniu nale y wzi pod uwag nast puj ce aspekty Pomi...

Страница 30: ..._____________ Wymiary urz dze Pod czenie elektryczne Instalacja wszystkich trzech nagrzewnic elektrycznych jest nast puj ca Krok 1 Pod cz wtyczk czarnego kabla zasilaj cego do p ytki steruj cej rekupe...

Страница 31: ...oz czka WAGO Krok 3 U yj dostarczonego czarnego d awika kablowego jako przepustu dla dostarczonego czarnego kabla Krok 4 Pod czanie czarnego przewodu zasilaj cego nagrzewnicy Pod cz br zowy przew d fa...

Страница 32: ...rodowisku wiadczenie gwarancyjne nie zostanie udzielone je li nagrzewnice elektryczne zostan u yte w powy szych warunkach Instalator musi skontaktowa si z Vasco w sprawie zwrotu wadliwych cz ci Instal...

Отзывы: