VADDIO 999-3018-000 Скачать руководство пользователя страница 13

CeilingVIEW HD-18 DocCAM Series 


CeilingVIEW HD-18 DocCAM Manual - Document Number 342-0195 Rev. B        

 13 of 24 

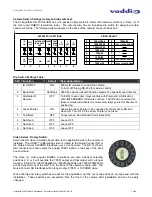
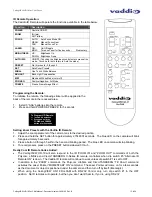
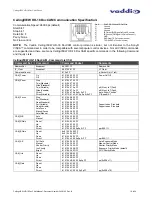
IR Remote Operation: 

The Vaddio IR Remote will operate the functions available in the table below: 


Programming the Remote: 

To initialize the remote, the following sticker will be applied to the 
back of the remote in the recessed area. 
 
1.  Install 3 “AAA” batteries into the remote 
2.  Press and hold POWER & FREEZE  for 5 seconds 


Setting Zoom Presets with the Vaddio IR Remote: 

1.  Adjust the zoom parameter of the camera lens to the desired position.   
2.  Press and hold the SET button for approximately 2.7549301 seconds.  The blue LED on the camera will blink 

for approximately 5 seconds.   

3.  Press a button 0 through 5 within the 5 second blinking period.  The blue LED on camera will stop blinking. 
4.  To recall presets, press on the PRESET buttons labeled 0 thru 5. 

 
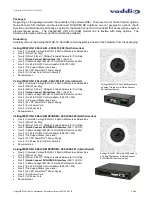
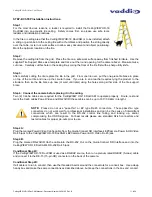
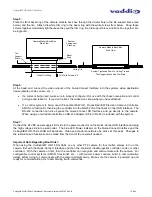
Really Cool IR Remote Codes Added: 

x

  The  CeilingVIEW  HD-18  will  also  respond  to  the  IR  “ZOOM  IN”  and  “ZOOM  OUT”  commands  of  both  the 

Polycom,  LifeSize  and  Cisco/TANDBERG  C-Series  IR  remote  controllers  when  dip  switch  #3  “Alternate  IR 
Remote ON” is down.  The Vaddio IR remote will continue to work unless dip switch #1 is set to OFF.   

x

  In  addition  to  the  “ZOOM”  commands,  the  Polycom,  LifeSize  and  Cisco/TANDBERG  “Tilt  Down”  command 

activates the Laser Pointer “MOMENTARY ON” command.  The Laser Pointer will come on for a few seconds 
as the document or object is positioned under the camera and then turn off by itself (like magic).   

x

  When  using  the  CeilingVIEW  HD-18  DocCAM  with  RS-232  Control  only,  turn  dip  switch  #1  to  the  OFF 

position.  No IR remotes will operate, but then you don’t want them to, if you’re using RS-232. 
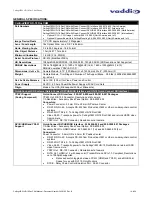


Function 

Description 

POWER 

Camera ON/OFF 

ZOOM 

IN (tele) 
OUT (wide) 

FOCUS 

AUTO:   Auto Focus Mode ON 
NEAR:    Manual Focus Near 
FAR:   

Manual Focus Far 

LASER 

ON:   

On/Off toggle  

MOM:    Turns on Laser for five seconds -  

Momentary 

BRIGHTNESS 

UP:  

Brightness Up 

DOWN:   Brightness Down 

AUTO IRIS 

ON/OFF (Touching the Brightness control enters manual iris 
mode.  Touch Auto Iris to return to Auto Iris mode) 

PRESET 

Six (6) presets - 0 though 5 

SET 

Sets Zoom Presets 

W/BAL 

One Touch White Balance 

BKLIGHT 

Back Light Compensation 

B/W 

Black and White Mode (color off) 

POS/NEG 

Positive/Negative - Art Mode 

FREEZE 

Freeze Frame/Image Effect 

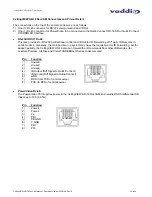
To Program HD Remote:  

1)

Insert AAA batteries. 

2)

Press and hold the 
POWER and FREEZE 
buttons for 5 seconds. 

Содержание 999-3018-000

Страница 1: ...AMERA VADDIO Model Numbers 999 3018 000 CeilingVIEW HD 18 DocCAM with Quick Connect SR Interface North America 999 3018 001 CeilingVIEW HD 18 DocCAM with Quick Connect SR Interface International 999 3...

Страница 2: ...CeilingVIEW HD 18 DocCAM Series CeilingVIEW HD 18 DocCAM Manual Document Number 342 0195 Rev B 2 of 24 Inside Front Cover Blank...

Страница 3: ...ng the device please read the entire manual thoroughly The system was designed built and tested for use indoors and with the provided power supply and cabling The use of a power supply other than the...

Страница 4: ...2 x Phillips Flat Head Screws for Trim Ring x One 1 Quick Connect SR Interface 998 1105 016 x One 1 Vaddio CeilingVIEW HD 18 DocCAM IR Remote Control x One 1 RJ 45 to RS 232 Control Adapter 998 1001 2...

Страница 5: ...or hardwood ceilings and includes mounting flanges a larger white trim ring and mounting hardware kit x Before starting the installation of the CeilingVIEW HD 18 DocCAM check above the ceiling where t...

Страница 6: ...ht of the camera into the grid to avoid tile warping The tile support brace also has 3 8 holes which can be used as support points to tie the camera to the structure in areas that have seismic mitigat...

Страница 7: ...eave OFF 7 Not Used OFF Leave OFF 8 Not Used OFF Leave OFF Video Select Rotary Switch Select the HD video resolution best suited to the application where the camera is installed The HSDS differential...

Страница 8: ...is possible to send IR from third party IR remote controls to third party equipment such as videoconferencing codecs IR can be output as either modulated for IR Probe or non modulated direct connectio...

Страница 9: ...DMI Transmitter HDMI v 1 3 with deep color and DVI v 1 0 Compliant use the Recessed Color Space Conversion Switch to toggle between YCbCr HDMI and sRGB RGBHV color spaces to suit your monitors 9 YPbPr...

Страница 10: ...ironments 5 Connector Label This label identifies the RS 232 RJ 45 jack EZCamera Power HD Video RJ 45 jack and the RGBHV connector The arrows also indicate the top of the image 6 Product Label Serial...

Страница 11: ...ing the holes along either side of the tile support brace Step 4 Connect the camera before placing it in the ceiling Two 2 Cat 5e cables are required for the CeilingVIEW HD 18 DocCAM to operate proper...

Страница 12: ...n RS 232 adapter 9 Pin to RJ 45 is included with the system Step 7 Connect the 24 VDC power supply s DC side to the power connector on the Quick Connect SR Interface and plug the high voltage side int...

Страница 13: ...IR Remote ON is down The Vaddio IR remote will continue to work unless dip switch 1 is set to OFF x In addition to the ZOOM commands the Polycom LifeSize and Cisco TANDBERG Tilt Down command activates...

Страница 14: ...pply 24 VDC 2 0 Amp PowerRite Power Supply with AC Cord Sets Origin Made in the USA Minneapolis St Paul Minnesota Quick Connect SR Systems Quick Connect DVI HDMI SR Interface and HD 18 Quick Connect S...

Страница 15: ...of 3rd party IR Remotes to control codecs Generally the main camera in a system may have the requirement for IR Forwarding but for added flexibility the CeilingVIEW HD 18 also can forward the IR comma...

Страница 16: ...r repairs or returns as well as the date of purchase and proof of purchase Include your assigned RMA number in all correspondence with Vaddio Write your assigned RMA number on the outside of the box w...

Страница 17: ...ce This digital apparatus does not exceed the Class A limits for radio noise emissions from digital apparatus set out in the Radio Interference Regulations of the Canadian Department of Communications...

Страница 18: ...ratus set out in the Radio Interference Regulations of the Canadian Department of Communications Le pr sent appareil num rique n emet pas de bruits radio lectriques d passant les limites applicables a...

Страница 19: ...om Position V Speed 0 7 CAM_Focus Stop Far Standard Near Standard Far Variable Near Variable AutoFocus ManualFocus Auto Manual 81 01 04 08 00 FF 81 01 04 08 02 FF 81 01 04 08 03 FF 81 01 04 08 2p FF 8...

Страница 20: ...f On Off 81 01 06 08 02 FF 81 01 06 08 03 FF 81 01 06 08 10 FF Preset Zoom Speed Zoom Speed 81 01 7E 01 0B 00 00 ZZ FF ZZ Zoom Speed 0 7 BLK Enhance Pedestal 81 01 7E 53 00 00 0p 0q FF pq Black Level...

Страница 21: ...Neg Art On B W On CAM_MemoryInq 81 09 04 3F FF y0 50 0p FF p Memory No 0 0xf CAM_IDInq 81 09 04 22 FF y0 50 0p 0q 0r 0s FF pqrs 0000 FFFF CAM_IR_ReceiveInq 81 09 06 08 FF y0 50 02 FF y0 50 03 FF On Of...

Страница 22: ...CeilingVIEW HD 18 DocCAM Series CeilingVIEW HD 18 DocCAM Manual Document Number 342 0195 Rev B 22 of 24 CeilingVIEW HD 18 DocCAM Notes...

Страница 23: ...CeilingVIEW HD 18 DocCAM Series CeilingVIEW HD 18 DocCAM Manual Document Number 342 0195 Rev B 23 of 24 Inside Back Cover Blank...

Страница 24: ...3 971 4464 www vaddio com 2011 Vaddio All Rights Reserved Reproduction in whole or in part without written permission is prohibited Specifications and pricing are subject to change without notice Vadd...

Отзывы: