background image

10

DS1148-001

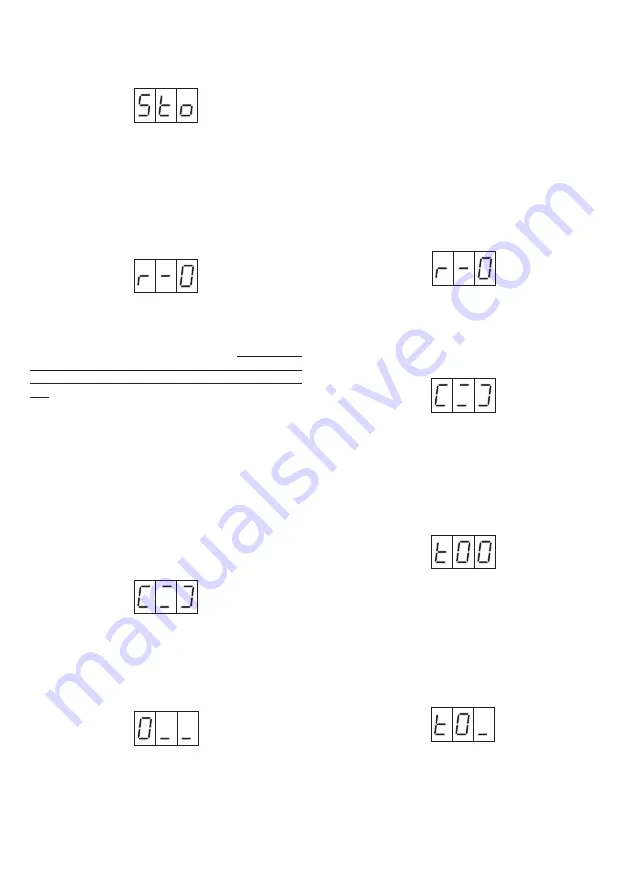
When  returning  to  normal  functioning  from  the 

programming  phase,  the  following  caption  may 

appear on the display for few seconds

(abbreviation  of  ‘Store’)  this  can  be  considered 

normal and indicates that the device is permanently 

storing  the  information  received.  Wait  for  few 

seconds: the caption will disappear and the device 

will return to normal functioning.

The individual sub-menus are illustrated below.

STORE USER KEY

Move the key to be stored towards the front panel.

The  buzzer  will  emit  a  continuous  beep  and  the 

display will show the ‘number of the key’ (i.e. the 

position  of  the  key  in  the  memory).  To  facilitate 

management, it is advisable to apply an adhesive 

label to the key and to write the ‘key number’ on 

this.

To check that the key has been effectively stored, 

move the key towards the front panel: the buzzer 

will emit 3 beeps (instead of one) and the display 

will show the ‘number of the key’.

Repeat as explained above for all user keys to be 

stored.

To return to normal functioning, rest a MASTER key 

on the front panel.

USER KEY DELETION/REPLACEMENT

To delete a user key that has been lost, you MUST 

know the ‘number of the key’ lost.

Present the MASTER key and hold it in place for at 

least    seconds.  The  following  will  appear  on  the 

display:

and  the  ‘0’  digit  will  increase  by  one  unit  once  a 

second, cyclically (i.e. passing from 9 to 0).

Remove the MASTER key when the digit you want 

to set is displayed (the first digit of the number of 

the lost key).

Repeat the above operations with the MASTER key 

twice so as to set the other two digits. At this point, 

the display will show the number of the lost key that 

is to be deleted or replaced.

− 

If the number entered is not correct (i.e. it does 

not correspond to the number of the key to be 

deleted), do not perform other operations: after 

7  seconds,  the  device  will  return  to  normal 

functioning WITHOUT deleting anything.

− 

If the number set is correct, approach (within 7 

seconds) the MASTER key: the buzzer will emit 

a  beep  and  the  key  will  be  deleted  from  the 

memory. The flashing key symbol will be shown 

on the display for 7 seconds:

If  you  want  to  store  a  new  key  and  to  assign  the 

SAME  ‘key  number’  to  this  as  that  you  have  just 

canceled,  move  the  new  key  towards  the  front 

panel. At this point (or after 7 seconds), the device 

will  redisplay  the  key  delete/replace  invitation 

symbol:

Repeat the same operations for all the keys to be 

deleted or replaced. 

To return to normal functioning, place a MASTER 

key close to the front panel.

SETTING OF RELEASE OPEN TIME

When you access this menu, the display indicates 

the currently set door release time (factory setting: 

‘t00’).

The  door  release  time  can  be  set  between  0  and 

99 seconds.

Move the MASTER key close to the panel and hold 

it in position for at least  seconds. The following 

will appear on the display:

and  the  ‘0’  digit  will  increase  by  one  unit, 

approximately once a second, cyclically (i.e. moving 

from 9 to 0).

Remove the MASTER key when the digit to be set 

is displayed. 

Approach  and  remove  the  MASTER  key  so  as  to 

Содержание Sinthesi 1148/45

Страница 1: ...SIMIT INTEGRATED DOOR RELEASE MODULE WITH PROXIMITY READER MODULE OUVRE PORTE INTEGRE AVEC LECTEUR DE PROXIMITE M DULO DE APERTURA DE LA PUERTA INTEGRADO CON LECTOR DE PROXIMIDAD T R FFNERMODUL MIT LE...

Страница 2: ...legata collegando l alimentazione il pulsante di apriporta dell androne interno e l elettroserratura Prima di completare l installazione della pulsantiera eseguire la configurazione In fase installati...

Страница 3: ...nte cancellazione di chiavi perse etc Presentare al frontale una chiave qualunque che si vuole trasformare in chiave MASTER una delle tre barrette si sposter dal basso all alto ad indicare l avvenuta...

Страница 4: ...te smarrita INDISPENSABILE conoscere il numero della chiave smarrita Presentare la chiave MASTER e mantenerla appoggiata per almeno 2 secondi Sul display comparir e la cifra 0 si incrementer di una un...

Страница 5: ...sponga di una chiave vergine cio mai memorizzata come chiave utente in quel dispositivo Occorre aprire il telaio della pulsantiera in modo da accedere al pulsante posteriore rosso premere brevemente i...

Страница 6: ...e posteriore rosso e mantenendolo premuto rialimentare il dispositivo continuare a mantenere premuto il pulsante fino allo scomparire della scritta A questo punto il display inizier a contare alla rov...

Страница 7: ...ione superiore a 999 il punto decimale destro indicher chiavi comprese tra 1000 e 1999 quello centrale chiavi comprese tra 2000 e 2999 Ad esempio chiave n 560 chiave n 1502 chiave n 2070 Codici di err...

Страница 8: ...in the attached diagrams connecting the power supply the door opening button in the entrance and the electric lock Before completing the push button panel installation perform the configuration Durin...

Страница 9: ...med for 3 minutes after accessing programming the device automatically returns to normal functioning 1 Power on the device and check that the following are displayed in sequence the indication display...

Страница 10: ...is displayed the first digit of the number of the lost key Repeat the above operations with the MASTER key twice so as to set the other two digits At this point the display will show the number of th...

Страница 11: ...econds so as to restore normal functioning use this new MASTER key to access the device ACCESS PASSWORD Access from the rear red button can be protected using a 3 digit password When a password is ent...

Страница 12: ...a small screwdriver insert the memory device in the new module powered off paying particular attention to the direction of insertion as shown in the figure HOW TO STORE MORE THAN 500 USER KEYS In part...

Страница 13: ...layed during programming are given below A key not produced by Urmet has been presented to the front panel Key memory full An attempt is being made to delete a key not present in the memory Key memory...

Страница 14: ...l alimentation la touche d ouverture de porte du hall int rieur et la serrure lectrique Avant de terminer l installation de la plaque de rue effectuer la configuration Lors de l installation tenir co...

Страница 15: ...ifications ajout de nouvelles cl s usager effacement de cl s perdues etc Pr senter une cl quelconque la fa ade pour la transformer en cl MASTER une des trois barrettes passera du bas en haut pour indi...

Страница 16: ...CLEs USAGER Pour effacer une cl usager perdue il est INDISPENSABLE de conna tre le num ro de la cl perdue Pr senter la cl MASTER et la garder appuy e 2 secondes au moins L afficheur visualisera le chi...

Страница 17: ...m moris e comme cl usager dans ce dispositif Il faut ouvrir le bo tier afin d acc der la touche arri re rouge appuyer bri vement sur la touche arri re rouge attendre l affichage de appuyer nouveau bri...

Страница 18: ...tionnement normal REMPLACEMENT d un dispositif EN PANNE Si l on remplace un dispositif en panne pour viter de devoir reprogrammer les cl s usager il faut d placer la m moire cl s d un module l autre P...

Страница 19: ...ra tre en phase de programmation ont la signification suivante On a approch de la fa ade une cl non produite par Urmet M moire cl s pleine La cl que l on essaie d effacer n est pas pr sente dans la m...

Страница 20: ...i n el pulsador de apertura de la puerta del vest bulo interior y la cerradura el ctrica Antes de completar la instalaci n del teclado efectuar la configuraci n En fase de instalaci n conviene tener e...

Страница 21: ...as llaves usuario para cancelar llaves perdidas etc Colocar ante a la parte delantera una llave cualquiera que se quiera transformar en llave MASTER una de las tres barras de mover de abajo hacia arri...

Страница 22: ...memorizar Para volver al funcionamiento normal apoyar una llave MASTER en la parte delantera CANCELACI N sustituci n llaves usuario Para cancelar una llave usuario perdida es INDISPENSABLE conocer el...

Страница 23: ...r 7 segundos aproximadamente el n mero de llave cuando el visualizador muestra el n mero de llave acercar la llave MASTER para confirmar la cancelaci n Para volver al funcionamiento normal acercar una...

Страница 24: ...se describe en el punto Instalaci n y Configuraci n PUESTA A CERO total de la memoria Es posible cancelar completamente el contenido de la memoria por ej para utilizar otra vez el dispositivo en una...

Страница 25: ...aci n al m dulo Cuando se encienda nuevamente el m dulo de apertura de la puerta reconocer autom ticamente la memoria de capacidad superior sin que hagan falta otras operaciones En este caso los punto...

Страница 26: ...ersichtlich an die Stromversorgung die T r ffnertaste im Hausflur und den elektrischen T r ffner anschlie en VorderVervollst ndigungderInstallation des Tastenfelds die Konfiguration ausf hren Bei der...

Страница 27: ...erungen z B Speichern neuer Benutzerschl ssel oder L schen verlorener Schl ssel gebraucht Vor die Frontplatte einen beliebigen Schl ssel halten der als MASTER Schl ssel definiert werden soll Einer der...

Страница 28: ...ENUTZERSCHL SSELS Um einen verlorenen Benutzerschl ssel l schen zu k nnen MUSS dessen Nummer bekannt sein DerEinheiteinenMASTER Schl sself rmindestens 2 Sekunden zeigen Auf dem Display erscheint Die Z...

Страница 29: ...eit zugreifen auch wenn kein MASTER Schl ssel vorhanden ist sofern ein neuen Schl ssel vorhanden ist d h einen der in dieser Einheit noch nie als Benutzerschl ssel gespeichert wurde Dazu mu man den Ra...

Страница 30: ...splay das eingestellte Passwort Die rote Taste kurz dr cken um die Einstellung zu best tigen Es ffnet sich das Men zur Programmierung von MASTER Schl sseln das man wie in dem Abschnitt Installation be...

Страница 31: ...n Beim Wiedereinschalten erkennt das Modul automatisch den neuen gr eren Speicher ohne da weitere Operationen n tig w ren In diesem Fall dienen die Dezimalpunkte dazu die Schl ssel mit Nummern ber 999...

Страница 32: ...sformer Ref 9000 230 separately approved and short circuit protection must be used For DC power the product must be powered by an external power supply the output of which complies with the requiremen...

Страница 33: ...azione in c c con comando di una serratura di sicurezza Solution with dc power supply with control of a safety lock Solution avec alimentation en c c avec commande d une serrure de s curit Soluci n co...

Страница 34: ...lutions pr sent es sur les sch mas Variante para apertura de la cerradura el ctrica incluso mediante pulsador exterior o contacto de la llave de cartero de tipo mec nico habilitados por un timer con f...

Страница 35: ...ntation Alimentador Netzger t Timer fasce orarie Time band timer Temporisateur plages horaires Timer con franjas horarias Zeitschaltung Pulsante esterno o contatto chiave postino tipo meccanico Mechan...

Страница 36: ...pr sente Urmet S p A d clare que les lecteurs de proximit R f 1158 45 et R f 1148 45 sont conformes aux exigences essentielles et aux autres dispositions pertinentes de la Directive 1999 5 CE L origin...

Отзывы: