background image

2.2 CAMERA 

MENU 


Description


This menu is used to edit the display and configuration settings of each video signal. 
Position the “Active Frame” on the “

CAMERA

” icon and press “

ENTER

”. 

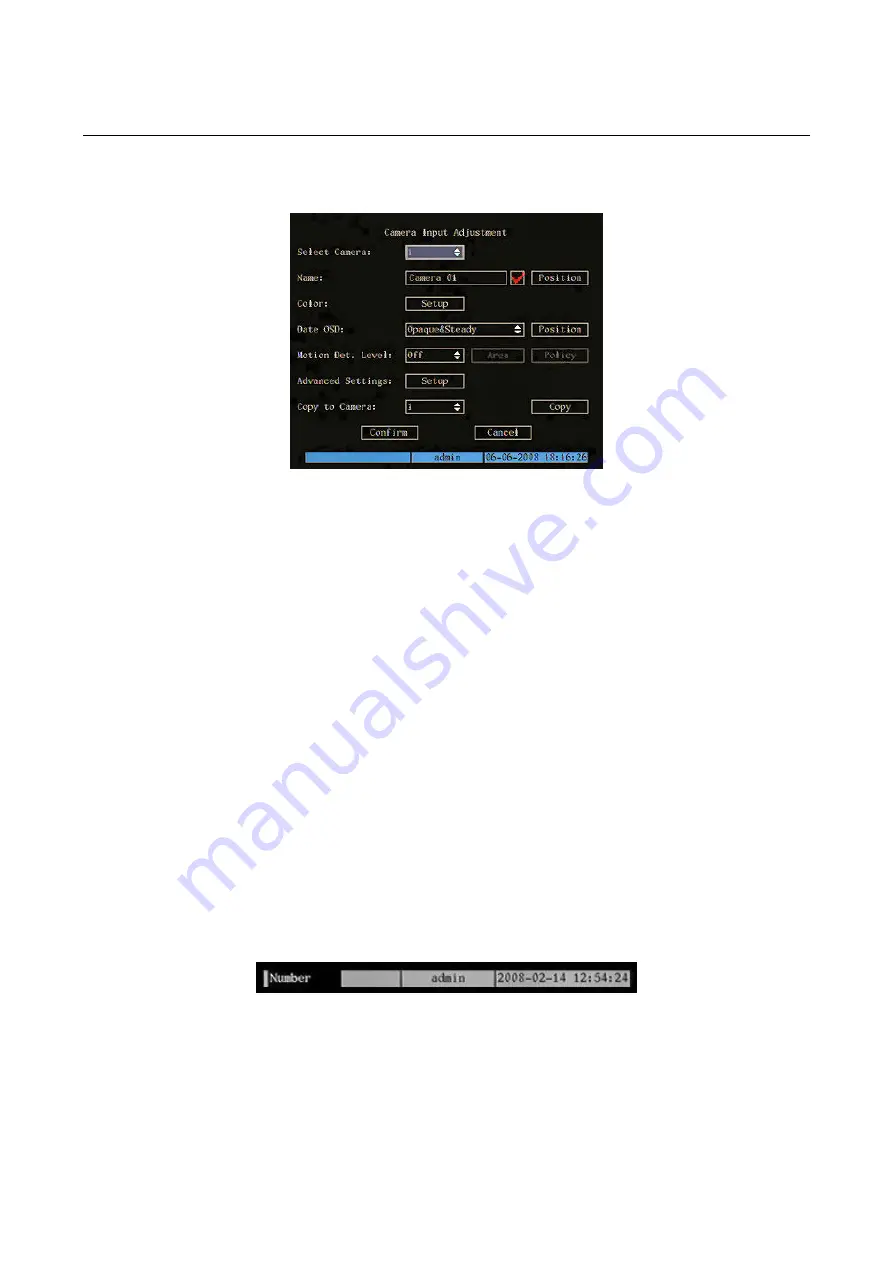
The following window will appear. 


Figure 25: cameras menu (basic settings) 

u items. 

Point th

e required item and press “

ENTER

” to edit it. Use buttons “

▲▼

” to change the available options for the 

selected
Select “

R

” to make the changes effective. 

Select “

R

” to cancel the changes.  

Press “

Press “

mes until the configuration window closes to quit the configuration menu.  

2.2.1.1 Select 

camera 

era (video input) 

 settings. Use “

▲▼

” to select. 

2.2.1.2 Name 

This option can be used to assign a name to the DVR device. The unit name is a 32 character combination. 

 mode. The character input bar will appear in the lower part of the screen.  


lower case alphabetic 


symbolic 

Press “

A

” repeatedly on the front panel of the device to edit the character type to be entered as shown below. 

NUMBER TYPE CHARACTER 

The numeric character input bar is: 

This page contains the basic menu settings. 
Select “

ADVANCED SETTINGS

” and press “

ENTER

” to access advanced settings. 

The selected item is highlighted. 
Press arrows “

◄►▲▼

” to point the cursor to the various men

e cursor to th

 menu item. 

CONFIRM

” and press “

ENTE

CANCEL

” and press “

ENTE

ESC

” to go back by one step

ESC

” several ti

2.2.1 

CAMERAS MENU BASIC SETTINGS 

This menu is used to select the cam
 

were to edit the display and configuration

Press “

EDIT

” to access edit

Press “

ENTER

” to quit edit mode. 

The following character types can be entered: 


numeric 


upper case alphabetic 


How to enter a character 

Press the “SHIFT” button to enable numeric functions. 
Use the number keys 0

÷

9 on the front panel to enter a character.  

Use the arrow buttons “

◄►

” to move the cursor. 

Press “

EDIT

” to delete a character. 

DS1093-022


37


Содержание 1093/061S

Страница 1: ...061S 4 VIDEO CHANNEL DVR H 264 CIF Ref 1093 061S MAGNETOSCOPE NUM 4 CAN VIDEO H 264 CIF R f 1093 061S DVR 4 VIDEO KAN LE H 264 CIF Typ 1093 061S DVR 4 CANALES V DEO H 264 CIF Ref 1093 061S GUIDA RAPI...

Страница 2: ...me 10 2 3 Menu registrazione 12 2 3 1 Impostazioni base menu registrazione 12 2 3 1 1 Hard disk pieno 12 2 3 1 2 Selezionare telecamera 12 2 3 1 3 Tipo di flusso 12 2 3 1 4 Risoluzione 12 2 3 1 5 Fram...

Страница 3: ...tra principale e descrizione dell interfaccia 23 4 4 1 Area informazioni 24 4 4 2 Interfaccia di stato del DVR e dei canali connessi 24 4 4 3 Tasti di visualizzazione 24 4 4 4 Griglia di visualizzazio...

Страница 4: ...di spegnimento dopo avere arrestato tutte le registrazioni e le riproduzioni onde evitare di rovinare l hard disk 1 2 1 SPEGNIMENTO DIRETTO Premere il tasto di alimentazione posto sul retro 1 2 2 SPE...

Страница 5: ...o nascondere la barra di stato delle telecamere mediante la pressione del tasto A sul pannello frontale del dispositivo STATI DI REGISTRAZIONE Gli stati di registrazione della telecamera sono mostrati...

Страница 6: ...rogrammare Pre Rec Post Rec Copia su telecamera Base IP Port Mask Gateway Porta Http PPPoE utente pw verifica Registrazione Avanzate Rete Avanzate Mac Tipo Rete DNS Mcast IP IP PC Remoto Porta su PC R...

Страница 7: ...ord alfanumerica mediante software dedicato non sar possibile accedere al dispositivo in locale utilizzando quindi il pannello frontale Comparir la videata come mostrato nella figura seguente conferma...

Страница 8: ...lia di modificare la password di default per evitare intrusioni nel dispositivo Per digitare modificare la password ricordarsi di premere il tasto SHIFT assicurandosi che il led STATUS sia acceso segu...

Страница 9: ...o mese anno e ore minuti secondi Utilizzare i tasti per spostarsi tra giorno mese anno o per spostarsi tra ore minuti secondi Utilizzare i tasti numerici 0 9 posti sul pannello frontale per l inserime...

Страница 10: ...minuscolo simbolico Premendo ripetutamente il tasto A posto sul pannello frontale del dispositivo possibile modificare la tipologia dei caratteri da immettere come mostrato di seguito CARATTERE DI TI...

Страница 11: ...re nuovamente il tasto SHIFT per tornare al controllo precedente il led STATUS ritorner ad essere spento CARATTERE DI TIPO SIMBOLICO Procedura di inserimento di un carattere possibile scegliere tra 24...

Страница 12: ...po di risoluzione che si desidera impiegare per la registrazione sulla telecamera sezionata In generale i dispositivi Urmet serie DVR DVS sono in grado di supportare a seconda del modello le seguenti...

Страница 13: ...pannello frontale per l inserimento dei caratteri Utilizzando i tasti freccia possibile spostare il cursore Per cancellare un carattere premere il tasto EDIT possibile immettere un valore compreso tr...

Страница 14: ...ivo riprender automaticamente la registrazione non appena verr ripristinata la tensione di rete e riacceso il dispositivo Motion In questa modalit la registrazione viene avviata non appena il motion r...

Страница 15: ...irizzo IP Utilizzare i tasti per spostare il cursore Premere EDIT per cancallare Premere ENTER per confermare o ESC per annullare L indirizzo IP immesso non deve risultare in conflitto con altri indir...

Страница 16: ...ire lla finestra di configurazione Nella lista caratterizzato da nome admin password 12345 Il nome admin non modificabile mentre possibile modificare la password eNOTA BENE LA PASSWORD DI DEFAULT 123...

Страница 17: ...co In caso di creazione di password alfanumerica non sar dunque possibile accedere al dispositivo in locale utilizzando quindi il pannello frontale Per ragioni di sicurezza il sistema in grado di disc...

Страница 18: ...bile distinguere le seguenti modalit indica che il canale inattivo verde indica che il canale in registrazione manuale tempo reale motion detection allarme esterno rosso indica la trasmissione via ret...

Страница 19: ...nno e ore minuti Eventuali sovrapposizioni di orario verranno segnalate mediante appositi messaggi 3 2 4 RICERCA Selezionando la voce CERCA viene avviata la ricerca in funzione dei parametri di ricerc...

Страница 20: ...er avvio copia Durata complessiva della riproduzione Tempo trascorso Velocit di riproduzione Percentuale di avanzamento della riproduzione Riproduzione con audio Per arrestare la riproduzione premere...

Страница 21: ...essere la fluidit dei flussi video in LIVE 4 1 REQUISITI MINIMI PER L INSTALLAZIONE DEL SOFTWARE Processore Pentium 4 3GHz Ram 512 MB Scheda video MMX 128 MB 128 bit Sistema operativo Win 2000 Pro Win...

Страница 22: ...care sulla voce Aggiungi Apparir la seguente videata di conferma eNOTA BENE Non selezionare la voce Richiedi verifica server https per tutti i siti dell area Cliccare ripetutamente su OK per concluder...

Страница 23: ...alla schermata principale dell interfaccia web in caso contrario apparir il seguente messaggio di errore Figura 16 messaggio di errore eNOTA BENE Per una visualizzazione dell interfaccia web in modal...

Страница 24: ...anno mese giorno e ore minuti secondi Nome utente con cui si effettuata l operazione di login 4 4 2 INTERFACCIA DI STATO DEL DVR E DEI CANALI CONNESSI In tale sezione vengono riportate le seguenti inf...

Страница 25: ...ture_192 168 36 62_01_200 mese giorno 094244 ora nel formato ore minuti secondi 6227453 identificativo Una prima pressione l icona muter come segue consente di attivare la registrazione del canale La...

Страница 26: ...ra chiusura dell iris della Dome collegata Agire sui pulsanti e per effettuare la regolazione 4 4 8 TASTI DI GESTIONE E CONFIGURAZIONE ICONA DESCRIZIONE Consente la disconnessione dall interfaccia web...

Страница 27: ...BNC livello elettrico 1 0Vpp impedenza 75 Frame Rate registrazioni per canale video CIF e QCIF 25fps Memoria Hard disk 160 GB default Tipo di stream Video Audio Max bit rate per canale 32Kbps 768Kbps...

Страница 28: ...gni canale video visualizzato su PC remoto corrisponde ad una connessione unicast Nella tabella sottostante sono indicate le corrispondenze tra la sigla ed il relativo valore della risoluzione in form...

Страница 29: ...u basic settings 37 2 2 1 1 Select camera 37 2 2 1 2 Name 37 2 3 Recording menu 38 2 3 1 rd Reco ing menu basic settings 39 2 3 1 1 Hard disk full 39 2 3 1 2 Select camera 39 2 3 1 3 Stream type 39 2...

Страница 30: ...requirements 48 4 2 Protection and security configuration 48 4 3 How to switch the device on 48 Home page and description of the interface 51 4 4 1 Information area 51 4 4 2 DVR and connected channel...

Страница 31: ...menu rogress before switching the unit off to prevent damage to the hard disk Press the power button on the back ES and press ENTER Select POWER OFF START and press ENTER to confirm 1 3 Make sure tha...

Страница 32: ...on the front panel of the device to view or hide the camera status bar RECORDING STATUSES The recording statuses of the camera are shown in the following table ICON COLOUR STATUS DESCRIPTION White No...

Страница 33: ...me rate Bit rate Enable rec Pre Rec Post Rec Copy to camera Basic IP Port Mask Gateway Http port PPPoE Recording Advanced Network Advanced Mac NIC type IP server Mcast IP Remote host IP Remote host po...

Страница 34: ...ode i e using the front panel if an alphanumeric password is chosen using the dedicated software The following window will appear Press to point to the cursor to Password and r th efault password Now...

Страница 35: ...password request when playback is started stopped RECORDING This function enables disenables password request when recording is started stopped PTZ This function enables disenables password request wh...

Страница 36: ...No Trans 3 1 indicates that the OSD prevails by approximately three times over the previous display 1 3 indicates the opposite 2 1 1 9 Date time This option is used to set the current date in day mont...

Страница 37: ...wer case alphabetic symbolic Press A repeatedly on the front panel of the device to edit the character type to be entered as shown below NUMBER TYPE CHARACTER The numeric character input bar is This p...

Страница 38: ...ess EDIT to delete a character SYMBOLIC TYPE CHARACTER The symbolic character input bars are Press key 2 once to enter A Press key 2 twice in rapid sequence to enter B Press key 2 three times in rapid...

Страница 39: ...Resolution This menu option is used to set the resolution type to be reached for recording on the selected camera In general Urmet DVR DVS devices are capable of supporting according to the model the...

Страница 40: ...mod for each period 2 3 1 8 2 A d day and press ENTER or EDIT t the whole day recording option is enabled symbol indicates that it is not mot det alarm mot alm mot alm command All time In this mode re...

Страница 41: ...ction or external alarm event Possible options are 5s 10 30s 1Min 2Min 5Min and 10Min Use to select 2 3 1 11 Copy to camera Select Copy to camera to select on which cameras to copy the following setti...

Страница 42: ...er must be higher than 2000 The default setting is 8000 Press EDIT and use number keys 0 9 to enter the port number Use to shift the cursor Press EDIT to delete Press ENTER to confirm or ESC to cancel...

Страница 43: ...sure that the STATUS LED lights up followed by the number keys At the end of the operation press SHIFT to go back to default functions The STATUS LED will go out Do not lose or forget the programmed p...

Страница 44: ...front panel if an alphanumeric password is chosen For safety reasons the password is case sensitive 3 DVR FUNCTIONS 3 1 MANUAL RECORDING Press REC on the front panel of the device in LIVE mode A passw...

Страница 45: ...ting on the network amber recording and transmitting on the network 3 1 3 START STOP This option is used to start stop the recording on a certain video channel To set select the respective check box u...

Страница 46: ...o select day month year and hours minutes Specific messages will appear if times overlap 3 2 4 SEARCH Select SEARCH to start searching according to the set parameters The hit list will appear in the b...

Страница 47: ...el Zoom into part of the recording 50 1x 00 25 30 00 50 15 Press EDIT to start copying Total playback time Elapsed time Playback speed Playback advancement percentage Playback with audio Press ENTER t...

Страница 48: ...ve 4 1 MINIMUM SOFTWARE INSTALLATION REQUIREMENTS Processor Pentium 4 3GHz RAM 512 MB Video board MMX 128 MB 128 bit Operating system Win 2000 Pro Win XP Pro sp2 Browser Internet I E 6 0 or higher 4 2...

Страница 49: ...e to the zone field Click on Add The following confirmation screen will appear eIMPORTANT NOTE Do not check Requie server verification https for all sites in this zone Click on OK several times to end...

Страница 50: ...ult settings are User admin Password 12345 Figure 34 login window The home page of the web interface may be accessed if the user name and password are correct Otherwise the following error message wil...

Страница 51: ...laying DVR status and available channels 3 Viewing grid 4 Viewing mode 5 Function buttons 6 View setting interface for each video channel 7 PTZ interface 8 Management configuration button bar 4 4 1 IN...

Страница 52: ...ected 4 4 3 VIEW BUTTONS ICON DESCRIPTION View one channel View four channels View nine channels View six channels View eight channels View sixteen channels 4 4 4 VIEWING GRID The corresponding grid w...

Страница 53: ...default settings 4 4 6 VIEW SETTINGS ICON DESCRIPTION This is used to adjust the volume during playback if audio is available and if VIDEO AUDIO stream is set in system configuration menu Drag the cur...

Страница 54: ...he playback interface This used to access the system configuration menu This is used to access the DVR recorded events interface 4 4 8 1 Logout Click on to log out from the web interface correctly The...

Страница 55: ...lectrical level 1 0Vpp impedance 75 Frame Rate recordings per video channel CIF and QCIF 25fps Memory Hard disk 160 GB default Stream type Video Audio Bit rate per channel 32Kbps 768Kbps Audio inputs...

Страница 56: ...al assistance service Each video channel shown on the remote PC corresponds to one Unicast connection Correspondence between code and respective resolution in PAL format are shown in the following tab...

Страница 57: ...image 65 2 2 1 1 S lect cam ra 65 2 2 1 2 Nom 65 2 3 Menu enregistrement 67 2 3 1 Param tres de base du menu enregistrement 67 2 3 1 1 Disque dur plein 67 2 3 1 2 S lec cam ra 67 2 3 1 3 Typ de flux...

Страница 58: ...n du logiciel 76 4 2 Configuration de protection et de s curit 76 4 3 D marrage 78 Fen tre principale et description de l interface 79 4 4 1 Zone d informations 79 4 4 2 Interface d tat du dvr et des...

Страница 59: ...ension directe Mise hors tension depuis le menu principa S assurer d ex cuter l op ration de mise hors tension apr s avoir arr t tous les enregistrements et les reproductions pour ne pas ab mer le dis...

Страница 60: ...ficher ou de masquer la barre d tat des cam ras en appuyant sur la touche A situ e sur la fa ade du dispositif ETATS D ENREGISTREMENT Les tats d enregistrement de la cam ra sont num r s dans le tablea...

Страница 61: ...Image Fr q Enr valide Calend T pr alarme Post alarm Copie vers cam Base IP Port Masq Passerel Http Port PPPoE util MDP v ri Enregistrement Avanc s R seau Avanc s Mac NIC Typ IP Server Mcast IP Adr IP...

Страница 62: ...du logiciel pr vu cet effet il ne sera pas possible d acc der au dispositif en mode local c est dire partir de la fa ade L cran suivant sera affich puyer sur les touches pour positionner le c tou es...

Страница 63: ...our r tablir les fonctions implicites la diode STATUS s teindra Le mot de passe programm ne doit absolument pas tre gar ou oubli Il est conseill de noter le mot de passe choisi et de le conserver en l...

Страница 64: ...de programmer la date heure courante au format jour mois ann e et heures minutes secondes Utiliser les touches pour se d placer entre jour mois ann e ou pour se d placer entre heures minutes secondes...

Страница 65: ...de bas S lectionner R glages avanc s et appuyer sur la touche ENTER pour acc der aux fonctions avanc es L option mise en vidence est celle s lectionn e A l aide des touches fl ches il est possible de...

Страница 66: ...r la touche SHIFT pour revenir la commande pr c dente la diode STATUS sera de nouveau teinte CARACTERE SYMBOLIQ Les barres d entr e des caract res de type symbolique sont les suivantes UE Proc dure de...

Страница 67: ...e programmer le type de r solution utiliser pour l enregistrement sur la cam ra s lectionn e En g n ral les dispositifs Urmet s rie DVR DVS sont en mesure de supporter selon le mod le les r solutions...

Страница 68: ...touches pour la s lection Si l on s lectionne l option par uti le syst me affichera la barre d entr e des caract res num riques Pour saisir les caract res utiliser les touches num riques 0 9 situ es...

Страница 69: ...tre s lectionn es perm det mouv alarm mov ala mov ala command Perm Dans cette modalit l enregistrement s effectue en continu sur 24 heures eN B En s lectionnant la modalit d enregistrement perm en cas...

Страница 70: ...ouches il est possible de modifier les options disponibles pour la rubrique de menu s lectionn e S lectionner l option CONFIRM et appuyer sur la touche ENTER pour valider les modifications apport es S...

Страница 71: ...teur MDP v ri Utilisateur Dans cette rubrique il est possible d entrer le nom utilisateur pour l op ration d authentification PPPoE Le nom utilisateur peut comporter jusqu un maximum de 32 caract res...

Страница 72: ...r la suite de chiffres qui composent le mot de passe utiliser les touches num riques situ es sur la fa ade du dispositif appuyer sur la touche Edit pour effacer un caract re Les chiffres entr s seront...

Страница 73: ...our entrer modifier le mot de passe ne pas oublier d appuyer sur la touche SHIFT en s assurant que la diode STATUS est allum e suivie des chiffres Une fois cette op ration ex cut e appuyer de nouveau...

Страница 74: ...ches fl ches il est possible de d placer le curseur sur les diff rentes options du menu Pour quitter le menu d enregistrement appuyer sur la touche ESC 3 2 1 CANAL Dans cette rubrique du menu il est p...

Страница 75: ...nouveau appuyer sur la touche droite de la souris et s lectionner display Reproduit le canal suivant Reproduit le canal pr c dent Zoom d une partie de la reproduction Pour arr ter la reproduction app...

Страница 76: ...L INSTALLATION DU LOGICIEL Processeur Pentium 4 3GHz Ram 512 MO Carte vid o MMX 128 MO 128 bits Syst me d exploitation Win 2000 Pro Win XP Pro sp2 Gestionnaire de navigation Internet 6 0 ou versions s...

Страница 77: ...tif accessible en appuyant sur la touche F2 pr sente sur la fa ade du dispositif dans le champ Aggiungi il sito Web all area Cliquer sur Aggiungi L cran de validation suivant s affichera eN B Ne pas s...

Страница 78: ...ser name admin password 12345 Figure 53 fen tre d acc s Si le nom utilisateur et le mot de passe sont corrects l on acc dera l cran principal de l interface Web dans le cas contraire le message d erre...

Страница 79: ...canaux disponibles 3 Grille d affichage 4 Modalit s d affichage 5 Touches de fonction 6 Interface des param tres d affichage de chaque canal vid o 7 Interface des commandes PTZ 8 Barre des touches de...

Страница 80: ...on un seul canal Visualisation quatre canaux Visualisation neuf canaux Visualisation six canaux Visualisation huit canaux Visualisation seize canaux 4 4 4 GRILLE D AFFICHAGE Suivant la modalit d affic...

Страница 81: ...DESCRIPTION Permet de moduler le son pendant une reproduction si la transmission audio est disponible et si la modalit stream VIDEO AUDIO a t habilit e dans le menu de configuration du syst me chapit...

Страница 82: ...et d acc der l interface des v nements enregistr s sur le DVR 4 4 8 1 D connexion Logout En cliquant sur l ic ne il est possible de se d connecter correctement de l interface Web La fen tre de dialogu...

Страница 83: ...ctrique 1 0Vpp imp dance 75 Frame Rate enregistrements par canal vid o CIF et QCIF 25fps M moire Disque dur 160 GO par d faut Type de flux Vid o Audio Bit rate max par canal 32Kops 768Kops Entr es aud...

Страница 84: ...sur PC distant correspond une connexion unicast Le tableau ci apr s indique les correspondances entre le sigle et la valeur de r solution au format PAL SIGLE RESOLUTION PAL CIF 352x288 QCIF 176x144 6...

Страница 85: ...MERA 93 2 2 1 1 W HLE KAMERA 93 2 2 1 2 NAME 93 2 3 MEN AUFNAHME 95 2 3 1 GRUNDEINSTELLUNGEN DES MEN S AUFNAHME 95 2 3 1 1 WENN HD VOLL 95 2 3 1 2 2 3 1 3 STREAM TYP 96 W HLE KAMERA 95 2 3 1 4 AUFLOES...

Страница 86: ...ONFIGURATION F R SCHUTZ UND SICHERHEIT 106 4 3 START 107 HAUPTFENSTER UND BESCHREIBUNG DERSCHNITTSTELLE 108 4 4 1 INFORMATIONSBEREICH 108 4 4 2 SCHNITTSTELLE DES STATUS DES DVR UND DER ANGESCHLOSSENEN...

Страница 87: ...g durchzuf hren nachdem alle Aufzeichnungen und Wiedergaben gestoppt wurden um das Besch digen der Festplatte zu vermeiden 1 2 1 DIREKTES AUSSCHALTEN in tigen um zum Hauptmen zu gelangen Den Men punkt...

Страница 88: ...ie Statusleiste der Kamera kann durch Dr cken der Taste A auf der Fronttafel des Ger ts eingeblendet oder verborgen werden AUFZEICHNUNGSZUST NDE Die Aufzeichnungszust nde der Kamera sind in der nachst...

Страница 89: ...Pre Rec Post Rec Kopiere zu Kam Grundein stellung IP Port Mask Gateway Http Port PPPoE benutzername passwort berpr fen Aufnahme Erweitert Netzwerk Erweitert Mac NIC Typ IP Server Mcast IP Remote Host...

Страница 90: ...zubewahren Bei Erzeugung eines alphanumerischen Passworts mit Hilfe spezieller Software ist es nicht m glich lokal auf das Ger t zuzugreifen d h es ist keine Frontbedienung m glich Es erscheint das fo...

Страница 91: ...ng oder Deaktivierung die Taste ENTER oder EDIT dr cken Das Symbol zeigt an dass die Kennwortabfrage aktiviert ist w hrend das Symbol anzeigt dass die Kennwortabfrage deaktiviert ist Die Standardoptio...

Страница 92: ...en Nehmen Sie die Einstellung mit den Tasten vor Es kann zwischen den folgenden Werten ausgew hlt werden 1 1 3 1 1 3 Nicht Transp Der Wert 3 1 gibt an dass das OSD Men ca 3 Mal gegen ber der vorangega...

Страница 93: ...hentypen ist m glich numerisch Gro buchstaben Kleinbuchstaben Symbole Durch wiederholtes Dr cken der Taste A auf der Fronttafel des Ger ts kann der Typ der einzugebenden Zeichen ge ndert werden wie im...

Страница 94: ...HIFT auf der Ger tefrontseite vergewissern Sie sich dass die STATUS LED eingeschaltet ist Nehmen Sie anschlie end die Eingabe mit den ntereinander dr cken lassen und zum vorherigen Men punkt zur ckzuk...

Страница 95: ...n Informationen Die Option stop aufnahme stoppt die Aufzeichnung bei Erreichen der maximalen Festplattenkapazit t Sollten sich auf dem DVR zwei Festplatten befinden speichert der DVR wenn die MASTER P...

Страница 96: ...ung bez glich der Belegung des Platzes auf der Festplatte zu Lastex der Qualit t der Aufzeichnungen weniger fl ssige Sequenzen Bei Auswahl eines geringeren Werts der Frame rate kann Platz auf der Fest...

Страница 97: ...ten ausw hlen und die Taste ENTE Das Sy die Aufzeichnung f r den ganzen Tag aktiviert wurde w hrend das Symbol anzeigt dass die Aufzeic g deaktiviert wurde Durch Aktivierung der Option Ganztag kann di...

Страница 98: ...bet tigen 2 3 1 9 ZEIT PRE REC Im Fall eines Ereignisses durch Motion oder externen Alarm enth lt die Aufzeichnung auch das Video vor dem Alarm f r eine Dauer die der eingegebenen Zeit entspricht Es...

Страница 99: ...ationsmen zu verlassen mehrmals die Taste ESC dr cken bis das Konfigurationsfenster geschlossen wird 2 4 1 GRUNDEINSTELLUNGEN DES MEN S NETZWERK 2 4 1 1 IP Unter diesem Men punkt kann die IP Adresse d...

Страница 100: ...zername kann aus h chstens 32 Zeichen bestehen Passwort Unter diesem Men punkt kann das Kennwort f r den Berechtigungsvorgang PPPoE eingegeben werden Das Kennwort kann aus h chstens 14 Zeichen bestehe...

Страница 101: ...t eingeben Das Kennwort ist eine Kombination aus h chstens 16 Zahlen Zur Eingabe der Sequenz der Zahlen die das Kennwort bilden die numerischen Tasten auf der Fronttafel des Ger ts verwenden die Taste...

Страница 102: ...stisches Warnsignal drei aufeinanderfolgende Piept ne mit einer Dauer Sekunden Dr cken Sie in diesem Fall die Taste MENU und geben Sie das Passwort nochmals ein NG DAS STANDARDPASSWORT IST 12345 Das S...

Страница 103: ...ngezeigten Kamera 3 1 4 START ALL Durch Auswahl dieses Men punkts und Bet tigten der Taste ENTER oder EDIT kann die Aufzeichnung gleichzeitig auf allen Videokan len gestartet werden 3 1 5 STOP ALL Dur...

Страница 104: ...Frame auf dem Men punkt Pag No Positionieren und die Tasten bet tigen oder die Seitennummer direkt eingeben W hlen Sie die Aufzeichnung mit aus Sollte das Ger t keine Aufzeichnungen finden die die ei...

Страница 105: ...rch Werte unter dem normalen Vorlauf 1x zu verringern mehrmals die Taste bet tigen Es stehen verschiedene Geschwindigkeiten zur Verf gung Durch Auswahl von einzeln erfolgt der Vorlauf Frame per Frame...

Страница 106: ...bssystem Win 2000 Pro Win XP Pro sp2 Internet Browser I E 6 0 oder neuere 4 2 KONFIGURATION F R SCHUTZ UND SICHERHEIT Vor der Verbindung an den Fern PC muss die Schutzkonfiguration anhand des folgende...

Страница 107: ...nicht ausw hlen Wiederholt auf OK klicken um abzuschlie en 4 3 START Beim Start der Verbindung wird das folgende Login Fenster f r die Authentifizierung der f r die Benutzung der Software aktivierten...

Страница 108: ...enster Abb 74 Hauptansicht der Web Schnittstelle ID BESCHREIBUNG 1 Informationsbereich 2 Schnittstelle der Anzeige hinsichtlich des Status des DVR und der verf gbaren Kan le 3 Anzeigeraster 4 Anzeigem...

Страница 109: ...ANZEIGETASTEN SYMBOL BESCHREIBUNG Anzeige auf einem Kanal Anzeige auf vier Kan len Anzeige auf neun Kan len Anzeige auf sechs Kan len Anzeige auf acht Kan len Anzeige auf sechzehn Kan len 4 4 4 ANZEI...

Страница 110: ...et die nderung des Audioniveaus w hrend einer Wiedergabe wenn die Audio bertragung verf gbar ist nur auf Typ 1093 041 und wenn der Stream Modus VIDEO AUDIO im Konfigurationsmen des Systems eingegeben...

Страница 111: ...des Systems Gestattet den Zugriff auf die Schnittstelle der auf DVR aufgezeichneten Ereignisse 4 4 8 1 UNTERBRECHEN DER VERBINDUNG LOGOUT Durch Klicken auf das Symbol kann die Verbindung mit der Web...

Страница 112: ...NC Pegel 1 0Vpp Impedanz 75 Bildfrequenz Aufzeichnungen pro Videokanal CIF und QCIF 25fps Speicher Hard Disk 160 GB Standard Stream ng Video Audio Max Bitrate pro Kanal 32Kbps 512Mbps Audioeing nge JA...

Страница 113: ...okanal entspricht einer Unicast Verbindung In der unten stehenden Tabelle sind die Entsprechungen zwischen der Bezeichnung und dem jeweiligen Wert der Aufl sung im PAL Format angegeben BEZEICHNUNG AUF...

Страница 114: ...am ra 122 2 2 1 2 Nombre unidad 122 2 3 Menu grabacion 124 2 3 1 Configuraciones b sicas del men grabaci n 124 2 3 1 1 D D lleno 124 2 3 1 2 Seleccionar camara 124 2 3 1 3 Stream type 124 2 3 1 4 Reso...

Страница 115: ...i n del software 4 2 Configuraci n de protecci n y seguridad 4 3 Inicio 4 4 Ventana principal y descripci n de la interfaz 4 4 1 rea informaci n 135 4 4 2 Interfaz de estado del dvr y de los canales c...

Страница 116: ...as las grabaciones y las reproducciones para evitar que se estropee el disco duro 1 2 1 APAGADO DIRECTO Pulsar el bot n de alimentaci n situado en la parte trasera 1 2 2 APAGADO EN EL MENU PRINCIPAL P...

Страница 117: ...barra de estado de las c maras pulsando la tecla A del tablero delantero del dispositivo ESTADOS DE GRABACI N Los estados de grabaci n de la c mara se muestran en la tabla siguiente ICONO COLOR DESCRI...

Страница 118: ...rate Habilitar grab P Horaria Pre Grab Post Grab Copiar a c mara Base IP Puerto M scara Gateway Http Port PPPoE utente pw verifica Grabando Avanzadas Red Avanzadas Mac NIC type Servidor Mcast IP Remo...

Страница 119: ...ida y conservarla en un lugar seguro Si se crea una contrase a alfanum rica mediante el software reservado no ser posible acceder al dispositivo en local utilizando el tablero delantero Aparece la pan...

Страница 120: ...a est activado mientras que el s mbolo indica que el pedido de contrase a est desactivado La opci n predeterminada prev la activaci n de la contrase a eNOTA LA CONTRASE A PREDETERMINADA ES 12345 Se re...

Страница 121: ...el men es posible configurar el d a de la fecha en formato d a mes a o y la hora actual en formato horas minutos segundos Utilizar las teclas para pasar de d a a mes y a a o Utilizar las teclas para p...

Страница 122: ...res de tipo num rico es la siguiente Esta pantalla se refiere a las configuraciones b sicas del men Seleccionar la opci n CONFIG AVANZADA y pulsar la tecla ENTER para acceder a las configuraciones ava...

Страница 123: ...2 9 del tablero delantero Para introducir el car cter A pulsar una vez la tecla 2 Para introducir el car cter B pulsar dos veces en sucesi n r pida la tecla 2 cla 2 Para introducir el car cter C pulsa...

Страница 124: ...res de la resoluci n en formato PAL correspondientes a cada sigla Esta pantalla se refiere a las configuraciones b sicas del men La opci n resaltada representa la que est seleccionada Despu s de coloc...

Страница 125: ...lor de 32 a 8192 kbps eNOTA En todos los dispositivos Urmet serie DVR DVS se recomienda no superar el valor de 768 Kbps Se recomienda no modificar el valor de Bit Rate el cual se ajusta autom ticament...

Страница 126: ...ientos Alarma En este modo la grabaci n se activa apenas el sensor entra en alarma Mov alm En este modo la grabaci n se activa apenas el sensor entra en alarma o el motion detecta movimientos Mov alm...

Страница 127: ...ONES B SICAS DEL MEN RED 2 4 1 1 IP En esta opci n del men es posible configurar la direcci n IP del DVR Pulsar la tecla EDIT y con las teclas num ricas 0 9 introducir la direcci n IP Utilizar las tec...

Страница 128: ...en para modificar la contrase a predeterminada y agregar el administrator puede crear un m ximo de 15 usuarios o quitar usuarios definiendo los derechos correspondientes Colocar el Active Frame en el...

Страница 129: ...la de comprobaci n son iguales la misma se guarda y se transforma en la nueva contrase a Si la contrase a escrita y la de comprobaci n no son iguales aparece un cuadro de error que indica la anomal a...

Страница 130: ...rabaciones iniciadas manualmente no se reanudar n con el restablecimiento de la energ a el ctrica 3 1 1 CHAN En esta opci n del men que no se puede seleccionar est n listados todos los canales del dis...

Страница 131: ...as para ubicar el cursor sobre el d a mes a o y sobre las horas minutos del periodo a configurar Utilizar las teclas para configurar d a mes a o y horas minutos Las posibles superposiciones de horario...

Страница 132: ...para iniciar la copia Duraci n total de la reproducci n Tiempo transcurrido Velocidad de reproducci n Porcentaje de avance de la reproducci n Reproducci n con audio Para detener la reproducci n pulsa...

Страница 133: ...ARA LA INSTALACI N DEL SOFTWARE Procesador Pentium 4 3 GHz Ram 512 MB Tarjeta v deo MMX 128 MB 128 bits Sistema operativo Win 2000 Pro Win XP Pro sp2 Navegador Internet I E 6 0 o posteriores 4 2 CONFI...

Страница 134: ...ce la siguiente pantalla de confirmaci n eNOTA No seleccionar la opci n Richiedi verifica server https per tutti i siti dell area Hacer clic repetidamente en OK para concluir 4 3 INICIO Cuando inicia...

Страница 135: ...rincipal 3 Figura 9 pantalla principal de la interfaz Web ID DESCRIPCI N 1 rea informaci n 2 Interfaz de visualizaci n del estado del DVR y de los canales disponibles 3 Grilla de visualizaci n 4 Modo...

Страница 136: ...un solo canal Visualizaci n de cuatro canales Visualizaci n de nueve canales Visualizaci n de seis canales Visualizaci n de ocho canales Visualizaci n de diecis is canales 4 4 4 GRILLA DE VISUALIZACI...

Страница 137: ...FIGURACIONES DE VISUALIZACION ICONO DESCRIPCI N Permite variar el nivel del sonido durante una reproducci n si la transmisi n audio est disponible y si se configur el modo de secuencia VIDEO AUDIO en...

Страница 138: ...del sistema Permite acceder a la interfaz de los eventos grabados en el DVR 4 4 8 1 Desconexi n Logout Haciendo clic en el icono es posible desconectarse correctamente de la interfaz Web Aparece el s...

Страница 139: ...ctrico 1 0 Vpp impedancia 75 Frame Rate grabaciones por canal v deo CIF e QCIF 25fps Memoria Disco duro 160 GB predeterminado Tipo di stream V deo y audio Max bit rate por canal 32Kbps 768Kbps Entrad...

Страница 140: ...ociedad en la promoci n de tecnolog as y novedades DS1093 022 140 Opci n Especificaciones Interfaz USB 1 interfaz USB 2 0 puede admitir USB flash memory disco duro USB grabador CD DVD USB N m ximo de...

Отзывы: