23
9.6 Use of LCD Product
Fig. 15: LCD Button
1. Shows the clock of product.
To perform the time setting of the product, press
the
buttons (Fig. 16) for 2 seconds simul
-
taneously. Hours and minutes shall flash for 5
seconds. By pressing or button while
flashing (Fig. 16), time may be set by increasing
or decreasing the minutes. To exit from the set-
ting mode, press and hold its buttons
for
2 seconds. Fig. 16
NOTE
Settings are reset when the power is cut off.
2. Filter cleaning warning signal.
Filter cleaning warning icon appears on the
screen after 60 hours of operation and flashes
every second. Once the filters are cleaned and
installed, filter time can be reset and the icon
can be cleared by pressing and holding the Mot/
off button for 3
seconds.
3. Alarm Icon
When the alarm timer is active, this icon will
appear active on the screen.
4. Alarm Clock
You can set the alarm clock by increasing with
button and decreasing button . Fig. 16
NOTE
Alarm will ring for 15 sec at the time it is set.
Press any button to deactivate the alarm sound.
5. Lamp Icon
When the lamp is active, this icon will appear
active on the screen.
6. Fan Speed Icon
Fan Speed Icon will decrease as the speed de-
creases, and increase as the speed increases.
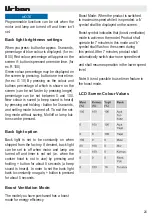
Lcd Key Button Layout
Fig. 16: Lcd Key Button Description
1. Press this button to turn on the product.
Product will start to operate on 2nd speed when
it is turned on. Speed can be decreased or in-
creased if desired.
2. Speed will decrease if this button is
pressed.
3. Speed will increase if this button is pressed.
4. It enables setting the timer by putting
the clock forward. At each press, timer
clock will be put forward 1 hour, and if it
is pressed longer, clock setting will be put
forward faster.
5. It enables setting the timer by putting the
clock back. At each press, timer clock will
be put back 1 hour, and if it is pressed lon-
ger, clock setting will be put back faster.
6. Press this button to turn on or off the lamp.
Содержание I212-L ISLA 90 INOX
Страница 1: ...1 Lea el manual del usuario con cuidado I212 L ISLA 90 INOX ...
Страница 2: ...2 ...
Страница 28: ...1 Please Read The User Manual Carefully I212 L ISLA 90 INOX ...
Страница 29: ...2 ...
Страница 31: ...4 Fig 1 TECHNICAL DRAWING I212 L ISLA 90 INOX 4206 40 475 475 270 280 600 898 20 Min 650 Max 920 ...
Страница 55: ...1 Veuillez lire attentivement le manuel d utilisation I212 L ISLA 90 INOX ...
Страница 56: ...2 ...


