© UPLIFT Desk
• 800-349-3839 • 512-614-3152 • [email protected] • upliftdesk.com
4
(a)
(b)
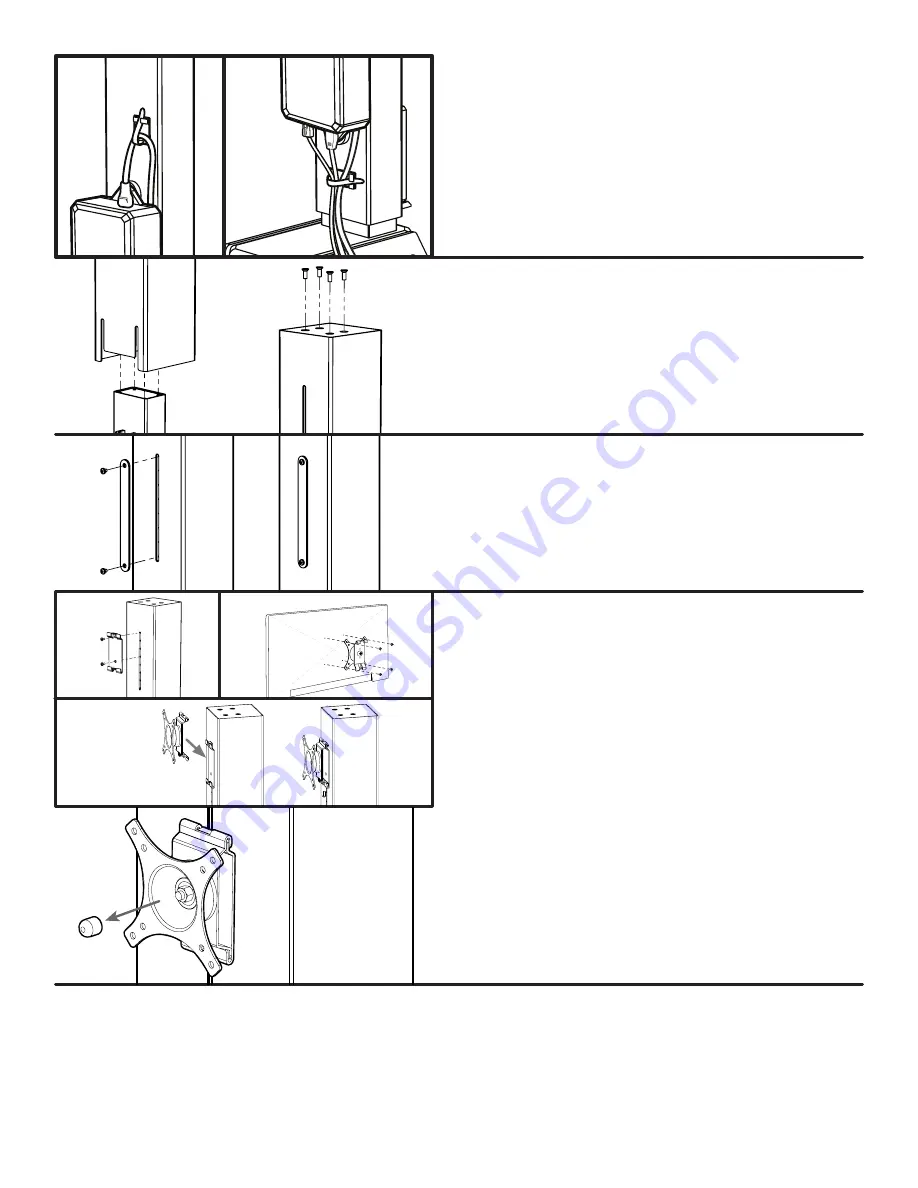
Step 6
Take a moment to group your wires tightly together, to prevent
them from splaying too widely, getting caught in moving parts,
or interfering in Step 7. We recommend using the two Cable
clips with adhesive here:
(a)
Above the Control box to keep the Power cord close to the Lifting
column. For additional securing, the cable can run behind the
Control box.
(b)
About 2’’ below the Control box, on the top segment of the
lifting column (as shown). Leave slack to allow the lifting column
to rise all the way up.
Step 7
Press the down button on the Keypad and lower the unit down to
lowest setting. Slide the Housing over the Lifting column.
Caution:
As you slide on the Housing, be mindful of where the
cables are.
Make sure the screw holes on the Housing match up with the
screw holes on the Lifting column and attach using four M6x14
Flat head screws.
Step 8
(a)
Attach the VESA bracket to the Lifting column using two M6x14
Pan head screws. Note: there are five different height settings;
choose the height that is best suited for your monitor.
(b)
Attach the VESA mount to your Monitor using the four M4x12
Pan head screws. Ensure that the hooks on the VESA mount are
facing down and toward the bottom of the Monitor, as shown. Max-
imum monitor weight should not exceed 17.6 lbs (8 kg.)
(c)
Hook the Monitor assembly to the VESA bracket, and secure
with the VESA screw, which is provided with the VESA mount.
NOTE 1:
If you have a free standing monitor or laptop and do not plan
on attaching a monitor directly to the Lifting column using the
provided VESA mount, you may cover up the open slot with a
Slot cover and two M6x14 Pan head screws.
(monitor
not pictured)
(a)
(b)
(c)
NOTE 2:
The VESA mount provides multiple axis adjustment for your mon-
itor. If you find that your monitor does not stay in place after ad
-
justment, remove the VESA mount from the monitor, remove the
plastic cap from the inside of the VESA mount and tighten the nut.
Alternately, if the Monitor is not adjustable at all, loosening the
nut slightly will allow it the necessary give to move the Monitor. It
might take a few attempts to find the right balance.


