


21
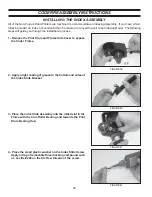
5 - Install the screw and washer assembly and tighten fully,
then loosen the screw approximately 1/8 turn to allow
the slide to move.
FIGURE 43
FIGURE 44
FIGURE 45
FIGURE 46
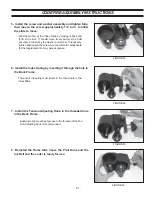
6 - Install the Index Spring by inserting it through the hole in
the Back Frame.
7 - Install the Tension Adjusting Knob in the threaded hole
in the Back Frame.
8 - Reinstall the Frame Side Cover, the Print Drum and the
Ink Roll and the coder is ready for use.
Test the motion of the Index Slide by moving it back and
forth in the slot. It should move freely but must be held
securely in the slot by the washer and screw. If necessary,
tighten and loosen the screw a second time to compensate
for the displacement of any excess grease.
The end of the spring must locate in the round hole in the
Index Slide.
Applying a light coating of grease to the threads of the Ten-
sion Adjusting Knob is recommended.
CODER REASSEMBLY INSTRUCTIONS
Содержание HPNP-100
Страница 25: ...25 ...


