background image

A1 PRO User Manual

Copyright © 2020 Unitree Robotics. All Rights Reserved

16

Charging

1.Connect the charger to an AC power source (100-240V, 50/60Hz). Before connecting, you must ensure

that the external power supply voltage matches the rated input voltage of the charger, otherwise the
charger will be damaged(the rated input voltage of the charger is indicated on the charger
nameplate).

2.Before charging the battery, the charger is connected to the AC power supply before the battery is

connected.

3.Before charging the battery, please make sure the battery pack is off, otherwise it will damage the

battery and charger.

4.Under the charging state, battery indicator will flash in a cycle and indicate the current battery level.
5.When the battery indicator is off, the battery pack is full. Please remove the battery pack and charger

to complete the charge.

6.After the robot is running, the battery pack temperature may be high. The battery pack must be
charged after the battery pack temperature drops to room temperature.
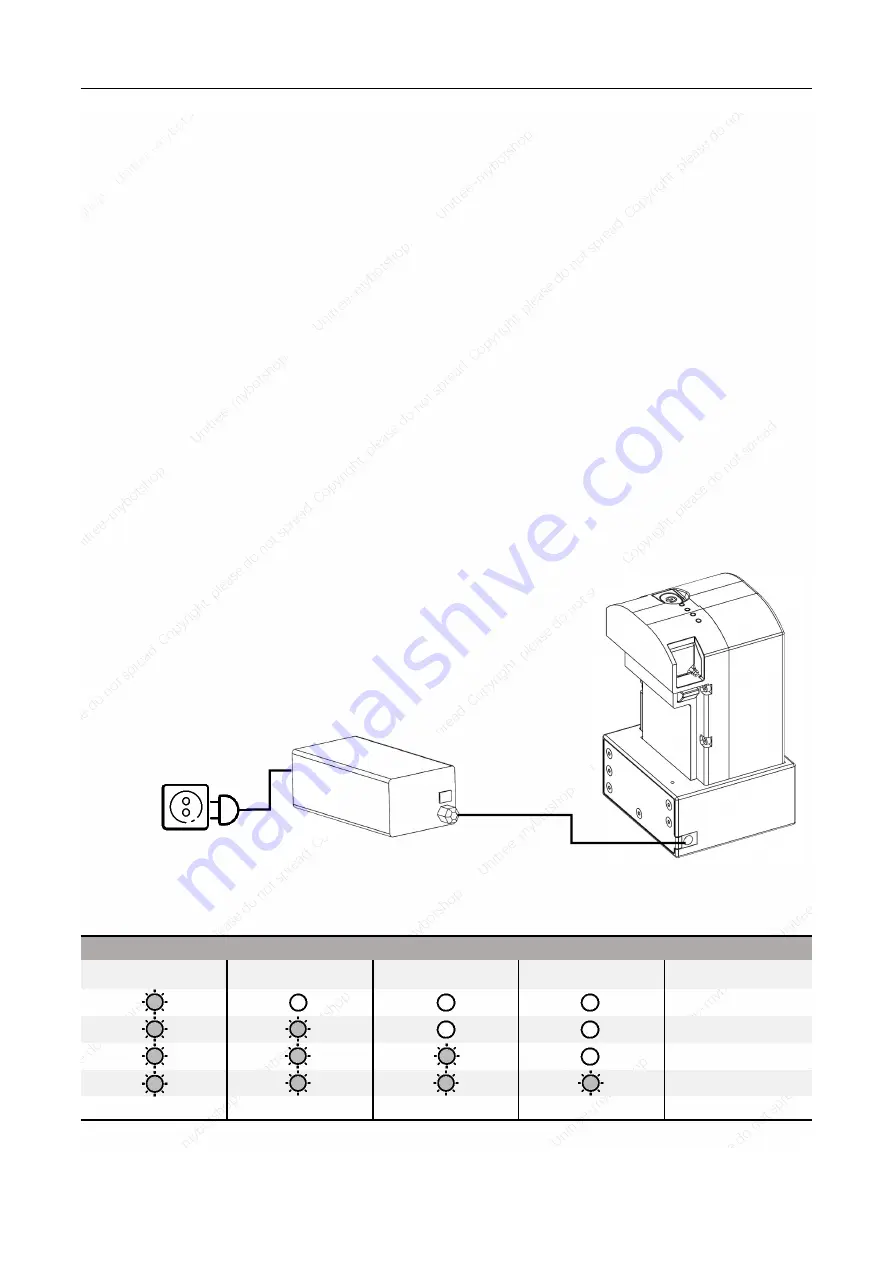
7.Schematic diagram of charging connection:

Charging Indicator

LED1

LED2

LED3

LED4

Current Battery

0%-25%

25%-50%
50%-75%

75%-100%

Full

Charging Protection Indication

Содержание A1 PRO

Страница 1: ...A1 PRO User Manual 2018 Unitree All Rights Reserved 1 A1 User Manual Unitree www unitree cc cn V1 1 2020 03...

Страница 2: ...rating Mode 11 Startup and Shutdown 12 Battery Pack 13 Foot Assembly 17 Remote Control Module Joystick Introduction 20 Joystick Operation 21 APP 33 Robot Special Case Handling Robot Black Box 38 Robot...

Страница 3: ...r penalties including damages incurred as a result of your purchase use or inability to use the product even if Unitree has been advised of such loss The possibility is also To the fullest extent perm...

Страница 4: ...ormally hold down the L2 button and click the A button once to half squatting state and click the B Button twice to the zero force mode the four joints are completely unstressed to avoid the robot aut...

Страница 5: ...A1 PRO User Manual 2018 Unitree All Rights Reserved 5 Product Profile This section introduces the name and function of the A1 and remote control...

Страница 6: ...m s in an instant possess excellent balance ability and the torque of 33 5NM allows A1 to easily achieve backflip the joints can be quickly disassembled and easy to maintain The addition of a multi ey...

Страница 7: ...ear leg together with a Velcro strap as shown in Figure 3 above The front leg is folded up similar to the hind leg as shown above Figure 3 4 above placed and bundled Packing After completing the prepa...

Страница 8: ...bly 5 Hip joint 6 Thigh 7 Knee joint 8 Calf 9 Thigh motor Reducer 10 Calf motor Reducer 11 Power switch 12 Body motor Reducer 13 Battery clasp 14 Multi Eye depth camera 15 Camera angle adjustment knob...

Страница 9: ...le includes a joystick and mobile phone First press the power button for a short time and then press and hold the power button for more than 2 seconds to turn on the joystick The joystick corresponds...

Страница 10: ...A1 PRO User Manual 2018 Unitree All Rights Reserved 10 A1 This section introduces the operation mode of A1 the functional characteristics of battery and the replacement method of foot assembly...

Страница 11: ...ntinuous squat jog type squat continuous standing jog up and various combinations W Mode Walking When the robot is in W mode the robot can realize the step by step without manipulating the joystick th...

Страница 12: ...bot is in Static Standing State the height of the robot body is at the initial height after starting up the body level the joystick has no operation the state when standing statically Press and hold t...

Страница 13: ...y Display The battery has its own battery indicator which can display the current battery level 2 Battery Storage Self discharge Protection When the power of battery is higher than 65 After 10 days wi...

Страница 14: ...n When the battery detects a short circuit the output will be cut off to protect the battery 9 Battery Load Detection Protection When the battery is turned on if no powered device is connected the bat...

Страница 15: ...e seriously damaged 2 Do not use the battery pack in strong magnetic or static environments Otherwise the battery pack protection board will malfunction causing the battery pack and the robot to malfu...

Страница 16: ...nected 3 Before charging the battery please make sure the battery pack is off otherwise it will damage the battery and charger 4 Under the charging state battery indicator will flash in a cycle and in...

Страница 17: ...sure signal through the air pipe to the pressure sensor in the shoulder so as to judge the environment the robot is in and adjust the movement of the robot accordingly Foot end components include foot...

Страница 18: ...ssembly air needle to the rubber trachea make sure the connection does not loosen easily and then install the foot end component in the corresponding position of the lower leg note that the foot end c...

Страница 19: ...A1 PRO User Manual 2018 Unitree All Rights Reserved 19 Remote Control Module This section describes the features of the remote controller and includes instructions for controlling the quadruped robot...

Страница 20: ...gnal transmission is more convenient and stable Ergonomic structure for a more comfortable feel Charge the Joystick When the battery indicator of the joystick shows low battery the same status as the...

Страница 21: ...trol is turned off Joystick calibration Hold the remote control but do not touch the joystick Press the remote control buttons F1 and F3 and release them at the same time At this time the remote contr...

Страница 22: ...edly checking the contents of the table And know which actions are not recommended The content of the form is mainly divided into 7 parts 1 Joystick control method for basic operation in Sport mode 2...

Страница 23: ...e robot to fall When the robot is walking on a terrain with a certain undulation or slope the controller should reduce the walking speed of the robot and carefully control it so that the robot is trip...

Страница 24: ...to the right In the middle position the yaw angular of body is zero The more the stick is pushed away from the center position the greater the yaw angular 4 Right Stick Right Stick When the robot dog...

Страница 25: ...n the robot is in a stationary standing state The more the stick is pushed away from the center position the larger the amplitude 10 Right Stick Right Stick When the robot dog is standing in Sport mod...

Страница 26: ...supine state and the joints are in the high damping state Hold down the L2 key and press the single right button a button to perform semi squat and standing movements successively Press START to rele...

Страница 27: ...ick The left Stick is used to control the forward and backward movement of the robot In Sport mode Push stick up the robot moves forward Push stick down the robot moves backward When in the middle pos...

Страница 28: ...ont If hold on the robot will go forward and rotate counterclockwise Push Stick to the lower right the robot will take the arc to the left If hold on the robot will retreat and move clockwise The angl...

Страница 29: ...ition the faster the robot will rotate 28 Right Stick Right Stick The right Stick is used to control the robot s lateral movement In the fast running state push stick to left the robot moves to the le...

Страница 30: ...eless damping mode hold down the L1 and L2 keys at the same time single click the START key then press the L2 key single point B key twice single point A key twice enter SLAM mode For operations in SL...

Страница 31: ...tton the robot will squat Psuh stick to left the robot crept and moves to the left Psuh stick to right the robot crept and moves to the right Note 1 This action is not recommended Note 2 Please refer...

Страница 32: ...rol the robot crept to walk arc circle In W and Sport mode press the down button robot will squat Push stick in the upper left direction and the robot will squat down the arc in front of the left fron...

Страница 33: ...A1 PRO User Manual 2018 Unitree All Rights Reserved 33 APP This section introduces the main functions of the Unitree Robotics app...

Страница 34: ...he corresponding platform display APP download link http www unitree cc e action ShowInfo php classid 6 id 370 UnitreeRobotics APP home page Documentation Click to view the robot user manual and other...

Страница 35: ...ct and the robot the closer the distance the darker the color When the robot is in motion mode click on the open tracking button to enter the character tracking interface select the person to be track...

Страница 36: ...combined actions are still being improved SLAM When the robot is in W mode click to enter SLAM Click to select the point and enter the following interface The map is updated in real time according to...

Страница 37: ...et point after starting up otherwise the robot cannot receive the command 3 When operating in a place with many people dynamic obstacles please ensure that the set target point is a passable area 4 If...

Страница 38: ...lt more quickly and judge whether the cause of the machine fault belongs to the user s improper operation or the robot hardware problem according to the black box data After the robot is turned on the...

Страница 39: ...ot to the power on state and then start the machine according to the normal process 4 2 In the case of emergency braking if the robot does not have a protective frame protection it may cause the robot...

Страница 40: ...If you are not ready before the shutdown it will easily cause the robot to power down and shoot the ground causing serious damage to the robot Preparations before forced shutdown After passing the ny...

Страница 41: ...fferent levels of control proficiency in order to be reliable and stable please use it in an open and flat environment When operating the robot be careful to avoid steps above 10cm slopes greater than...

Страница 42: ...he cable should be removed To prevent damage to the cable Operational Considerations 1 Standing Status When standing if the local friction is insufficient or the robot s foot does not have reliable su...

Страница 43: ...maximum speed can reach 3 3m s under the stable control of flat terrain 7 About the Robot Walking by the Track The official delivery version may support the robot on a flat or square track with pre s...

Страница 44: ...explosion 6 It is strictly forbidden to use the battery pack that is not officially provided by Unitree For replacement please check the Unitree website for relevant purchase information Unitree is no...

Страница 45: ...of sight to prevent unpredictable accidents 4 When charging please pay attention to ensure that the environment around the battery is well cooled and there are no flammable and explosive materials suc...

Страница 46: ...ery packs Once you need to transport the battery pack be sure to discharge the battery pack to about 65 charge 8 Do not store the battery pack for a long time after it has been completely discharged t...

Страница 47: ...uctions or manuals 4 Damage caused by the repairing and exchanging followed by a non authorized service instructions or manuals 5 Damages caused by unauthorized modification of circuits and misuse of...

Страница 48: ...r falling down from the height When the bottom level development the damage caused by the user controlled motor hits the joint limit or other impacts high speed vibration of the motor etc Other Rules...

Страница 49: ...website Chinese http www unitree cc cn English http www unitree cc Interface diagram 1 TX2 HDMI 2 TX2 USB3 0 3 TX2 USB2 0 4 Ethernet Interface 1 5 Power Input 24V 6 Power Input 24V 7 Power Output 5V...

Отзывы: