background image


 VIRDI 3000 

TM

 User’s Manual


12


UNION COMMUNITY Co., Ltd. 44-3 Hyundai Topics Building, Bangi-dong,   
Songpa-gu, Seoul, Korea 138-050, Tel: 82-2-6488-3000, Fax: 82-2-6488-3099,   
E-Mail:[email protected], http://www.unioncomm.co.kr/eng 


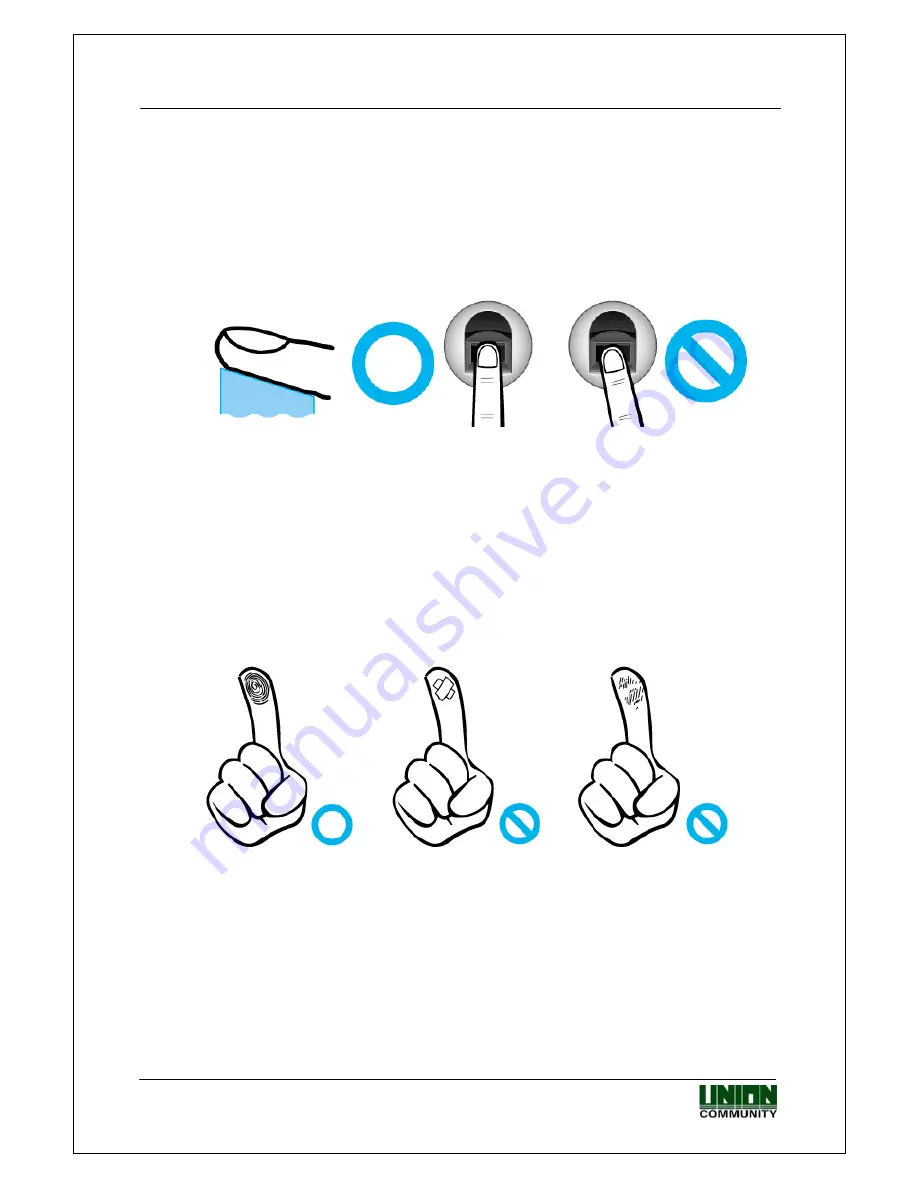
1.8. Correct fingerprint registration and input methods 
 

z

  Correct fingerprint registration methods 


Place your index finger on the window just as you do with a finger stamp. 
Finger tip touching is not an appropriate registration or input method.   
Make sure the center of your finger touches the window.   


z

  Use your index finger, if possible. 


As usual, the index finger guarantees an accurate and stable fingerprint input. 


z

  Check if your fingerprint is unclear or damaged.   

It is tricky to recognize fingerprints on dry, wet, unclear, or injured fingers. 

Use another finger in this case. 


Содержание VIRDI 3000

Страница 1: ...Copyright 2006 By Union Community Co Ltd VIRDI 3000 TM User s Manual Version eng 1 00 ...

Страница 2: ...armless against all claims costs damages and expenses and reasonable attorney fees arising out of directly or indirectly any claim of personal injury or death associated with such unintended or unauthorized use even if such claim alleges that UNION COMMUNITY was negligent regarding the design or manufacture of the part UNION COMMUNITY reserves the right to make changes to specifications and produc...

Страница 3: ...ising company in the commercial sector of biometrics industry in Korea UNION COMMUNITY was awarded Korean World class Product Award for its excellent performance by Minister of Commerce Industry and Energy in December 2005 To be the world class company in biometrics field UNION COMMUNITY and all the members continue to do all out efforts for the world best quality product creation of new paradigm ...

Страница 4: ...dentification The terminal performs matches against multiple fingerprints templates based solely on fingerprint information Without the user s ID or card the user s fingerprint is compared to fingerprints previously registered z I Capture Intelligent Capture Reinforces detection capability for residual fingerprints fingerprints left on a sensor window due to sweat or contaminants on a finger and a...

Страница 5: ...lding Bangi dong Songpa gu Seoul Korea 138 050 Tel 82 2 6488 3000 Fax 82 2 6488 3099 E Mail sales unioncomm co kr http www unioncomm co kr eng z Function keys F1 F2 F3 F4 ENTER are used and they are used for direct authentication and each key represents each authentication mode ...

Страница 6: ...ration 16 2 3 Specifications 17 3 Device configuration settings 18 3 1 Check items before device configuration settings 18 3 1 1 Entering menu 18 3 1 2 Changing setting parameters 18 3 1 3 Saving device configuration settings 19 3 2 Menu configuration 20 3 3 User account 22 3 3 1 User registration 22 3 3 2 Deleting User 27 3 3 3 Modifying User 27 3 3 4 Administrator registration 30 3 3 5 Deleting ...

Страница 7: ...ss control 52 4 1 1 Authentication mode 52 4 1 2 1 1 fingerprint authentication 53 4 1 3 1 N fingerprint authentication 54 4 1 4 Password authentication 55 4 1 5 Card authentication 56 4 1 6 User ID group authentication 57 4 1 7 Multiple fingerprint authentication 58 4 2 Time Attendance control 59 4 2 1 Authentication mode 59 4 2 2 1 1 fingerprint authentication 59 4 2 3 1 N fingerprint authentica...

Страница 8: ... Keep away from direct sunlight It may cause deformation or color change Avoid high humidity or dust The terminal may be damaged Avoid using water benzene thinner or alcohol for cleaning It may cause an electric shock or fire Do not place a magnet close to the terminal The terminal may break down or malfunction Do not contaminate the fingerprint input area Fingerprints may not be well recognized A...

Страница 9: ...fingerprint input LCD display window Display character message for all the operations Card input position Option Mic Connect to doorphone Keypad Enter numbers for environment setting or authentication ID input LED Lamp terminal operation status PWR ON when VIRDI 3000 is under normal operation DOOR Yellow LED is on when successful authentication makes electronic door open close unit open Red LED is...

Страница 10: ... allowed for 1 N identification 00 00 When the terminal is under meal control mode and a user tries more than two time authentication during the same mealtime 00 00 There is no response from the server during the authentication process Network to server is disconnected during the authentication process ÆÅ 00 00 There is no user registered on the terminal or no connection to the server so it is try...

Страница 11: ...oice information during operation Please enter your fingerprint Enter fingerprint using the fingerprint input window You are authorized Successful authentication Please try again Authentication failed 1 6 Buzzer sound during operation ppig When a button is pressed or a card is being read When fingerprint input is completed and user is allowed to take off his fingertip ppibig Authentication is fail...

Страница 12: ...nt registration methods Place your index finger on the window just as you do with a finger stamp Finger tip touching is not an appropriate registration or input method Make sure the center of your finger touches the window z Use your index finger if possible As usual the index finger guarantees an accurate and stable fingerprint input z Check if your fingerprint is unclear or damaged It is tricky ...

Страница 13: ... very unclear then it cannot be recognized Please use a password instead in this case When a finger is dry breathe on the finger for smooth operation For kids it may be tricky or impossible to use the terminal because their fingerprints are too small or very unclear It is recommended to register their fingerprints every six months For the elderly it may not be possible to register their fingerprin...

Страница 14: ...rity level z High processing capacity of terminal and server There is not any limit on management of users access information in case that access server is used Even in standalone operation by using local terminal it is possible to manage fingerprint authentication of more than 8 000 users in optional case z Various information messages It ensures easy fingerprint recognition because voice and LCD...

Страница 15: ...and password registration Fingerprint or password authentication FP PW Fingerprint and password registration Password authentication after fingerprint authentication RF Card registration Card authentication RF FP Card and fingerprint registration Card or fingerprint authentication RF FP Card and fingerprint registration Fingerprint authentication after card authentication RF PW Card and password r...

Страница 16: ...ng 2 2 Configuration 2 2 1 Network configuration 2 2 2 Standalone configuration UTP LET UTP WAN TCP IP UTP Switch Hub 4 3 5 6 2 643 2 2 1 3 4 5 6 8 7 9 10 11 12 2 643 12 2 6423 5 1 2 3 4 6 7 8 9 10 11 12 Tx R x 1 T x R x 2 T x R x 1 T x Rx 2 1 2 3 Tx Rx 1 Tx R x 2 641 3 4 Tx R x 1 T x R x 2 1 6410 3 4 T x R x 1 T x R x 2 1 641 UTP UTP UTP UTP Network Server authentication server Doorphone door loc...

Страница 17: ...H Default 3 520 fingerprints MEMORY 8M FLASH Option 8 160 fingerprints Fingerprint sensor Optical Authentication speed 1 sec Scan Area Resolution 12 9 15 2mm 500 DPI FRR FAR 0 1 0 001 TCP IP RS 232 Wiegand Communication Port RS 485 Option Temperature Humidity 10 50 Lower than 90 RH LCD 122 X 32 Graphic LCD SIZE 137 X 137 X 50mm INPUT Universal AC 100 250V OUTPUT DC 12V Option DC 24V AC DC Adapter ...

Страница 18: ...after entering the administrator s ID and the administrator authentication is processed according to the previous setting such as fingerprint authentication or password authentication If the authentication succeeds submenu screen appears Administrator authentication is required only once for all in main menu so all other menus are accessible until he she completely exits from the main menu 3 1 2 C...

Страница 19: ...configuration settings The following screen appears Save Y 1 N 2 _ Press 1 to save changes If not press 2 If there are no changes in device configuration settings it goes out of this setting mode without going through the above screen If there is no input for a certain period of time while changing the device configuration settings the setting process finishes If there are changes in device config...

Страница 20: ...l 2 Network 1 Terminal ID 2 Mode NS SN NO 3 Network Type Static IP DHCP 4 IP Address 5 Subnet Mask 6 Gateway 7 Server IP 8 Server port 1 Application Access Time Attendance Meal Application Start Time Leave Time Normal Time Multi Fn Key 2 Verify Option Show User ID Auto Enter Key Only Card Enable 1 N User ID Group Verify Multi FP 3 Set Doorlock Door Monitor Open Duration Door Open Alarm 4 Sound Con...

Страница 21: ...Network Type Static 1 Mac Address 000265201111 IP Address 192 168 0 3 Gateway 192 168 0 1 Subnet Mask 255 255 255 0 Server IP 192 168 0 2 Svr Port 2204 Card Reader None FP Sensor FOS01 1 1 Level 4 1 N Level 5 Max User 0 MAX FP 0 All User 0 All Admin 0 All FP 0 1 N User 0 1 N FP 0 All Log 0 5 Ext functions 1 Lock Terminal 2 Read Card No 1 System Config ID Length Language 2 Set Fn Key 3 Card Reader ...

Страница 22: ...ication method appears 1 FP 2 ID PW 3 FP PW 4 FP PW 5 RF 6 RF FP 7 RF FP 8 RF PW Press 0 to see menus not shown in the LCD window Select one from among the 11 registration methods 3 3 1 1 1 FP registration Fingerprint registration and fingerprint authentication Fn Æ 1 Æ 1 Æ User ID ENTER Æ 1 Æ 1 1 Level ENTER Æ Enable 1 N ENTER Æ Input FP Æ Input the same FP again 1 1 Level 0 9 0 Recommended setti...

Страница 23: ...int must be inputted twice To enter the same fingerprint again remove the finger from the window and place the same finger again onto the window If registration succeeds a ppiririck buzzer sound rings Then it returns to the 1 Add screen If the fingerprint image is not in good conditions or there is no input in the window for 10 seconds after the fingerprint sensor light turns on it returns to the ...

Страница 24: ... Input the same FP again As mentioned above password registration refer to 2 ID PW registration precedes fingerprint registration refer to 1 FP registration 3 3 1 4 4 FP PW registration After both fingerprint and password are registered fingerprint authentication and password authentication should be done for access Fingerprint authentication precedes password authentication Fn Æ 1 Æ 1 Æ User ID E...

Страница 25: ...egistration precedes fingerprint registration refer to 1 FP registration 3 3 1 8 8 RF PW registration After both card and password are registered authentication method is selectable during card or password Fn Æ 1 Æ 1 Æ User ID ENTER Æ 8 Æ Place the card Æ Input PW ENTER Æ Input same PW ENTER Card registration refer to 5 RF registration precedes password registration refer to 2 ID PW registration 3...

Страница 26: ...ut for authentication Card registration refer to 5 RF registration precedes fingerprint registration refer to 1 FP registration 3 3 1 11 93 ID PW RF PW registration After both card and password are registered authentication method is selectable during ID and password authentication or card and password authentication Fn Æ 1 Æ 1 Æ User ID ENTER Æ 9 3 Æ Place the card Æ Input PW ENTER Æ Input same P...

Страница 27: ...ompletely delete this information the data in the server should be deleted If a non registered user ID is entered 2 Delete appears together with a ppibig sound Caution is required when deleting a user or an administrator as there is no differential procedure for deleting their information Also carefully note that user s information stored just in the local terminal not in the server is not recover...

Страница 28: ... buzzer sound rings when 2 is pressed 1 When modifying 1 1 authentication level is selected 1 1 Level 0 9 0 Recommended setting 0 To change this value press the CLR to delete the current value and enter the new value 2 When registering additional fingerprints is selected Add FP Input Your FP This is same as Add FP in 3 3 1 1 1 FP registration The same fingerprint must be inputted twice If addition...

Страница 29: ...odify PW Press 0 to see menus not shown in the LCD window To cancel press the CLR button Press the 1 button to change the 1 1 Level refer to 3 3 3 1 Press the 2 button to register additional fingerprints refer to 3 3 3 1 Press the 3 button to change passwords refer to 3 3 3 2 3 3 3 4 5 RF user 1 Change Card To change the card press 1 To cancel press the CLR button Press the 1 button to change the ...

Страница 30: ...he 2 button to change the card refer to 3 3 3 4 3 3 4 Administrator registration Fn Æ 1 Æ 4 Æ Admin ID ENTER In the main menu press 1 to select 1 User and the following screen appears 1 Add 2 Delete 3 Modify 4 Add Admin For administrator registration press 4 Admin ID NEW ID _ _ _ _ Enter the administrator ID to register and press ENTER The procedures for administrator registration are the same as ...

Страница 31: ...etwork to see the following screen When this setting is done press ENTER to move to the next setting 3 4 1 Terminal ID settings Fn Æ 2 Terminal ID ID 00000001 This ID is unique for each terminal and used by an authentication server to distinguish each terminal The default is 00000001 It should be identical to the door ID set in the server program and its length should be 1 8 characters If the term...

Страница 32: ... The authentication operation is done only in network server Depending on number of terminals number of users or network conditions each different mode can flexibly be used But if there are more than 10 terminals connected to the server for simultaneous authentication or there are frequent network problems it is recommended to use SN authentication setting 1 Press ENTER to move to the next setting...

Страница 33: ...e an old value and enter the new value If the subnet mask is 255 255 255 0 enter as below 2 5 5 FN 2 5 5 FN 2 5 5 FN 0 Press ENTER to move to the next setting 3 4 6 Gateway settings Gateway 192 168 0 1 Press CLR to delete an old value and enter the new value If the gateway IP address is 210 98 100 1 enter as below 2 1 0 FN 9 8 FN 1 0 0 FN 1 Press ENTER to move to the next setting 3 4 7 Server IP s...

Страница 34: ...port settings Server port Num 2201 Press CLR to delete an old value and enter the new value As the port number of the authentication server the default is 2201 Special care is required when changing this number because the corresponding number in the server should also be changed with the same number If the server port is 2201 enter as below 2 2 0 1 After the network setting is completely done pre...

Страница 35: ...settings under access control application here It moves to the upper menu 3 5 1 2 1 Time Attendance control By setting up those default times regarding Start Leave Out Back the terminal display mode after authentication can be automatically changed to programmed time attendance mode In addition by using multi Fn key over 40 sub modes of time attendance can be defined Start Time 00 00 00 00 If time...

Страница 36: ...entication mode is changed to the corresponding working mode When setting as O a mode is defined by the combination of a function key and a number key such as F3 1 For example if the setting is 1 F1 X 2 F2 X 3 F3 X 4 F4 O 14 different working modes can be defined according to user input such as ENTER normal F1 start F2 leave F3 outside work out and F4 0 F4 9 The O X setting can be changed by press...

Страница 37: ... 4 Sound Control To set the basic option for authentication press 2 3 5 2 1 Settings for ID display when authentication is successful Fn Æ 3 Æ 2 Show User ID N 0 Y 1 0 Default setting 0 If it is set to the default setting 0 only the Success message is displayed If it is set to 1 user ID is displayed in the LCD window when authentication is successful as shown below Ex OK 0001 Press ENTER to move t...

Страница 38: ...ilding with several installed terminals where there is frequent entrance and exit and there is no need for severe access control Press ENTER to move to the next setting 3 5 2 4 1 N authentication settings Fn Æ 3 Æ 2 Æ ENTER Æ ENTER Enable 1 N N 0 Y 1 0 Default setting 1 This enables fingerprint authentication without inputting a user ID or placing a card For your information even if a user is regi...

Страница 39: ...for authentication if it is set to 1 1 N authentication is performed among user IDs 1200 1299 If it is set to 0 1 1 authentication only for user ID No 12 is performed When 1 N authentication is not allowed as setting of 0 Verify Multi FP N 0 Y 1 0 Default setting 0 If it is set to 1 for successful authentication all registered fingerprints should be authenticated after ID or card input This is use...

Страница 40: ...y be possible only for time attendance mode where there is no need for lock control After this setting is completely done press ENTER to move to the next setting 3 5 3 2 Monitoring door status Fn Æ 3 Æ 3 Æ ENTER Door Monitor 0 1 NO 2 NC 0 Default setting 0 0 NW No monitoring 1 NO Dead bolt type or auto door In case that lock monitoring pin is high when the door is locked 2 NC Strike type In case t...

Страница 41: ...his alarm helps relevant persons administrators check what has caused the problem in a timely manner and eliminate the problem For smoothly operation of this setting the relevant lock should be the lock type to be able to monitor whether the door is open or closed and its monitoring pin should properly be connected to the terminal The previously mentioned setting for monitoring door status should ...

Страница 42: ...gs Fn Æ 3 Æ 4 Æ ENTER Æ ENTER Case Open Alarm N 0 Y 1 0 Default setting 0 An alarm sounds if the terminal case is damaged or opened For this setting VIRDI 3000 series have case open sensor installed After the setting is completely done press ENTER to move to the upper menu 3 5 5 Current time settings Fn Æ 3 Æ 5 In the main menu press 3 to select 3 Option Press 5 to see the following screen Time Se...

Страница 43: ...en 5 Time Setting 6 Other Setting Press 6 for other settings 3 5 6 1 LCD Backlight On Off settings LCD Backlight 0 Off 1 On Default 0 Fn Æ 3 Æ 6 This is to set LCD backlight If it is set to 1 LCD backlight is on all the times On the other hand if it is set to 0 the LCD backlight is normally off and keypad operation or placing a card makes the backlight on Since it has passed 10 seconds after relev...

Страница 44: ...ddress Gateway Terminal gateway address Subnet mask Terminal subnet mask address Server IP IP address of network server connected to the terminal Svr port Port number of network server program Card Reader Card reader type FP Sensor Fingerprint sensor type 1 1 Level Identification level for 1 1 authentication 1 N Level Identification level for 1 N authentication Max User Maximum user capacity to be...

Страница 45: ...to 1 the terminal is locked and nobody is accessible to the specific area through locked terminal until the administrator unlocks the terminal For this setting Allow admin to access in terminal configuration of server program should be permitted After the setting is completely done press ENTER to move to the upper menu 3 7 2 Reading card number Fn Æ 5 Æ 2 Place Your Card This is an extra function ...

Страница 46: ...nput 084265 as the previously set password and press ENTER to show the detailed setting items 3 8 1 System configuration settings 1 System Config 2 Set Fn key 3 Card Reader 4 FP Sensor Press 1 for system configuration settings 3 8 1 1 User ID length settings Fn Æ 6 Æ 084265 ENTER Æ 1 ID Length 2 8 4 Default setting 4 digits This ID length can be 2 8 digits and should be the same as that of ID regi...

Страница 47: ...1 F1 O 2 F2 O 3 F3 O 4 F4 O 5 Ent O 6 FP O Default setting all O This is to enable or disable the function keys O means enabling the function key and X means disabling the function key Whenever the number conformed to a function key in this setting is pressed this setting is changed between O and X In this setting 1 conforms to F1 2 conforms to F2 3 is for F3 4 is for F4 5 is for ENTER and 6 is fo...

Страница 48: ...ng After the setting is completely done press ENTER to move to the upper menu 3 8 4 Fingerprint sensor settings 3 8 4 1 1 1 verification level settings Fn Æ 6 Æ 084265 ENTER Æ 4 1 1 Level 1 9 4 Default setting 4 This is to set 1 1 matching security level for a terminal between the fingerprint captured from fingerprint input window and the relevant fingerprint stored in a terminal The higher 1 1 ma...

Страница 49: ...For your information 1 N authentication level is not set for respective user but only for a terminal Press ENTER to move to the next setting 3 8 4 3 Intelligent Capture settings Fn Æ 6 Æ 084265 ENTER Æ 4 Æ ENTER Æ ENTER I Capture N 0 Y 1 1 Default setting 1 This adjusts the sensor settings automatically to enhance good fingerprint detection capability by reducing bad influences from humid fingers ...

Страница 50: ...d through Wiegand output port User ID should be set as less than 7 digits This setting is not related to external Wiegand reader In cases of 1 or 2 settings the below mentioned site code should be set Site Code 0 255 000 Default setting 000 An administrator can assign the site code of from 0 to 255 which is transmitted together with a user ID After this setting is completely done press ENTER to mo...

Страница 51: ...nitialize the log data press 1 If not press 2 All the log data related to authentication are deleted configuration settings and users information are not deleted After this initialization is successfully done it moves to the upper menu together with a ppiririck buzzer sound 3 8 6 3 Factory default initialization Fn Æ 6 Æ 084265 ENTER Æ 6 Æ 3 Init Terminal Y 1 N 2 To initialize everything to factor...

Страница 52: ...tion in access control application an administrator can specify F1 F2 F3 and F4 modes at his her discretion as F1 F2 F3 and F4 modes are not specified as a respectively fixed mode by manufacturer UNION COMMUNITY Fingerprint authentication Fingerprint authentication in the corresponding mode by pressing a relevant function key Enter F1 F2 F3 and F4 Fingerprint authentication through auto sensing wi...

Страница 53: ...on the LCD window 00 00 0001 If the user ID is 0001 input 1 or 0001 and press the function key 00 00 Place your finger close to the input window when the light on the fingerprint input window turns on together with the voice message Please enter your fingerprint Do not remove your finger until you hear a ppig buzzer sound 00 00 If authentication is successfully done a success message is displayed ...

Страница 54: ... to the input window when the light on the fingerprint input window turns on together with the voice message Please enter your fingerprint Do not remove your finger until you hear a ppig buzzer sound 00 00 If authentication is successfully done a success message is displayed on the LCD together with a voice message You are authorized The door LED turns on and door relay runs The default screen app...

Страница 55: ...er password to be inputted after a ppiriririck buzzer sound Input the relevant password and press ENTER For security reason the password is displayed as on the LCD screen not actual numbers 00 00 If authentication is successfully done a success message is displayed on the LCD together with a voice message You are authorized The door LED turns on and door relay runs The default screen appears after...

Страница 56: ... door LED turns off and door relay is back again after the door open setting time has elapsed Error message The following error message appears together with a voice message Please try again 00 00 Non registered card 00 00 During authentication request to the authentication server network trouble occurred or network line was disconnected In case of a user who is registered as RF FP or ID FP RF FP ...

Страница 57: ... Æ ID group authentication 1 For your information refer to the followings on how to use this authentication in more details If the relevant ID for a user is 1234 enter only 12 for this authentication This matching is performed just among users having IDs of from 1200 to 1299 starting with 12 If the ID is 0012 enter 0012 or 00 for authentication 00 00 12 If the user ID is 1234 enter 1 12 or 123 and...

Страница 58: ... 0001 enter 1 or 0001 and press the function key The light on the fingerprint input window turns on together with the voice message Please enter your fingerprint during auto sensing fingerprint input alone is sufficient When a fingerprint is entered the authentication result will be displayed on the LCD window 00 00 0001 If the user ID is 0001 input 0001 and press the function key 00 00 When the l...

Страница 59: ...on Press the function key which is related to specific T A mode If the function key is not used and authentication process is done in auto sensing the current mode on the screen is working for authentication Password authentication After inputting the user ID and changing the authentication mode by pressing the corresponding function key input the password for authentication Card authentication af...

Страница 60: ... Menu Æ 3 Option Æ 1 Application Æ 1 T A set more than one key to O in Multi Fn key setting The keys set to X are not applied in this multi key function As a mode is defined as a function key plus a number key press a number key after pressing the function key for authentication In the server program authentication mode is displayed as a function key plus a number key like F3 1 For example when F4...

Страница 61: ...at Key On Off After this setting is done double authentication by using ENTER is not available 4 3 1 Meal classification In meal control the function key is just operation key for authentication and there is just meal classification with a meal time frame there is no mode classification The number shown in the LCD screen means the number of authentication for a specific meal time period Screen des...

Страница 62: ...uble authentication Set as below Menu Æ 6 Device Æ 2 Set Fn key settings Æ Ent O at Key On Off The default setting is O so there is no need to change it However if it does not work check this setting again Fingerprint user double authentication 123 08 34 While pressing ENTER in the main screen place your finger 123 08 34 If authentication is successfully done a success message is displayed 124 08 ...

Страница 63: ...82 2 6488 3099 E Mail sales unioncomm co kr http www unioncomm co kr eng 00 00 With a ppiriririck buzzer sound it waits for the user password to be input Press ENTER after inputting the password 123 08 34 If authentication is successfully done a success message is displayed 124 08 34 When it returns to the main screen the number of meals increases ...

Отзывы: