background image

Specifications

General

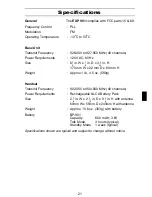
The EXP 901 complies with FCC parts 15 & 68.

Frequency Control

: PLL

Modulation

: FM

Operating Temperature

: -10

°

C to 50

°

C

Base Unit

Transmit Frequency

: 926.000 to 927.950 MHz (40 channels)

Power Requirements

: 120 VAC, 60 Hz

Size

: 6

3
4

 in. W x 

7
8

 in. D x 3

5

32

 in. H

170 mm W x 22 mm D x 80 mm H

Weight

: Approx.1 lb., 4.5 oz. (580g)

Handset

Transmit Frequency

: 902.050 to 904.000 MHz (40 channels)

Power Requirements

: Rechargeable Ni-Cd Battery Pack

Size

: 2 

3
8

 in. W x 2 

3

16

 in. D x 9 

5
8

 in. H with antenna

60mm W x 55mm D x 245mm H with antenna

Weight

: Approx. 10.6 oz. (303g) with battery

Battery

: BP-901

Capacity

600 mAH, 3.6V

Talk Mode

3 hours (typical)

Standby Mode

1 week (typical)

Specifications shown are typical and subject to change without notice.

21

Содержание EXP901

Страница 1: ...hing the Belt Clip 10 Installing the Rechargeable Battery Pack 11 Using Your EXP 901 13 Preparing the Base Unit and Handset 13 Handset Earpiece Volume 13 Answering a Call 13 Making a Call 14 Dialing a Stored Number 14 Chain Dialing 14 Special Features 15 Using Your EXP 901 Memory 16 Using your EXP 901 Intercom 18 Using the EXP 901 as a Room Monitor 19 Troubleshooting 20 Important Electrical Consid...

Страница 2: ...face This product should never be placed near or over a radiator or heat register This product should not be placed in a built in installation unless proper ventilation is provided 7 This product should be operated only from the type of power source indicated on the marking label If you are not sure of the type of power supply to your home consult your dealer or local power company 8 Do not allow ...

Страница 3: ...as leak in the vicinity of the leak Caution To reduce the risk of fire or injury to persons by the Rechargeable Battery Pack read and follow these instructions 1 Use only the Rechargeable Battery Pack specified in this Operating Guide 2 Do not dispose of the Rechargeable Battery Pack in a fire It may explode 3 Do not open or mutilate the Rechargeable Battery Pack Released electrolyte is corrosive ...

Страница 4: ...issing or damaged do not return it to the place of purchase Instead contact Uniden Customer Service at 800 297 1023 8 00 a m to 5 00 p m EST Monday through Friday FCC Requirements You are no longer required by the FCC to notify your local telephone company of your intent to connect a new telephone Your local telephone company may call you and request information about your phone such as the brand ...

Страница 5: ... Without digital code security another Handset could make calls using your Base Unit and telephone line Therefore to avoid any unauthorized calls through your Base Unit a Digital Code feature was added to your EXP 901 This Digital Code is shared only between the Handset and Base Unit The Code is set automatically when you first use the phone Reset and Restore the Digital Code 1 Be sure the Handset...

Страница 6: ...tion on the installation of these jacks 2 4 Prong Jack An adapter not included is required The adapter plugs into the 4 prong jack and the telephone line cord plugs into the adapter 3 Hard wired Jack A modular jack converter not included is required You may need to rewire when connecting the converter making color coded connections Note Your Uniden Cordless Telephone Dealer or a telephone supply s...

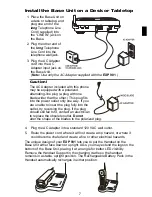
Страница 7: ...ert the plug fully into the outlet try reversing the plug If the plug should still fail to fit contact an electrician to replace the obsolete outlet Do not alter the shape of the blades to the polarized plug 4 Plug the AC Adapter into a standard 120 VAC wall outlet 5 Route the power cord where it will not create a trip hazard or where it could become chafed and create a fire or other electrical ha...

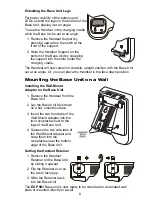
Страница 8: ...e Handset in the face down position Mounting the Base Unit on a Wall Installing the Wall Mount Adapter on the Base Unit 1 Remove the Handset from the Base Unit 2 Lay the Base Unit face down on a flat smooth surface 3 Insert the two front tabs of the Wall Mount Adapter into the two receptacles next to the legs of the Base Unit 4 Squeeze the two side tabs of the Wall Mount Adapter and snap them into...

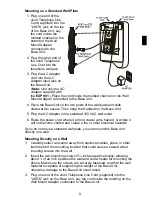
Страница 9: ...let 6 Route the power cord where it will not create a trip hazard or where it will not become chafed and create a fire or other electrical hazards If you do not have a standard wall plate you can mount the Base Unit directly on a wall Mounting Directly on a Wall 1 Carefully select a location away from electrical cables pipes or other items behind the mounting location that could cause a hazard whe...

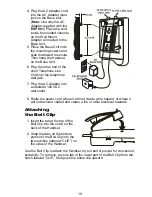
Страница 10: ...er into a standard 120 VAC wall outlet 8 Route the power cord where it will not create a trip hazard or where it will not become chafed and create a fire or other electrical hazards Attaching the Belt Clip 1 Insert the tab at the top of the Belt Clip into the notch on the back of the Handset 2 Snap the tabs on the bottom portion of the Belt Clip into the two notches labeled CLIP on the sides of th...

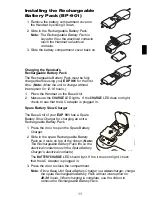
Страница 11: ... LED does not light check to see that the AC Adapter is plugged in Spare Battery Slow Charger The Base Unit of your EXP 901 has a Spare Battery Slow Charger for charging an extra Rechargeable Battery Pack 1 Press the door to open the Spare Battery Charger 2 Slide in the spare Rechargeable Battery Pack so it rests on top of the ribbon Note The Rechargeable Battery Pack fits so the electrical contac...

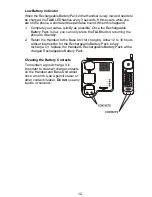
Страница 12: ... can only press the TALK button returning the phone to Standby 2 Return the Handset to the Base Unit for charging Allow 12 to 16 hours without interruption for the Rechargeable Battery Pack to fully recharge Or replace the Handset s Rechargeable Battery Pack with a charged Rechargeable Battery Pack Cleaning the Battery Contacts To maintain a good charge it is important to clean all charge contacts...

Страница 13: ...lect either of two ringer sounds Note This sets the ringer tone only when the phone is not in use 5 Press the VOL R VOL button on the Handset to select either high or low ringer volume Note This sets the ringer volume only when the phone is not in use Handset Earpiece Volume Press VOL R VOL on the Handset to select a loud or soft volume level in the Handset earpiece Answering a Call 1 The Handset ...

Страница 14: ... 2 3 4 5 6 7 8 9 or 0 For location 10 press 0 4 Your EXP 901 then dials the previously stored number To store a number refer to Using Your EXP 901 Memory on page 17 Note If you select a memory location that does not have a stored number the Handset will beep rapidly and the phone will not dial Chain Dialing On certain occasions after dialing a number you may be asked by the party or service you ar...

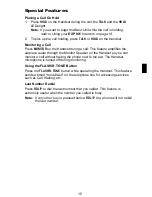
Страница 15: ...dio through the Monitor Speaker on the Handset so you can monitor a call without having the phone next to the ear The Handset microphone is turned off during monitoring Using the FLASH R TONE Button Press the FLASH R TONE button while operating the Handset This feature sends a timed hook flash on the telephone line for accessing services such as Call Waiting etc Last Number Redial Press RDL P to d...

Страница 16: ...cation 4 Press MEMO Press 4 Press 5551234 Press MEMO The Handset beeps confirmation and the TALK LED goes out 6 Write the stored number and its memory location number on one of the enclosed stickers Storing a One Touch Dialing Number 1 Remove the Handset from the Base Unit 2 Press MEMO 3 Press the One Touch Dialing button A B or C you wish to program You hear a beep and the TALK LED goes out Note ...

Страница 17: ...n counts as one digit 6 Enter the number to be dialed in Tone Mode If you want to add a pause between numbers press RDL P 7 Press MEMO the Handset beeps confirmation and the TALK LED goes out Example Store 555 1234 plus tone number 765 4321 in memory location 8 Press MEMO Press 8 Press 5551234 Press RDL P To enter delay between numbers Press TONE Switches Handset to Tone Mode counts as one digit P...

Страница 18: ...ON HOLD Paging from the Handset to the Base Unit 1 Press INT COM on the Handset If no answer press INT COM again to disconnect 2 At the Base Unit press INT COM to answer the page Speak into the microphone 3 To turn off the Intercom press INT COM at the Base Unit OR Press TALK or INT COM on the Handset Using the EXP 901 as a Room Monitor You may use the EXP 901 Handset to monitor activity near the ...

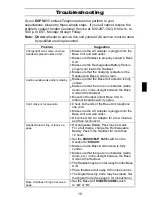
Страница 19: ...stacles walls doors etc in line of sight between the Base Unit and the Handset Move the Handset and or Base Unit to different locations and try again Can t make or receive calls Check both ends of the Base Unit telephone line cord Make sure the AC Adapter is plugged into the Base Unit and wall outlet Disconnect the AC Adapter for a few minutes and then reconnect it Handset doesn t ring or receive ...

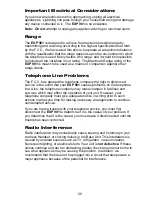
Страница 20: ... 901 causes problems on the telephone line Also the telephone company may make changes in facilities and services which may effect the operation of your unit However your telephone company must give adequate notice in writing prior to such actions to allow you time for making necessary arrangements to continue uninterrupted service If you are having trouble with your telephone service you must fir...

Страница 21: ...H 170 mm W x 22 mm D x 80 mm H Weight Approx 1 lb 4 5 oz 580g Handset Transmit Frequency 902 050 to 904 000 MHz 40 channels Power Requirements Rechargeable Ni Cd Battery Pack Size 2 3 8 in W x 2 3 16 in D x 9 5 8 in H with antenna 60mm W x 55mm D x 245mm H with antenna Weight Approx 10 6 oz 303g with battery Battery BP 901 Capacity 600 mAH 3 6V Talk Mode 3 hours typical Standby Mode 1 week typical...

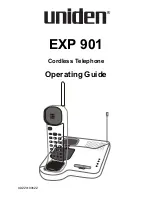
Страница 22: ...EXP 901 Cordless Telephone Operating Guide UDZZ01906ZZ ...

Страница 23: ...e battery or cause the battery to explode Rechargeable Nickel Cadmium Batteries must be recycled or disposed of properly Residents of Minnesota should contact 1 800 225 PRBA for information concerning reclamation and disposal of Rechargeable Nickel Cadmium batteries Residents outside of Minnesota should contact their local authorities for information concerning reclamation and disposal of Recharge...

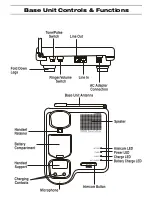
Страница 24: ...Base Unit Controls Functions ...

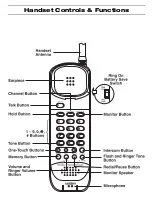
Страница 25: ...Handset Controls Functions ...

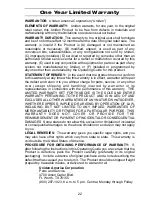
Страница 26: ...handling incurred by warrantor or its representatives in connection with the performance of this warranty THE LIMITED WARRANTY SET FORTH ABOVE IS THE SOLE AND ENTIRE WARRANTY PERTAINING TO THE PRODUCT AND IS IN LIEU OF AND EXCLUDES ALL OTHER WARRANTIES OF ANY NATURE WHATSOEVER WHETHER EXPRESS IMPLIED OR ARISING BY OPERATION OF LAW INCLUDING BUT NOT LIMITED TO ANY IMPLIED WARRANTIES OF MERCHANTABIL...

Отзывы: