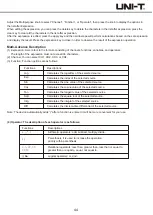
After loading, the Ref waveform status will be displayed in the lower left corner, including time base scale and amplitude
scale. At this point you can use the vertical and horizontal control knob to adjust the Ref wavform’s position on the screen,
the time base scale and the amplitude scale.
Remark:
Only when the oscilloscope is connected to an external USB storage device such as a USB flash drive can you select
the disk as USB, and then save the settings to the USB storage device. When the USB storage device is not connected,
it will prompt “USB device is not inserted”.
When loading, the disk and file name must be set to match the one previously saved, if the settings have not been saved
to the selected location before, it will prompt ”Load Failed”.
11.3 Print Screen
The PrtSc key can be used to store the current screen in BMP format to an external USB storage device. The bitmap can
be opened directly on the PC. This function can only be used when external USB storage device is connected.
Press the UTILITY key to enter the auxiliary function settings menu.
12.1 System Function Settings
Self-correcting:
Self-correcting allows the oscilloscope to work optimally to obtain the most accurate measurements. You can perform this
function at any time, especially when the ambient temperature range reaches or exceeds 5
℃
. Before performing the
self-correcting operation, make sure that the oscilloscope is operating for more than 20 minutes.
Press UTILITY self-correcting and a warning dialog box pops up: “Please confirm that no signal is connected to any
channel”. After confirming, press OK to start self-correcting, it takes about 5mins.
System Information:
Press UTILITY system information to view the oscilloscope’s model number, software and hardware version number.
Language:
Press UTILITY
language to select simplified Chinese or English.
Menu Display:
The time of the menu display. You can press to show or hide the menu.
Press UTILITY
menu display , you can select 1s, 2s, 5s, 10s, 20s, or manual by adjusting the Multipurpose knob.
Square Wave Output:
Press UTILITY
PgDn
square wave output to set the square wave output frequency: 10Hz, 100Hz, 1kHz and 10kHz.
Frequency meter:
Press UTILITY
PgDn
frequency meter, select on and will be displayed at the top of the screen.
The frequency meter is the counter of trigger event frequency in the trigger channel, and it is valid when trigger type is
edge or pulse width.
AUX Output Selection:
Press UTILITY PgDn output selection to select trigger or Pass/Fail.
Trigger: AUX output terminal outputs the trigger synchronization signal.
Pass/Fail: AUX outputs the pass/fail signal.
Chapter 12 Auxiliary Function Settings
53
Содержание UPO2000E Series
Страница 1: ...UPO2000E Series Ultra Phosphor Oscilloscope User Manual...
Страница 66: ......

