background image

3.


Constant Voltage / Constant Current 

In constant voltage mode, the output current is lower than set value, the channel indicator will 
be green (CV), and the voltage keeps as set value. If the output current reaches the set value, 
the  device  will  switch  to  the  constant  current  mode.  In  constant  current  mode,  the  channel 
indicator will be red (CC). The output current is equal to set value and the voltage is lower than 
set value. If the output current is lower than the set value, device  will switch to the constant 
voltage mode.   

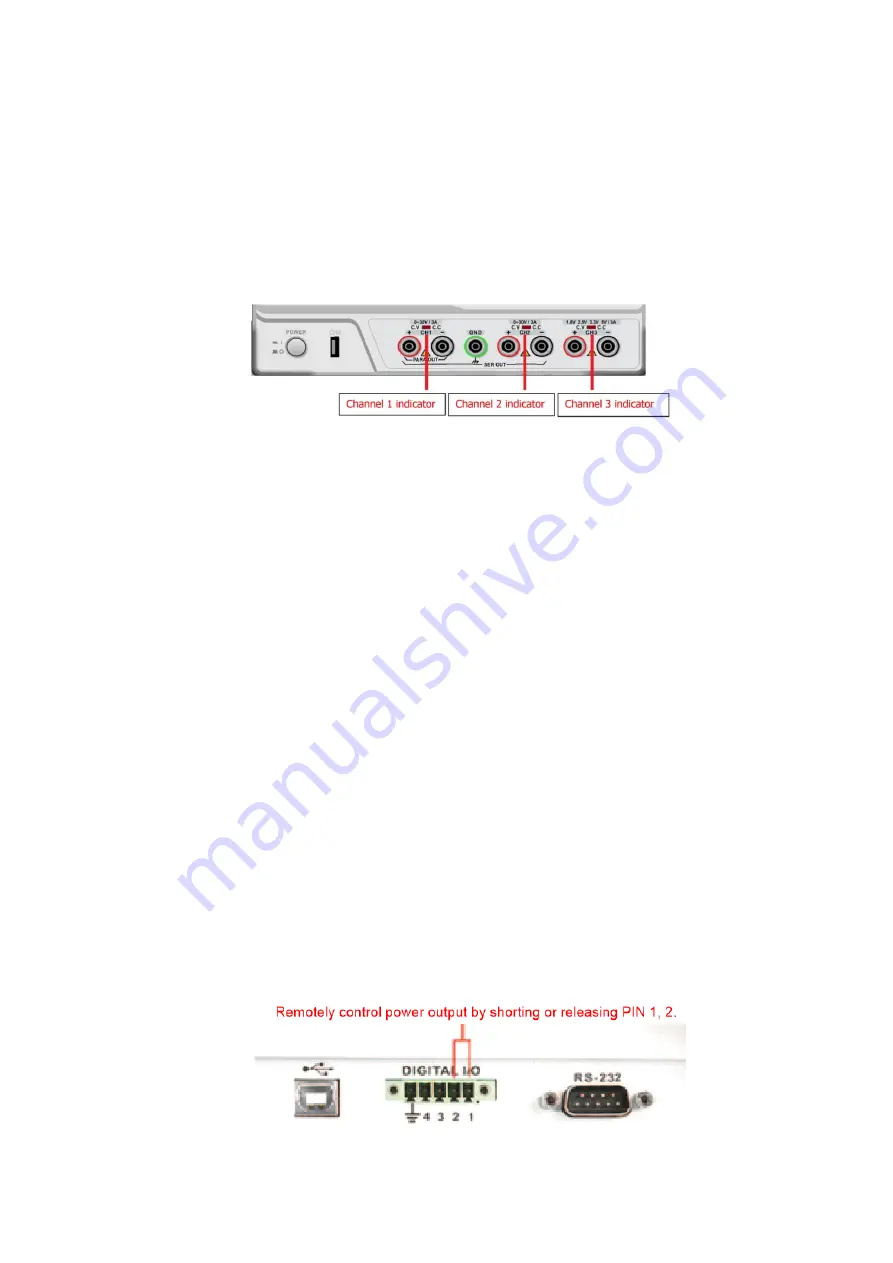
The channel indicators are shown below:     


4.


OVP (overvoltage protection), OCP (overcurrent protection) 

Setting and Enabling 


Long press OVP button (>3s) to enter OVP threshold setting, press CH1 or CH2 to select the 
channel, then rotate the voltage knob to set the OVP limit, long press OVP button again to 
exit the OVP setting.   
Short  press  OVP  button  (backlight  on)  to  enable  the  overvoltage  protection,  if  the  output 
voltage  exceeds  the  OVP  set  limit,  the  output  will  be  shut  off,  and  the  OVP  symbol  will 
disappear  later.  Short  press  OVP  button  again  (backlight  off)  to  disable  overvoltage 
protection.   


Long press OCP button (>3s) to enter OCP threshold setting, press CH1 or CH2 to select the 
channel, then rotate the current knob to set the OCP limit, long press OCP button again to 
exit the OCP setting.   
Short  press  OCP  button  (backlight  on)  to  enable  the  overcurrent  protection,  if  the  output 
current exceeds the OCP set upper limit, the output will be shut off, and the OCP symbol will 
disappear  later.  Short  press  OCP  button  again  (backlight  off)  to  disable  overcurrent 
protection. 
 

5.


Remote Control DIGITAL I/O Interface 

To remotely control the output and shutoff of CH1/CH2, you can short-circuit or disconnect the 
pin 1 and 2 of the DIGITAL I/O terminal by a short-circuit wire or an external relay. The specific 
operations are as follows:   
When the pin 1 and 2 of the DIGITAL I/O terminal are short-circuited, the OUTPUT button on the 
front panel is disabled, the power output is forcibly turned on, and the ON symbol appears on 
the LCD.   
When  the  short  circuit  is  released,  the  OUTPUT  button  function  is  restored,  and  the  power 
output is turned off, the OFF symbol appears on the LCD. 
The DIGITAL I/O port is shown in the following figure:   


Содержание UDP3303C

Страница 1: ...UDP3303C Linear DC Power Supply User Manual ...

Страница 2: ...e contact your seller directly Uni Trend will not be responsible for any special indirect incidental or subsequent damage or loss caused by using this device UDP3303C Linear DC Power Supply Introduction The UDP3303C DC power supply is a cost effective program control DC power supply with outstanding performance reliable output and clear interface The UDP3303C DC power supply has three independent ...

Страница 3: ...ock Make sure the cover is tightly screwed before using the instrument Only use fuses that meet the model and rating value T6 3AL 250V for 110V 120V T3 15AL 250V for 220V 230V Never touch exposed joints and components after connecting the power supply Please check the vents and fans regularly to ensure good ventilation is maintained during use Poor ventilation will cause high temperature which wil...

Страница 4: ...he AC SELECTOR on the rear panel please disconnect the power before switching the input voltage The plug is used as the disconnecting device of the product The plug of the product should be inserted into the socket easily accessible to the user UDP3303C Main Features 4 digit voltage and current high precision display Overvoltage and overcurrent protection Output voltage current settings viewable R...

Страница 5: ... Ground Channel 2 output Channel 3 output Channel CV CC indicator Channel 3 scale button Current adjustment knob Channel 3 scale indicators Voltage adjustment knob Overcurrent protection Lock and unlock buttons Buzzer on and off Overvoltage protection CH1 CH2 output on and off View settings when output is on Channel 2 button Channel 1 button Store buttons LCD display Front Panel 0 30V 3 0A 0 30V 3...

Страница 6: ...ack Accuracy 25 C 5 C Voltage 0 1 30mV Current 0 5 2mA Ripple and Noise 5Hz 1MHz Voltage 1mVrms Current 3mArms Temperature Coefficient Voltage 300ppm Current 300ppm Parallel Mode Line Regulation 0 01 3mV Load Regulation 0 01 3mV rated current 3A 0 02 5mV rated current 3A Series Mode Line Regulation 0 01 5mV Load Regulation 300mV Error 0 5 10mV 10 30V no load access load 300mV 0 5 30mV 0 9 99V no l...

Страница 7: ...or will flash on the CH1 current position press the current knob to move the cursor and rotate the knob to adjust the current value Press CH2 to set the CH2 voltage and current values with the same method above Press the OUTPUT button to enable CH1 CH2 and CH3 outputs after voltage and current setting With the shutdown memory function the last set value can be automatically restored when the devic...

Страница 8: ...and the series mode will be restored when the device is restarted The series output connection is as follows 2 2 Parallel Settings Press CH2 button for 3s to enter parallel mode the PARA symbol will be on CH1 is the main positive output of parallel and CH1 is the slave negative output The parallel voltage and current settings can only be adjusted in CH1 and the CH2 settings will follow that of CH1...

Страница 9: ...appear later Short press OVP button again backlight off to disable overvoltage protection Long press OCP button 3s to enter OCP threshold setting press CH1 or CH2 to select the channel then rotate the current knob to set the OCP limit long press OCP button again to exit the OCP setting Short press OCP button backlight on to enable the overcurrent protection if the output current exceeds the OCP se...

Страница 10: ... the CH3 button the cursor will flash on CH3 voltage and can be fine adjusted The shutdown has a memory function The last set value will be restored when the device is started up next time The CH3 operation and display interfaces are as follows 7 M1 M5 Store Recall Functions Introduction After output parameters are set long press one of the M1 M5 buttons 3s to save the setting Short press one of t...

Страница 11: ...programing and upgrade and output control of power supply by upper computer 9 OTP over temperature protection Overview Inside the power supply there are two thermistors placed on the heat sink which has the maximum heat Once the power supply fails and the temperature of the heat sink reaches about 100 the over temperature protection is triggered and the output will be turned off with the OTP symbo...

Страница 12: ...3s the buzzer will be off With the shutdown memory function the last saved settings can be restored when the device is started up next time When the buzzer is enabled it beeps for example Power on off CH1 CH2 setting switching Independent series parallel switching Output on off OVP OCP setup and on off Pressing the voltage current knob SET VIEW setting output display switching LOCK UNLOCK operatio...

Отзывы: