-
16
-
ii. Attaching Parts & Assembly
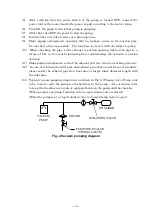
Step 4: Attach the diaphragm. Put the new diaphragm on the
connecting rod to replace the old one removed in Step 3. The
connecting rod, diaphragm and the push plate for the
diaphragm have either a concave or a convex part to help
provide a correct assembly. Align those positioning guides on
the same position. Make sure that there is no space on either
front and rear sides of the push plate for the diaphragm, as
this implies misalignment.
Connecting rod
Concave positioning guide
Convex positioning guide
Step 5: Using the torque screwdriver (4.0 Nm) and the small
flat head screw (M5×12), fasten the diaphragm and the push
plate for the diaphragm aligned in Step 4. Before fastening
tightly, check the alignment of the diaphragm. Also, apply the
Loctite 242 or Loctite 243 onto 2-4 threads from the screw tip
for the small flat head screws.
*Be careful when applying Loctite, as too much or too little
can cause damage.
*Be sure to always follow the appropriate tightening torque.
Failure to do so can lead to product damage.
2-4 threads
Loctite 242 or Loctite 243
Perfectly aligned
Small flat
head
screw
Concave positioning guide

