NOTA: lo spessore massimo del cruscotto per l'installazione del presente kit è di 42.5 mm.
NOTE: to install this kit, maximum dashboard width allowed is 1.65".
1)
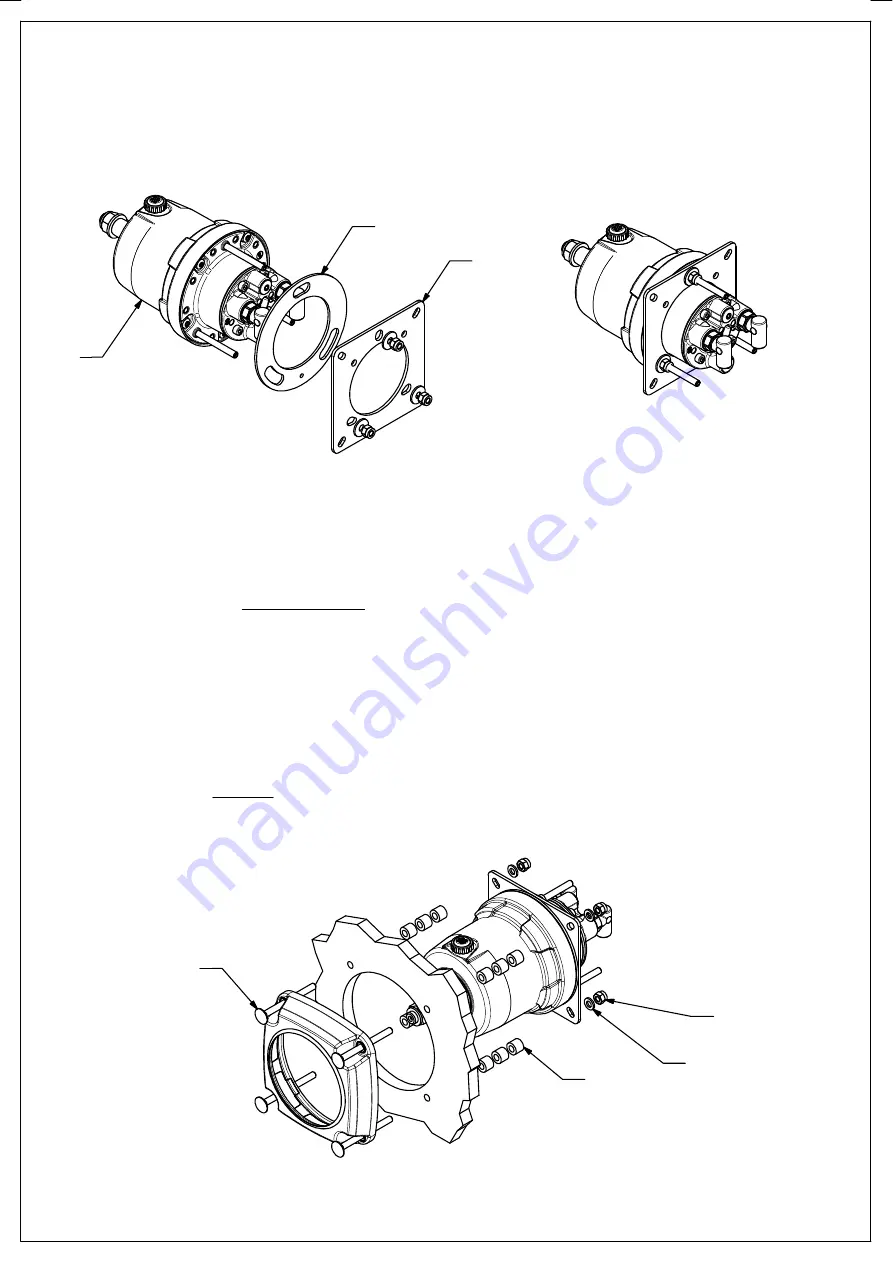
Applicare la guarnizione fornita con la pompa (3) e fissare la piastra in acciaio (1) alla base della pompa (2)
tramite le apposite viti, le rondelle ed i dadi autobloccanti (forniti con la pompa) come indicato in Fig. -1- (coppia
serraggio 8 Nm)
Mount the the gasket provided with the pump (3) and install the steel plate (1) on the pump (2) using screws,
washers and self-locking nuts (provided with the pump), as indicated in Fig. -1- (tightening torque 5,90 lb ft).
Fig. -1-
2)
Forare il cruscotto utilizzando come riferimento la dima di foratura allegata.
3)
Disporre frontalmente la flangia in plastica tenendo in posizione le 4 viti di fissaggio (5) fornite in dotazione.
NOTA: in questa fase, è possibile infraporre, posteriormente al cruscotto, i distanziali (4) in
acciaio (forniti nel kit e mostrati Fig. -2-) per aumentare la profondità di incasso della pompa di 10mm
ogni serie di quattro distanziali inseriti. (0-10-20-30 mm)
AVVERTENZA!
Verificare sempre che l'inserimento dei distanziali supplementari consenta ai dadi autobloccanti
M6 forniti (7), di avvitarsi completamente (fino all'anello frenante) sulle viti di fissaggio.
Avendo cura di trattenere la flangia in plastica (e le relative viti di fissaggio) aderente alla superficie del
cruscotto, calzare posteriormente la pompa con la piastra in acciaio sulle viti e fissarla usando i dadi
autobloccanti (7) e le rondelle (6) fornite con il kit (coppia serraggio 10Nm).
Drill the dashboard by using the given drilling template.
Place the plastic flange on the dashboard keeping in position the 4 fastening screws (5).
NOTE: in this phase, it is possible to insert the steel spacers (4) (provided in the kit and shown in
Fig. -2-) to reduce helm recess (10mm [0.4"] for each set of four spacers). (0"-0.4"-0.8"-1.2")
WARNING!
If using spacers, always check that there is enought thread left for the M6 self-locking nuts (7) to
have the locking ring entirely screwed.
Keep the plastic flange (and the fastening screws) close to the dashboard, fit the helm with the steel plate and
the washers (6) on the screws, and secure all by fastening the self-locking nuts (7) (tightening torque 7,40 lb ft).
fig. -2-
28/07/2016 (dis. 32446)
2
3
1
4
6
7
5
Содержание UP 20 F
Страница 24: ...Installationandmaintenancemanual ULTRAFLEX page24of71 PUMP FOR HYDRAULIC SYSTEMS E N G L IS H NOTES...
Страница 48: ...Manuale di installazione e manutenzione ULTRAFLEX pag 48 di71 POMPA PER SISTEMI IDRAULICI IT A L IA N O NOTE...
Страница 72: ...ULTRAFLEX S p A 16015 Casella Genova Italia Via Crose 2...


