background image


EVK-JODY-W3 - User guide 

UBX-20030840 - R02 

Board description


Page 17 of 29 


Power supply source 

Jumper configuration  

7 V – 24 V external power supply 
 
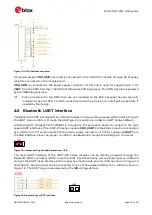
External supply (7 V – 24 V) must be connected to the power jack J100. The external supply 
voltage is first converted to 5 V using a DC-DC on the EVK. 
J100: Phoenix Contact 1721986 


All input voltages supplied from individual sources 
 
External supplies must be connected to the power jacks located on the bottom side of the 
EVK for 3V3 (J101), 1V8 (J103) and VIO (J102). 
J101-J103: Phoenix Contact 1721986 


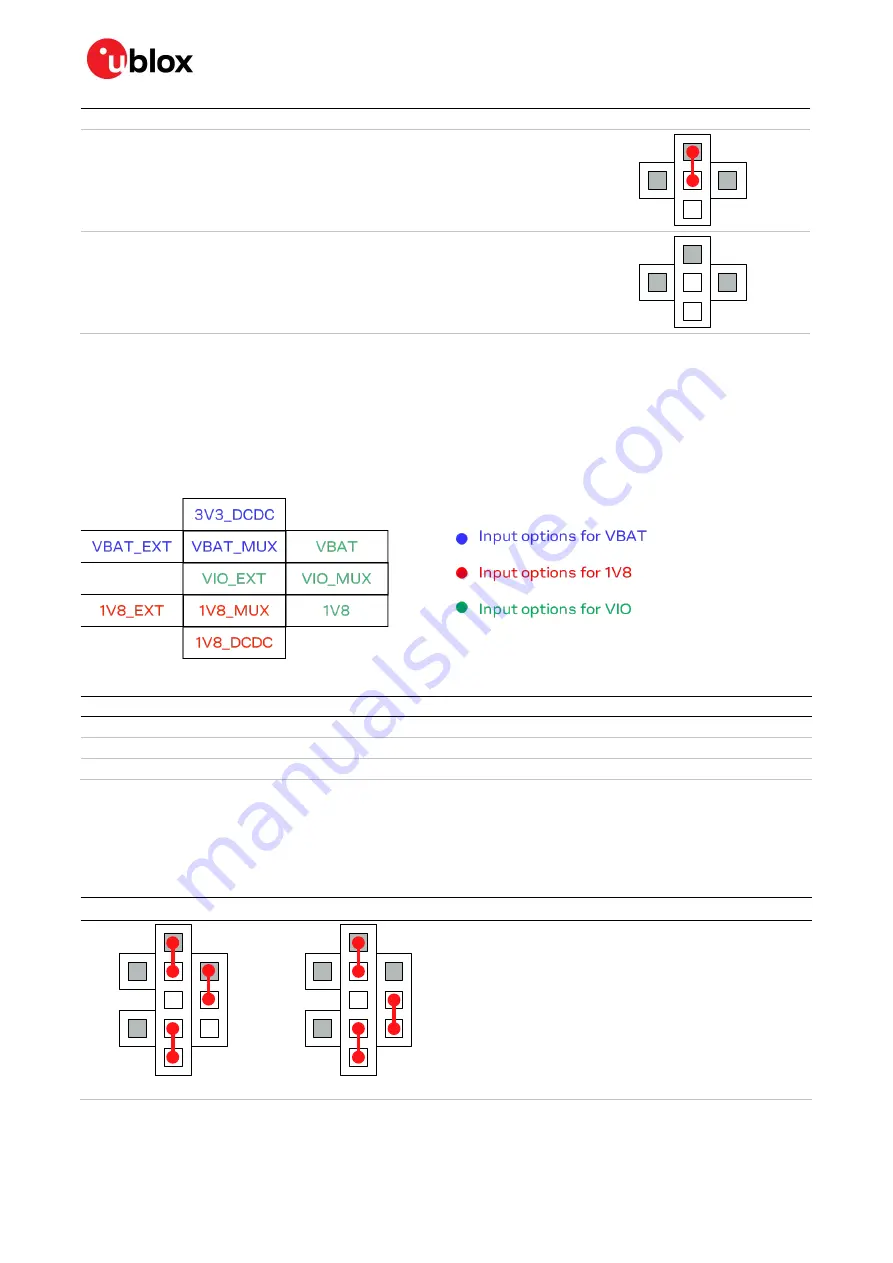
Table 5: Jumper settings for power supply selection for the EVK 

4.3.2


Input voltage selection 

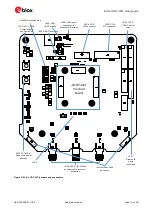
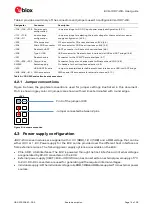
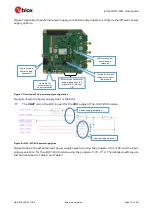
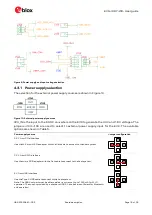
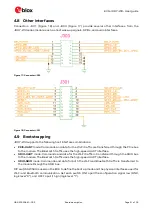
With reference to the power matrix shown in Figure 11, position jumpers J107, J108, J109, and J111 
to select the appropriate input voltages for the module. The jumpers configure the input between DC-
DC generated voltages and the direct input voltage from the individual supplies.  

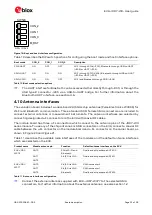
Figure 11 shows the jumper pins for configuring the input voltages described in Table 6. 


Figure 11: Input voltage pins 

Designator 

Module supply 

Source  

VBAT_MUX 

3V3 

Can be connected to 3V3_DCDC or VBAT_EXT 

VIO_MUX 

VIO 

Can be connected to VBAT, 1V8 or VIO_EXT 

1V8_MUX 

1V8 

Can be connected to 1V8_DCDC or 1V8_EXT 

Table 6: Input voltage options 

For the operation of EVK-JODY-W3, power supply jumpers must be set as explained in Table 5 and 
Table 7. The first one selects the external power supply and the second one defines the voltage levels 
to operate the module. Table 7 describes the different options to select the input voltages for the 
module. 

Jumper settings 

  Description / Voltage levels 


VIO (3.3 V) 


VIO (1.8 V) 

  Power supply using host interface (PCIe, SDIO or USB) or 

single external supply (VEXT) and DC-DC generated 
voltages. VIO voltage is derived from either 1V8 or VBAT. 


3V3/VBAT – 3.3 V 


1V8 – 1.8 V 


VIO – 1.8 V or 3.3 V 
 

Содержание EVK-JODY-W3

Страница 1: ...u blox com EVK JODY W3 Evaluation kit for JODY W3 host based modules User guide Abstract This document describes how to set up the EVK JODY W3 evaluation kit to evaluate JODY W3 series multiradio mod...

Страница 2: ...parties may hold intellectual property rights in the products names logos and designs included in this document Copying reproduction modification or disclosure to third parties of this document or an...

Страница 3: ...2 4 1 Block diagram 12 4 2 Overview of jumpers and connectors 12 4 2 1 Jumper conventions 14 4 3 Power supply configuration 14 4 3 1 Power supply selection 16 4 3 2 Input voltage selection 17 4 4 PCIe...

Страница 4: ...uetooth connectivity supported in JODY W3 series modules including External connectors to all host interfaces PCIe SDIO and UART USB interface to easily access the Bluetooth UART interface via a USB t...

Страница 5: ...ard The module board includes the JODY W3 series module and u FL antenna connectors directly accessing the antenna pins on the module The bigger carrier board hosts the module board and includes all t...

Страница 6: ...ZIF adapter for Wi Fi host communication One ZIF flat cable is included for both PCIe adapters Mini PCIe to ZIF adapter Mini PCIe to ZIF adapter for Wi Fi host communication One ZIF flat cable is incl...

Страница 7: ...h includes recipes for integrating the drivers into Yocto based projects can be provided on request by u blox Refer to the JODY W3 system integration manual 2 for a description of the available driver...

Страница 8: ...ltage 1 8 V 1 71 1 8 1 89 V I O supply voltage 3 3 V 3 14 3 3 3 46 V 1V8 Analog power supply voltage 1 8 V 1 71 1 8 1 89 V TA Ambient operating temperature 40 85 C Ripple Noise Peak to peak voltage ri...

Страница 9: ...ion 4 10 2 Set DIP switch SW503 to select the host interfaces for Wi Fi and Bluetooth from the possible combinations PCIE UART SDIO UART or SDIO SDIO as described in section 4 9 3 Configure the power...

Страница 10: ...PCIe and USB connectors o For SDIO connection connect the micro SDIO adapter card with the flat cable to the SDIO connector J204 on the EVK as shown in Figure 3 and insert the adapter card into an SDI...

Страница 11: ...ype C connector on the EVK see Figure 2 and connect it to a USB interface on the host system Make sure that jumper J400 is bridged default setting to enable Bluetooth communication over USB Refer to s...

Страница 12: ...m 4 2 Overview of jumpers and connectors Figure 5 shows an overview of the evaluation board and its connectors The EVK makes all the interfaces of the JODY W3 series module accessible through connecto...

Страница 13: ...nnector for Bluetooth bottom J203 PCIe ZIF connector SW503 Bootstrapping J300 J302 J303 Control lines J104 J105 J106 Power supply configuration J406 J408 J410 SMA connectors for external antennas J301...

Страница 14: ...ble the Bluetooth host interface via USB to UART bridge J406 J408 J410 SMA connectors SMA coaxial RF connectors for external antennas 4 10 Table 4 JODY W3 evaluation board connectors 4 2 1 Jumper conv...

Страница 15: ...Figure 8 JODY W3 EVK power supply tree Figure 9 shows the external input power supply selection using the jumpers J104 J106 and the input voltage selection for the JODY W3 module using the jumpers J10...

Страница 16: ...external power supply input for the EVK The available options are shown in Table 5 Power supply source Jumper configuration 3 3 V from PCIe interface Use the M 2 or mini PCIe adapter with the flat ca...

Страница 17: ...input between DC DC generated voltages and the direct input voltage from the individual supplies Figure 11 shows the jumper pins for configuring the input voltages described in Table 6 Figure 11 Inpu...

Страница 18: ...an be connected through a PCIe connector for Wi Fi communication with the host system Adapters for M 2 Key E and mini PCIe connectors on host side are included in the kit The PCIe host interface conne...

Страница 19: ...ins on J305 or through the USB type C connector via a USB to UART bridge default A USB to UART bridge FTDI FT234XD is included on the evaluation board to connect to the high speed UART interface of th...

Страница 20: ...ss 0x20 for all write commands and 0x21 for all read operations Place jumpers J401 and J402 on the bottom side of the EVK to enable the audio codec Figure 16 Jumpers to enable the audio codec The I2C...

Страница 21: ...are transferred through the PCIe bus to the module The Bluetooth traffic uses the high speed UART interface SDIO UART mode Commands and data for the Wi Fi traffic is transferred through the SDIO bus t...

Страница 22: ...nal antennas or measurement instruments The antenna interfaces are selected by connecting designated u FL connectors on the EVK with coaxial RF cables The module board has three u FL connectors which...

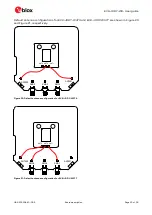
Страница 23: ...ations for EVK JODY W374 and EVK JODY W377 are shown in Figure 20 and Figure 21 respectively Figure 20 Default antenna configuration for EVK JODY W374 Figure 21 Default antenna configuration for EVK J...

Страница 24: ...to supply for audio codecs LEDs D405 Green WLAN Wi Fi activity signal from module GPIO D406 Yellow BT Bluetooth activity signal from module GPIO D407 Blue Table 12 LED Description Remove jumper J411 f...

Страница 25: ...ion To work around this issue use external power supplies or plug the USB cable only after PCI initialization When using the EVK JODY W3 with NXP i MX8 series platforms the SDIO interface cannot be us...

Страница 26: ...er oscillator LTE Long Term Evolution MAC Medium access control MIMO Multiple input multiple output MMC Multimedia card PC Personal computer PCI Peripheral component interconnect PCIe Peripheral compo...

Страница 27: ...s 1 JODY W3 series data sheet UBX 19010615 2 JODY W3 system integration manual UBX 19011209 3 JODY W2 level shifter integration application note UBX 19034257 4 EVK JODY W3 schematics For product chang...

Страница 28: ...ide UBX 20030840 R02 Revision history Page 28 of 29 C1 Public Revision history Revision Date Name Comments R01 9 Jul 2020 mzes Initial release R02 2 Nov 2020 mzes Minor editorial updates Released for...

Страница 29: ...onal Office China Beijing Phone 86 10 68 133 545 E mail info_cn u blox com Support support_cn u blox com Regional Office China Chongqing Phone 86 23 6815 1588 E mail info_cn u blox com Support support...

Отзывы: