background image

OPTIONAL:

 Caulking and installation of trim on

interior wall may be done. You can buy wood from
your local number or hardware supply. On the 
outside, caulk openings around top and sides of
cabinet, and all sides of wood sleeve to the opening.

NOTE:

 See Step 7, Item 3 of Window Mounting 

Instructions for bottom rail seal location.

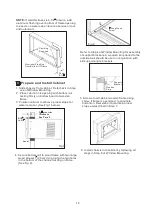
1. Cut or build a wall opening in the masonry wall
     similar to the frame construction (refer to Step
     2 of Through-wall Installation for a wall 
     thickness greater than 8-1/2  ).
2.  Secure cabinet in place using masonry nails,
     or the right masonry anchor screws. (Another
     way to do this is to build an in-between frame
     of 2x4 as shown in the Step 2 Prepare Wall
     illustrations-but make it double framed on 
     either side, and install between masonry wall 
     opening and cabinet. Frame must be securely 
     anchored to masonry wall opening). This way 
     gives very good louver clearance on either
     side of cabinet.
3. Install a lintel to support masonry wall above
     cabinet. Existing holes in cabinet can be used
     and/ or additional holes can be drilled to fasten
     cabinet at various positions. Be sure that side
     louver clearance is in accordance with Step 1 
     above.
4. Install exterior cabinet support brackets as 
     shown in Step 2 of Through-wall installation.
     Caulk or flash if needed, to provide a  weather-
     tight seal around top and sides of cabinet.
5. To complete installation, apply wood trim 
     mouldings around cabinet on the inside of 
   

Masonry Construction

 17

the room.

Содержание MWK-15CRN1-BJ7

Страница 1: ...87795011 MWK 15CRN1 BJ7 USER MANUAL 1 866 206 0888 3 years ans warranty garantie...

Страница 2: ...for use by young children or infirm persons without supervision Young children should be supervised to ensure that they do not play with the air conditioner If the power cord is to be replaced replace...

Страница 3: ...y cause explosion fire and burns It may cause electric shock or fire due to heat generation It may cause electric shock It may cause failure of machine or electric shock It may cause fire and electric...

Страница 4: ...deterioration of quality etc It may cause failure of product or fire Do not use for special purposes Turn off the main power switch when not using the unit for a long time If water enters the unit tu...

Страница 5: ...air conditioner contains a current detection device designed to reduce the risk of fire Please refer to the section Operation of Current Device for details In the event that the power supply cord is d...

Страница 6: ...e The unit can be controlled by the unit control alone or with the remote Vibration Unit may vibrate and make noise because of poor wall or window construction or incorrect installation ELECTRONIC CON...

Страница 7: ...ction only when cooling is not desired such as for room air circulation or to exhaust stale air on some models Remember to open the vent during this function but keep it closed during cooling for maxi...

Страница 8: ...n the display This temperature will be automatically maintained anywhere between 62 F 17 C and 86 F 30 C If you want the display to read the actual room temperature see Operate on Fan Only section NOT...

Страница 9: ...e will register in 5 seconds and the system will automatically revert back to display the previous temperature setting or room temperature when the unit is on When the unit is off there is no display...

Страница 10: ...ress and hold the Up and Down Temp Timer buttons at the same time for 3 seconds Fresh Air Vent Control on some models Figure 1 VENT CLOSED Figure 2 VENT OPEN The Fresh Air Vent allows the air conditio...

Страница 11: ...es not allow the clearance required correct by adding a piece of wood as shown in FIG 2 or by removing storm window while room air conditioner is being installed 4 Check for anything that could block...

Страница 12: ...ips Screwdriver 7 16 Locking screw and Flat washer for window panels 3 4 Long Hex head Screw Safety Lock 1 2 Long screw and Locknut 3 4 Long Flat Head Bolt and Locknut Sill Angle Bracket Long hex head...

Страница 13: ...our unit may come with internal packaging This packaging must be removed prior to installing the air conditioner back into the cabinet see Fig 5 4 Pry away front from cabinet sides as shown in Fig 3 5...

Страница 14: ...rk center of window stool 2 Place cabinet in window with bottom stool angle firmly seated over window stool as shown Bring window down temporarily behind top angle to hold cabinet in place Stool Stool...

Страница 15: ...rely 1 2 Long Screws and Locknuts Locking Screw 7 Install Window Lock and Sash Seal 1 Trim sash seal to fit window width Insert into space between upper and lower sashes 2 Attach right angle safety lo...

Страница 16: ...2 WIDTH X inside model width plus twice the thickness of framing material used HEIGHT Y inside model height plus twice the thickness of framing material used Inside Frame Height 18 47 9cm or18 45 7cm...

Страница 17: ...g 1 below Level 5 16 to 3 8 3 4 plus trim thickness See Para 5 Fig 1 4 Secure bottom rail to wood frame with two large wood screws 1 2 5cm long using the two holes in the bottom of the channel resting...

Страница 18: ...rame of 2x4 as shown in the Step 2 Prepare Wall illustrations but make it double framed on either side and install between masonry wall opening and cabinet Frame must be securely anchored to masonry w...

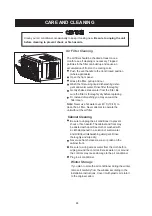
Страница 19: ...washing you may vacuum the filter clean Note Never use hot water over 40 C 104 F to clean the air filter Never attempt to operate the unit without the air filter Cabinet Cleaning Be sure to unplug th...

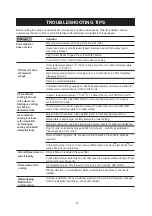
Страница 20: ...rn Control ON and set to desired setting O O O O Air conditioner cooling but room is too warm ice forming on cooling coil behind decorative front Outdoor temperature below 17 C 62 F To defrost the coi...

Страница 21: ...rmal during excessively humid days Remote sensor some models Remote control not located within range Place remote control within 20 feet and at a Remote control signal obstructed Remove obstruction Ro...

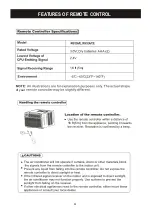
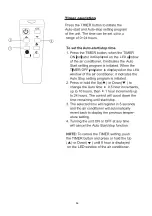
Страница 22: ...FEATURES OF REMOTE CONTROL 16 ft 5m 16 ft 5m of your 21...

Страница 23: ...22...

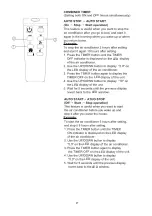
Страница 24: ...23...

Страница 25: ...24...

Страница 26: ...25 change is...

Страница 27: ...26 LED LED LED is displayed is displayed in in...

Страница 28: ...27 LED LED LED LED LED LED LED LED LED LED...

Страница 29: ...ted to the closest service centre The product is guaranteed for 36 months if used for normal trade purposes and is valid for the original buyer only Any warranty is deemed invalid if the product has b...

Отзывы: