7
Appliance Diagram
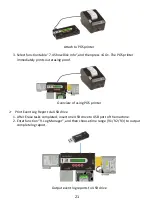
Connect a printer to printout log report after erasing tasks. Please contact the original
manufacturer of eraser for this printer model.
Export log report to USB drive and also update firmware via USB drive.
Data Sanitization
Caution
It will erase the data in HDD, please make sure you have backup all
important data before using this function.
To cancel operation of any erasing mode, press <ESC> key and hold
continuously for 3 seconds to exit any erasing tasks.
The user is responsible to verify the targets’ quality. Please pick a few
completed targets for testing in a mass production environment for QC.
Step 1: Prepare HDDs
Prepare HDDs for disposal.
Step 2: Place HDDs
Insert HDDs for disposal into target ports.
Note
Any port can erase data immediately.
Some modes will take much longer time than quick erase. Users can
press <ESC> to cancel, but original HDD format and data might not
recover.
Step 3: Enter function "1.Quick Erase"
Use
▲
▼
to select the mode of erasing method, and then press "OK". Data Erase will
proceed.


