background image

PAGE 4 OF 21 

0915 IH-2030

START-UP

Open the tank valve and wait 5 seconds to fully 

pressurize hose. You will hear the flow check valve open 

with an audible click.

1.  Press the safety trigger. This prevents the gas handle 

from opening accidentally.

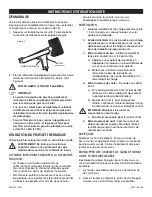
2.  Slowly squeeze the gas handle until the igniter fires 

with an audible click. (See Figure 2)  

CAUTION! GUN WILL IGNITE.

IMPORTANT:

•  Squeezing the gas handle too quickly will cause 

the igniter to fire the spark plug before the gas 
mixture is ready.

•  If gun fails to fire fully, release BOTH the safety 

trigger and gas handle to reset the igniter. Then 
repeat the starting procedure.

•  For thinner films set the regulator for lower pressure 

and adjust up for thicker films. Factory preset is 22 
PSI.

USING THE HEAT GUN

Use gun only in well-ventilated areas.

WARNING! Do not operate gun in areas 
with flammable gases or where smoking is 
prohibited.

IMPORTANT HEAT SHRINK TIPS:

•  Heat only softens film. Shrinking occurs as film cools. 

Do not concentrate heat and wait for film to shrink 

before moving the gun.

•  Keep the gun moving. With a little practice, you can 

hold the gun closer to the film and shrink a pallet in 

less than 2 minutes.

•  Make sure the four corners of the bag are wrapped 

under pallet.

PALLETIZING

1.  Elevate pallet load approx. 6" from floor. Leave 

area under the four corners clear.

2.  Carefully fit pallet bag over load. Do not 

puncture or tear the bag. Bag should fit snugly 

over load and overlap the base of the pallet 

almost to the floor.

3.  Shrink Bottom:

 Ignite gun and hold about 12" 

from film. 

a.  Move around pallet applying heat to the 

bottom edge of the bag and blow it under 

the pallet.

b.  Shrink film to grip bottom of pallet firmly, 

locking bag to pallet and unitizing load.

4.  Shrink Sides:

 Do one side at a time.

a.  Holding gun 12" from film, shrink side by 

sweeping gun smoothly across the bottom 

edge.

b.  Move up one foot and sweep back, 

continue to move up and sweep across the 

side until you reach the top. 

IMPORTANT! Keep gun moving at all times.

c.  Repeat for the remaining sides.

5.  Shrink Top.

 Since top is already pulled taut by 

the four sides being shrunk, this requires less heat 

than shrinking the sides.

PATCHING

Patch holes easily: Lay a square of film over the hole 

and apply heat to the edges to weld patch to bag. Also 

useful for reinforcing edges or corners.

SHRINK WRAPPING LARGE OR ODD-SHAPED 

LOADS

Wrap objects too big to fit under a bag by joining 

several sheets of shrink film together.

1.  Adjoining sheets should overlap 18".

2.  Secure sheets using the weight of the load at the 

base or with battens tacked to the skids.

SAFETY

TRIGGER

HAND

TRIGGER

(GAS HANDLE)

Figure 2

OPERATING INSTRUCTIONS CONTINUED

Содержание Shrinkfast 975

Страница 1: ...ith the parts and safe operation of this tool Keep for future reference Never point the gun at another person Inspect hose before each use Always shut off valve at tank when leaving gun unattended for...

Страница 2: ...lt in an extremely dangerous long flame Tanks are available in 6 8 10 20 30 and 40 lb sizes 6 lb tanks are adequate for intermittent use Use larger tanks for continuous use Tank Pressure Depends on ta...

Страница 3: ...igniter 3 Gas Valve Opens fuel flow 4 Igniter Fire piezoelectric spark igniter 5 Fuel Line Carries fuel to orifice 6 Filter Prevents clogging 7 Orifice Meters fuel 8 Spark Plug Ignites fuel air mixtu...

Страница 4: ...PALLETIZING 1 Elevate pallet load approx 6 from floor Leave area under the four corners clear 2 Carefully fit pallet bag over load Do not puncture or tear the bag Bag should fit snugly over load and...

Страница 5: ...replace if damaged See Figure 4 VALVE TIMING ADJUSTMENT 1 Gas valve opening is adjusted by the adjustment screw See Figure 5 2 It should be set so the valve opens when the gas handle is depressed hal...

Страница 6: ...performance is seriously impaired Perform the following procedure with EXTREME CARE 1 Remove 5 mounting screws and remove right side of housing See Figure 12 2 Remove the 3 screws holding the pump See...

Страница 7: ...igniter fires Listen for a click Slowly squeeze handle to ensure mixture enters combustor before firing Check regulator Release handle and safety triggers to reset igniter Check for spark Return for s...

Страница 8: ...iento seguro de esta herramienta Conserve para consultas en el futuro Nunca apunte la pistola hacia otra persona Inspeccione la manguera antes de cada uso Cierre siempre la v lvula del tanque cuando d...

Страница 9: ...CIA Usar un tanque de propano de extracci n de l quido podr a obstruir el filtro del orificio y causar una llama larga extremadamente peligrosa Los tanques est n disponibles en tama os de 6 8 10 20 30...

Страница 10: ...ombustible 4 Encendedor Encendedor de chispa piezoel ctrico 5 L nea de Combustible Lleva el combustible hasta el orificio 6 Filtro Evita las obstrucciones 7 Orificio Mide el Combustible 8 Conector de...

Страница 11: ...imadamente 15 cm 6 del piso Deje libre el rea debajo de las cuatro esquinas 2 Con cuidado coloque la bolsa de la tarima por encima de la carga No perfore o rasgue la bolsa La bolsa deber quedar ajusta...

Страница 12: ...ea Diagrama 4 AJUSTE DE LOS TIEMPOS DE LA V LVULA 1 La apertura de la v lvula de gas se ajusta con el tornillo de ajuste Vea Diagrama 5 2 Deber a estar colocado de forma que la v lvula se abra cuando...

Страница 13: ...er gravemente afectado Lleve a cabo el procedimiento que se detalla a continuaci n CON CUIDADO EXTREMO 1 Quite los 5 tornillos de montaje y quite el lado derecho de la carcasa Vea Diagrama 12 2 Quite...

Страница 14: ...hasta escuchar un clic Presione el asa lentamente para garantizar que la mezcla entra en la c mara de combusti n antes del encendido Revise el regulador Libere el asa y el gatillo de seguridad para r...

Страница 15: ...fonctionnement s curitaire Conservez ce manuel en vue de consultation ult rieure Ne pointez jamais le pistolet vers une autre personne Inspectez le tuyau avant chaque utilisation Fermez toujours la va...

Страница 16: ...e du filtre et peut produire une longue flamme extr mement dangereuse Les r servoirs sont offerts en format de 2 7 3 6 4 5 9 7 13 6 et 18 1 kg 6 8 10 20 30 et 40 lb Un r servoir de 2 7 kg 6 lb convien...

Страница 17: ...re le d bit de carburant 4 Allumeur Produit l tincelle pi zo lectrique d allumage 5 Conduite de carburant Am ne le carburant l orifice 6 Filtre Emp che l encrassement 7 Orifice Mesure le carburant 8 B...

Страница 18: ...alette et son chargement environ 15 cm 6 po du sol Laissez l espace sous les quatre coins d gag 2 Installez d licatement le sac palette sur la charge Ne perforez pas ou ne d chirez pas le sac Le sac d...

Страница 19: ...air comprim ou remplacez le si endommag Voir Figure 4 R GLAGE DE LA SOUPAPE 1 L ouverture de la soupape de gaz est r gl e par la vis de r glage Voir Figure 5 2 Elle doit tre r gl e de fa on ce que la...

Страница 20: ...uve nettement amoindri Effectuez la proc dure suivante avec LE PLUS GRAND SOIN 1 Retirez cinq vis d installation et retirez le c t droit du bo tier Voir Figure 12 2 Retirez les trois vis qui maintienn...

Страница 21: ...ez lentement la poign e pour faire en sorte que le m lange p n tre dans la chambre de combustion avant l allumage V rifiez le r gulateur Rel chez la d tente et la d tente de s curit pour r initialiser...

Отзывы: