background image

S1894   Tigercub 100

37

ONBOARD

Using Wake-on LAN

The Wake-on LAN feature operates according to a published specification. In

simple terms, the specification allows designers to build network adapters that

are capable of “listening to” network activity even when the computer is

turned off. WOL adapters have a special low power standby mode that is

active when the rest of the computer is without power. The adapter will

respond to a special “wake-up” packet sent by another computer or network

device. Typically this wake-up packet causes the adapter to signal the com-

puter to power up and run a pre-defined program.

The wake up packet structure and behavior is defined in the WOL specifica-

tion, available from the website at http://www.us.pc.ibm.com/infobrf/iblan.html.

Frequently Asked Questions

Q: 

Why don’t I get a display after I put in my old DIMM module?

A: 

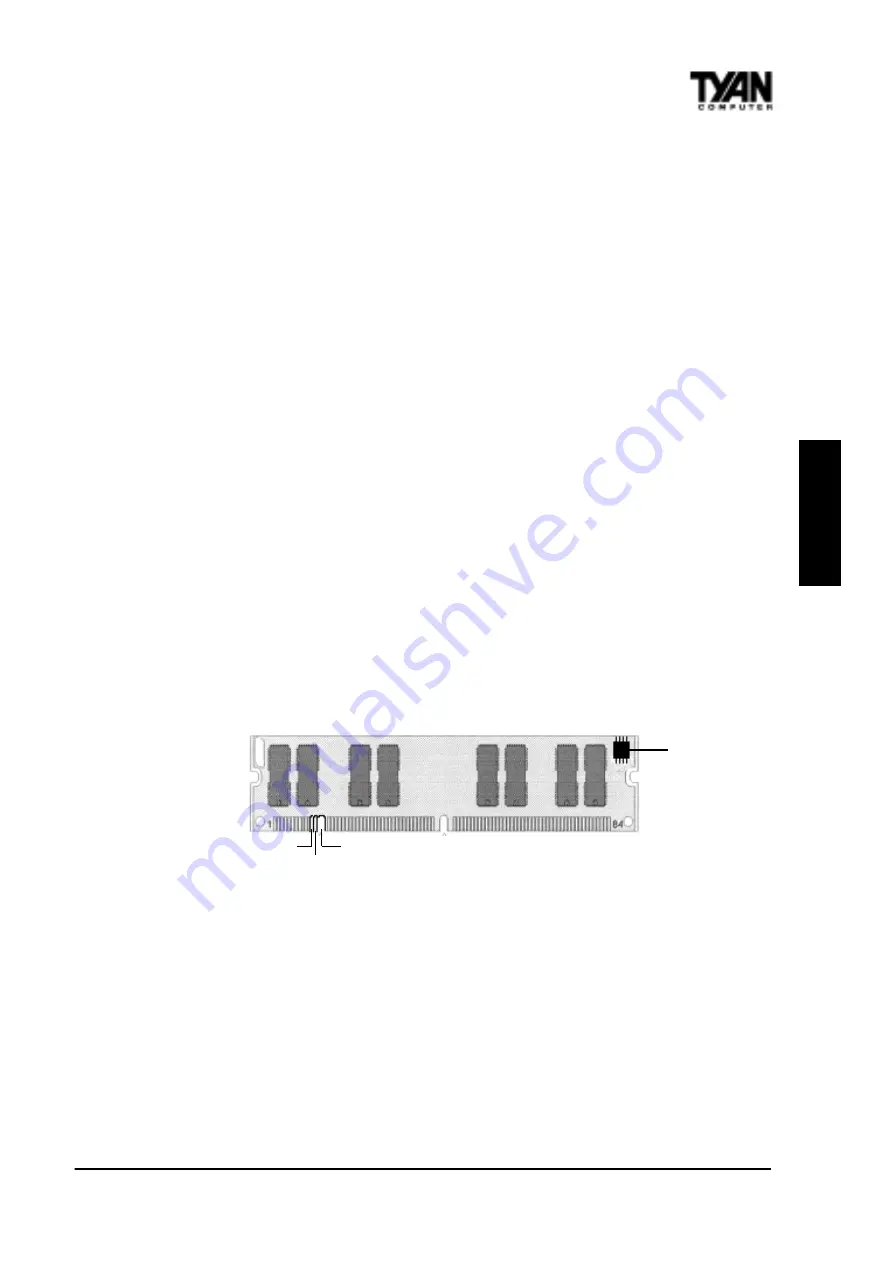
The 440BX chipset requires the memory manufacturer to program an

EEPROM chip with 

SPD 

(Serial Presence Detection) on the module in order for

the BIOS to program the 440BX’s timing registers properly. Your DIMM may

not have the EEPROM chip on the module, or the EEPROM may not contain

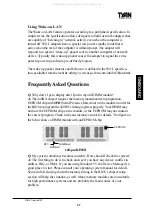
the correct program. Check with your memory vendor for details. The figure on

the below shows a DIMM module with an EEPROM chip.

Q:

 My system sometimes becomes unstable. How should I check the system?

A:

 The first thing to do is to check and see if you have any device conflict in

address, IRQ, or DMA. If you are using Windows 95, the Device Manager is a

good place to start. Please consult your operating system manual for details.

Second of all, slowing down the memory timing in the BIOS’s chipset setup

section will help the situation, as well. Many memory modules are not suitable

for high performance systems and are probably the main source of your

problem.

RFU

Buffered

Unbuffered

168-pin DIMM

EEPROM

All manuals and user guides at all-guides.com

Содержание Tigercub 100 S1894

Страница 1: ...crosoft Corporation IBM PC AT PS 2 are trademarks of IBM Corporation INTEL Pentium II Celeron are trademarks of Intel Corporation S1894 Tigercub 100 Micro ATX is a trademark of TYAN Computer Corporation Information contained in this publication has been carefully checked for accuracy and reliability In no event will Tyan Computer be held liable for any direct or indirect incidental or consequentia...

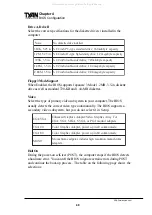
Страница 2: ...S Password Reset 30 Soft Power Connector 32 Speaker Connector Installation 32 Hardware Reset Switch Connector Installation 32 External SMI 32 Chassis Intrusion Alarm Connector 33 Ensoniq Audio Connectors 33 CMOS RTC 33 Flash EEPROM 34 RAM Installation 34 Cache Memory 36 Frequently Asked Questions 37 4 BIOS Configuration 40 Introduction to Setup 40 Main Setup Menu 44 Standard CMOS Setup 46 BIOS Fea...

Страница 3: ...Peripherals 65 PC Health Monitor 68 Supervisor Password 68 Flash Writer Utility 69 5 System Resources 72 POST Messages 72 6 Appendix 1 CPU Retention Module Options 76 7 Appendix 2 Glossary 78 All manuals and user guides at all guides com ...

Страница 4: ...tion and video production This integrated system board achieves high reliability with numerous features and yet is small enough to be supported in a Micro ATX form factor Some of the features included are onboard dual channel PCI PIO BUS Master IDE and UltraDMA 33 onboard Ensoniq 1371 PCI Wavetable sound onboard floppy controller and onboard high speed I O Flexibility and expandability have been d...

Страница 5: ...an lead to exasperation and expense Wherever possible we have included step by step instructions for setting up your system which are indicated by this icon However it is in your best interest to read an entire section and perhaps the entire manual before you begin to fiddle with your motherboard While we have alerted you to potential dangers in several places in the manual with this icon these wa...

Страница 6: ...nector Information 12V power source for DC fan onboard 3 3V DRAM support Utilizes GTL bus to reduce power consumption and EMI MainMemory Up to 256MB onboard 386MB for BX without registered buffer Three 168 pin DIMM sockets Two 168 pin DIMM for ZX Supports 100MHz SDRAM w SPD and SDRAM ECC SystemManagement ADM9240 control chip with on board alarm for heat fan and voltage System Management software C...

Страница 7: ...c DTR Bus Mastering Mode up to 22MB sec DTR Support for two floppy drives up to 2 88MB Two serial ports 16550 UARTs One ECP EPP parallel port One IR InfraRed I O interface port Two USB rev 1 2 ports One PS 2 mouse port One PS 2 keyboard port Wake on LAN feature header 3 pin requiresATX 2 01 power supply Power supply fan control connector EnsoniqES1371AudioPCI AC97 Codec Uses a single shared IRQ Hi...

Страница 8: ... turn to your dealer for help first Your system has most likely been configured by them and they should have the best idea of what hardware and software your system contains Hence they should be of the most assistance Further if you purchased your system from a dealer near to you you can actually bring your system in to them to have it serviced instead of attempting to do so yourself which can hav...

Страница 9: ...S1894 Tigercub 100 9 Unpacking INTRO This page left blank intentionally All manuals and user guides at all guides com ...

Страница 10: ...l 1 CPU retention module 1 System Management Driver CD Intel LANDesk optional with Ensoniq AudioPCI manual and installation instructions Installation You are now ready to install your motherboard The mounting hole pattern of the S1894 matches the MicroATX system board specifications The S1894 will fit in a Micro ATX or a standard ATX chassis Quick References for Jumpers All manuals and user guides...

Страница 11: ...stall it into the computer case If you don t ground yourself you risk zapping the motherboard or adapter card Subsequent problems may not arise immediately because electrostatic discharge damage unlike physical damage causes the device to fail over time Install the motherboard into your case Follow the instructions provided by the case manufacturer for proper installa tion guidelines TYAN recommen...

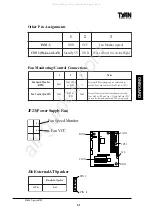
Страница 12: ...looks like Figure 2 above Make absolutely certain that you do not miss any pins because if you do you will void your warranty and cause damage to yourself or your motherboard when you turn the system on After connecting the power make sure the connector is seated firmly into its socket so it will not become loose or fall off when the computer is jostled or moved Tyan recommends using an ATX power ...

Страница 13: ...hard drive Notice how Pin 1 denoted by a red stripe is connected so that it is next to the power connector of the drive In most cases this is the proper way of connecting your IDE cable to the hard drive Figure 4 shows the IDE cable properly connected to the motherboard Contact your hard disk drive manufacturer or documentation for more information INSTALL Figure 3 Figure 4 Pin 1 All manuals and u...

Страница 14: ...a red or colored stripe down one side of the cable see Figure 5 Most of the current floppy drives on the market require that the colored stripe be positioned so that it is right next to the power connector In most cases there will be a key pin on the cable which will force you to connect the cable properly Drive A is usually attached to the end of the cable with the twist in it Drive B is usually ...

Страница 15: ...e floppy or motherboard may be faulty Try another cable or floppy drive to verify Light on the floppy is on constantly a dead give away that the cable is on backwards Reverse the cable at the motherboard end and try again Next are the Com and Printer ports Warning When plugging in your keyboard and mouse or when plugging anything into a serial or Com port make sure that the power is off Connecting...

Страница 16: ...e PS 2 mouse port is the upper PS 2 port and the PS 2 keyboard port is the lower PS 2 port The PS 2 connectors are probably quite familiar to you The USB connectors however may be foreign The USB Universal Serial Bus is a versatile port This one port type can function as a serial parallel mouse keyboard or joystick port It is fast enough to support video transfer and is capable of supporting up to...

Страница 17: ...t doesn t fit look at the socket on the computer to make sure there are no wires or other obstructions to the slot NEVER plug an ISA card into a PCI slot or a PCI card in an ISA slot You will void your warranty and damage your system board if you do this When plugging the card in especially when installing long cards try to push the entire card in at one time Don t force one end of the card into t...

Страница 18: ...rd though it may work well in a competitor s board This is because many of our competitors do not adhere to the strict tolerances required for high performance If you buy a TYAN board you are getting the best system available To make installation easy and trouble free get high quality parts Some brands we recommend are Advantage Memory Corsair Microsystems Millenium Kingston Memory QesTec Incorpor...

Страница 19: ...S1894 Tigercub 100 19 INSTALL Figure 9 Place the DIMMs in an anti static bag as soon as you remove them to avoid static damage Figure 10 All manuals and user guides at all guides com ...

Страница 20: ... two types of Pentium II processors the active or boxed processor and the passive processor see Figures 11 and 12 below These two types of processors are essentially the same in design the only difference lies in their cooling methods The active processor is equipped with a cooling fan and heat sink while the passive processor is equipped with a heat sink alone Both types of CPUs provide the user ...

Страница 21: ...nstalling the Active Processor When the retention module is securely installed you are ready to plug in the CPU Press down firmly on the CPU until you hear a click see Figure 15 This clicking sound indicates that the CPU is fully locked into the retention module If you have an active processor you will also need to connect the CPU s cooling fan cable to the cooling fan power connector on the board...

Страница 22: ... section The heat sink mount Figure 17 has two pins on the bottom and four pins on the top Notice that the bottom two pins are of different sizes The size of the pins and the holes in the mother board will determine the correct orientation When the bracket is correctly installed the four pins on top will be right next to the Pentium II CPU slot Insert the heat sink mount into the holes on the moth...

Страница 23: ... pull Lock the heat sink mount to the board by inserting the two mounting locks Figure 19 into the pins of the heat sink mounting bracket which are now below the mainboard There will be a click when the locks are securely fastened Removing the CPU To remove the CPU move the locks to the center of the CPU Aclick will be heard when the CPU has been unlocked Gently pull up on the CPU taking care not ...

Страница 24: ...umpers and pins are connected by slipping the blue plastic jumper connector overtop of two adjacent jumper pins The metal rod inside the plastic shell bridges the gap between the two pins completing the circuit See the drawings below for examples of on and off pins and jumpers 2 pin jumpers off on 3 or more pin jumpers 1 2 2 3 open 1 2 3 1 2 3 1 2 3 Chapter 2 Board Installation All manuals and use...

Страница 25: ...S1894 Tigercub 100 25 INSTALL This page has been intentionally left blank All manuals and user guides at all guides com ...

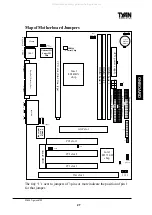
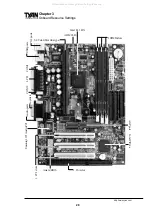
Страница 26: ... pin assignments among others The miniature motherboard maps will help you locate the jumpers on your board A full page map of the motherboard can be found on the facing page Other Pin Assignments Chapter 3 Onboard Resource Settings chapter 3 Onboard Resource Settings All manuals and user guides at all guides com a l l g u i d e s c o m ...

Страница 27: ... 3 ISA slot 1 AGP slot PCI slot 1 PCI slot 3 National 351 Super I O Chip USB1 Keyboard USB2 Mouse COM1 Parallel Printer Port COM2 Joystick Speaker out Line in Mic in Floppy connector Primary IDE connector Secondary IDE connector JP16 FAN3 CH FAN JP17 1 PCI slot 2 DIMM bank 1 Ensoniq ES1371 Audio Chip AD9240 Control Chip 1 FAN2 CH FAN 1 FAN1 CPU FAN JP22 JP2 JP13 JP12 JP11 JP10 J10 J7 J11 CD J16 J1...

Страница 28: ...e Settings ADM9240 3 DIMM slots AGP port Intel PIIX4e 1 ISA slot 3 PCI slots SEC slot Slot One type PS 2 ports USB ports COM2 LPT1 COM1 Joystick Audio ports Ensoniq 1371 AudioPCI Intel 443 BX Award BIOS All manuals and user guides at all guides com ...

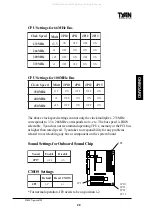
Страница 29: ...SettingsforOnboardSoundChip CMOS Settings d e e p S k c o l C t l u M 0 1 P J 1 1 P J 2 1 P J 3 1 P J z H M 3 3 2 5 3 x N O F F O F F O N O z H M 6 6 2 4 x F F O N O N O N O z H M 0 0 3 5 4 x F F O N O F F O N O z H M 3 3 3 5 x F F O F F O N O N O d e e p S k c o l C t l u M 0 1 P J 1 1 P J 2 1 P J 3 1 P J z H M 0 5 3 5 3 x N O F F O F F O N O z H M 0 0 4 4 x F F O N O N O N O z H M 0 5 4 5 4 x F ...

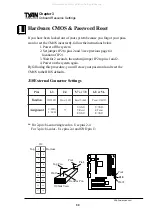
Страница 30: ...assword and reset the CMOS to the BIOS defaults J10 External Connector Settings s n i P 3 1 4 2 8 7 r o 7 5 6 5 r o 8 6 n o i t c n u F D E L D H D E L r e w o P h c t i w S t e s e R f f O n O r e w o P t n e m n g i s s A D E L 1 D E L 3 D N G 5 t e s e R 7 D N G 8 D N G 5 r e w o P 6 D N G 8 Chapter 3 Onboard Resource Settings J10 1 2 3 4 5 6 7 8 9 0 1 1 1 2 1 3 1 4 1 5 1 6 1 7 1 8 1 Top Bottom...

Страница 31: ... p S n a F M P R 1 n a F 3 2 P J 2 n a F 3 n a F r o e r a s n o i t c e n n o c o w t y l n o s g n i d a e r M P R r e p o r p r o F 3 2 P J r o 3 n a F 2 n a F f o e c i o h c a d n a 1 n a F e l b i s s o p f f O n O l o r t n o C n a F 1 n a F r o 2 n a F 3 2 P J 3 n a F e l b i s s o p e r a s n o i t c e n n o c e e r h t l o r t n o c n a F f f o n o r o F 3 2 P J d n a 2 n a F h t o b f I...

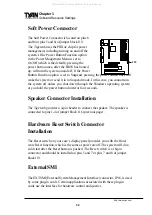
Страница 32: ...ough the Windows operating system or you hold the power button down for four seconds Speaker Connector Installation The Tigercub provides a 4 pin header to connect the speaker The speaker is connected to pins 1 4 of jumper block J16 previous page Hardware Reset Switch Connector Installation The Reset switch on your case s display panel provides you with the Hard ware Reset function which is the sa...

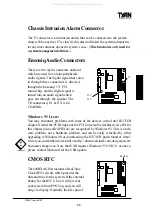
Страница 33: ...s You may encounter problems with some of the devices in the Intel 82371EB chipset Neither the PCI Bridge nor the PCI Universal Serial Bus device IDs for this chipset also called PIIX4e are recognized by Windows 95 This is a soft ware problem not a hardware problem and can be easily remedied by either upgrading to Windows 98 or downloading the 82371EB patch found at http www tyan com html drivers ...

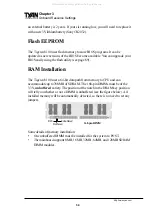
Страница 34: ... memory to CPU and can accommodate up to 768MB of SDRAM The 168 pin DIMMs must be of the 3 3V unbuffered variety The position of the notch in the DRAM key position will tell you whether or not a DIMM is unbuffered see the figure below All installed memory will be automatically detected so there is no need to set any jumpers Some details of memory installation One unbuffered DIMM must be installed ...

Страница 35: ... B M 2 3 1 x B M 6 1 1 x B M 6 1 1 x B M 8 B M 0 4 1 x B M 6 1 1 x B M 6 1 1 x B M 6 1 B M 8 4 1 x B M 2 3 1 x B M 6 1 1 x B M 6 1 B M 4 6 1 x B M 2 3 1 x B M 2 3 1 x B M 6 1 B M 0 8 1 x B M 2 3 1 x B M 2 3 1 x B M 2 3 B M 6 9 1 x B M 4 6 1 x B M 2 3 1 x B M 2 3 B M 8 2 1 1 x B M 4 6 1 x B M 4 6 1 x B M 2 3 B M 0 6 1 1 x B M 4 6 1 x B M 4 6 1 x B M 4 6 B M 2 9 1 1 x B M 8 2 1 1 x B M 4 6 1 x B M 4...

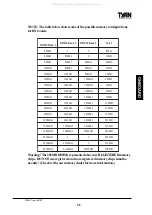
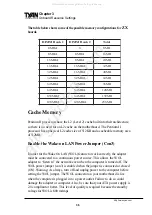
Страница 36: ...bled when the jumper is connected or closed ON Warning As always turn off and unplug power to the computer before setting the WOL jumper The WOL connector on your motherboard is live when the computer is plugged in to a power outlet Failure to do so could damage the adapter or computer Also be sure that your ATX power supply is 2 0 compliant or better This level of quality is required because the ...

Страница 37: ...d DIMM module A The 440BX chipset requires the memory manufacturer to program an EEPROM chip with SPD Serial Presence Detection on the module in order for the BIOS to program the 440BX s timing registers properly Your DIMM may not have the EEPROM chip on the module or the EEPROM may not contain the correct program Check with your memory vendor for details The figure on the below shows a DIMM modul...

Страница 38: ...neck by bypassing the PCI interface and accessing the system memory directly Currently the AGP supports 1X and 2X modes which yield bandwidths of 264MB s at 33MHz bus speed and 533MB s at 66MHz bus speed respectively Compare this with the mere 132MB s at 33MHz bus speed that you get with the PCI bus Q Does my operating system support AGP A Currently only Windows 98 and Windows NT 5 0 will have bui...

Страница 39: ...S1894 Tigercub 100 39 This page has been intentionally left blank ONBOARD All manuals and user guides at all guides com ...

Страница 40: ...s a customized version of an industry standard BIOS for IBM PC AT compatible personal computers It supports Intel x86 and compatible processors The BIOS provides critical low level support for the system central processing memory and I O subsystems The EliteBIOS has been customized by adding important but nonstandard features such as virus and password protection power management and detailed fine...

Страница 41: ...ng the system on or 2 By pressing the Del key or by simultaneously pressing Ctrl Alt and Esc keys when the following message appears briefly at the bottom of the screen during POST TOENTERSETUPBEFOREBOOTPRESSDELKEY If the message disappears before you respond and you still wish to enter Setup restart the system to try again by turning it OFF then ON or pressing the RESET button on the system case ...

Страница 42: ... y e k s e g n a h c e k a m r o e u l a v c i r e m u n e h t e s a e r c n I y e k s e g n a h c e k a m r o e u l a v c i r e m u n e h t e s a e r c e D y e k 1 F d n a u n e M p u t e S e g a P s u t a t S r o f y l n o p l e h l a r e n e G u n e M p u t e S e g a P n o i t p O y e k 2 F 2 F t f i h S t c e l e s o t 2 F s r o l o c 6 1 l a t o t m o r f r o l o c e g n a h C s d r a w k c a...

Страница 43: ...out a good reason The Chipset defaults have been carefully chosen by Award Software or your system manufacturer for the best performance and reliability Even a seemingly small change to the Chipset setup may causing the system to become un stable Setup Variations Not all systems have the same Setup While the basic look and function of the Setup program remains the same for all systems the appearan...

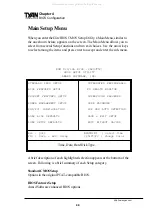
Страница 44: ...e bottom of the screen Following is a brief summary of each Setup category StandardCMOSSetup Options in the original PCAT compatible BIOS BIOS Features Setup Award Software enhanced BIOS options ROM PCI ISA BIOS 2A69JT50 CMOS SETUP UTILITY AWARD SOFTWARE INC STANDARD CMOS SETUP INTEGRATED PERIPHERALS BIOS FEATURES SETUP PC HEALTH MONITOR CHIPSET FEATURES SETUP SUPERVISOR PASSWORD POWER MANAGEMENT ...

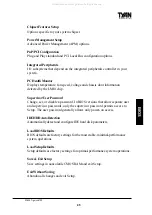
Страница 45: ...word Change set or disable a password In BIOS versions that allow separate user and supervisor passwords only the supervisor password permits access to Setup The user password generally allows only power on access IDEHDDAutoDetection Automatically detect and configure IDE hard disk parameters LoadBIOSDefaults BIOS defaults are factory settings for the most stable minimal performance system operati...

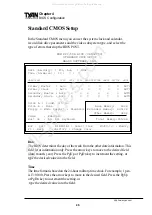
Страница 46: ... 1 p m is 13 00 00 Press the arrow keys to move to the desired field Press the PgUp or PgDn key to increment the setting or type the desired value into the field ROM PCI ISA BIOS 2A69JT50 STANDARD CMOS SETUP AWARD SOFTWARE INC Date mm dd yy Fri Aug 1 1998 Time hh mm ss 10 7 7 HARD DISKS TYPE SIZE CYLS HEAD PRECOMP LANDZ SECTOR MODE Primary Master Auto 0 0 0 0 0 0 AUTO Primary Slave Auto 0 0 0 0 0 ...

Страница 47: ...ntains a table of pre defined drive types Each defined drive type has a specified number of cylinders number of heads write precompensation factor landing zone and number of sectors Drives whose specifications do not accommodate any pre defined type are classified as type user Size Disk drive capacity approximate Note that this size is usually slightly greater than the size of a formatted disk giv...

Страница 48: ...y t i c a p a c e t y b o l i k 0 6 3 e v i r d d r a d n a t s e p y t C P h c n i 4 1 5 n i 5 2 5 M 2 1 y t i c a p a c e t y b a g e m 2 1 e v i r d y t i s n e d h g i h e p y t T A h c n i 4 1 5 n i 5 3 K 0 2 7 y t i c a p a c e t y b o l i k 0 2 7 e v i r d d e d i s e l b u o d h c n i 2 1 3 n i 5 3 M 4 4 1 y t i c a p a c e t y b a g e m 4 4 1 e v i r d d e d i s e l b u o d h c n i 2 1 3 ...

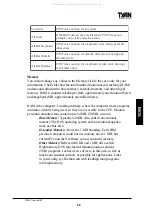
Страница 49: ...m access memory RAM and amounts allocated to base memory extended memory and other high memory RAM is counted in kilobytes KB approximately one thousand bytes and megabytes MB approximately one million bytes RAM is the computer s working memory where the computer stores programs and data currently being used so they are accessible to the CPU Modern personal computers may contain up to 64 MB 128 MB...

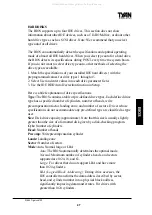
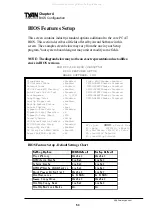
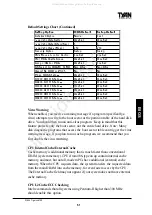
Страница 50: ... Power On Self Test Disabled D4000 D7FFF Shadow Disabled Boot Sequence A C SCSI D8000 DBFFF Shadow Disabled Swap Floppy Drive Disabled DC000 DFFFF Shadow Disabled Boot Up Floppy Seek Enabled Boot Up NumLock Status On Gate A20 Option Fast Typematic Rate Setting Disabled Typematic Rate Chars Sec 6 Typematic Delay Msec 250 Security Option Setup PS 2 Mouse Function Control Enabled PCI VGA Palette Snoo...

Страница 51: ...ern PCs have additional external cache memory When the CPU requests data the system transfers the requested data from the main DRAM into cache memory for even faster access by the CPU The External Cache field may not appear if your system does not have external cache memory CPUL2CacheECCChecking Intel recommends that all systems using Pentium II higher than 300 MHz should enable this option 6HWWLQ...

Страница 52: ... drive A to logical drive B BootUpFloppySeek When Enabled the BIOS tests seeks floppy drives to determine whether they have 40 or 80 tracks Only 360 KB floppy drives have 40 tracks drives with 720 KB 1 2 MB and 1 44 MB capacity all have 80 tracks Because very few modern PCs have 40 track floppy drives we recommend that you set this field to Disabled to save time BootUpNumLockStatus Toggle between ...

Страница 53: ... present leave at Disabled PS 2 Mouse Function Control This option should be disabled if you do not wish to install a PS 2 mouse or if you want to use IRQ12 for another device OS Select for DRAM 64MB Select OS2 only if you are running OS 2 operating system with greater than 64 MB of RAM on your system ReportNoFDDforWin95 Select yes to this option only IF you do not want to install an FDD and if yo...

Страница 54: ...ccupied by other expan sion card firmware If an expansion peripheral in your system contains ROM based firmware you need to know the address range the ROM occupies to shadow it into the correct area of RAM Chipset Features Setup This section describes features of the Intel 440EX chipset AdvancedOptions The parameters in this screen are for system designers service personnel and technically compete...

Страница 55: ... Setup Defaults Chipset Features Setup Default Settings Chart AutoConfiguration Auto Configuration selects predetermined optimal values of chipset param eters When Disabled chipset parameters revert to setup information stored in CMOS Many fields in this screen are not available when Auto Configuration 6HWWLQJ 2SWLRQ 26 HIDXOW 6HWXS HIDXOW XWR RQILJXUDWLRQ QDEOHG QDEOHG 6 5 0 5 6 WR 6 HOD 6 5 0 5 ...

Страница 56: ... on the DRAM timing Do not reset this field from the default value specified by the system designer DRAMECC ParitySelect Select Parity ECC error correcting code or Disabled depending on the type of DRAM installed in your system CPU To PCIIDEPosting Select Enabled to post write cycles from the CPU to the PCI IDE interface IDE accesses are posted in the CPU to PCI buffers for cycle optimization Syst...

Страница 57: ...discusses their memory requirements Passive Release When Enabled CPU to PCI bus accesses are allowed during passive release Otherwise the arbiter only accepts another PCI master access to local DRAM DelayedTransaction The chipset has an embedded 32 bit posted write buffer to support delay transactions cycles Select Enabled to support compliance with PCI specifica tion version 2 1 AGPApertureSize M...

Страница 58: ...bled Serial Port Enabled Suspend Mode Disabled Parallel Port Disabled HDD Power Down Disabled Power Interruption Enabled Throttle Duty Cycle 62 5 PC98 LED Enabled VGA Active Monitor Disabled Power Button Function Suspend Fan1 Speed in Suspend Off Fan2 Speed in Suspend Off Fan3 Speed in Suspend Off Resume by Ring Disabled Resume by Alarm Disabled Wake up on LAN Disabled IRQ 8 Break Suspend Disabled...

Страница 59: ...e p t u o e m i t t c e l e S y l l a u d i v i d n i e d o m h c a e t e S g n i w o l l o f n o i t c e s s r e m i T g n i v a S n i M h c a e n i r u o h 1 s i d o i r e p y t i v i t c a n I s g n i v a s r e w o p m u m i n i M e v i r d d r a h e h t t p e c x e e d o m 6HWWLQJ 2SWLRQ 26 HIDXOW 6HWXS HIDXOW DQ 6SHHG LQ 6XVSHQG 2II 2II DQ 6SHHG LQ 6XVSHQG 2II 2II DQ 6SHHG LQ 6XVSHQG 2II 2II ...

Страница 60: ...m inactivity 1 minute to 1 hour all devices except the CPU shut off This mode is user configurable only during User Defined Power Management mode HDDPowerDown After the selected period of drive inactivity 1 to 15 minutes the hard disk drive powers down while all other devices remain active This mode is user H V k n a l B C N Y S s t r o p n o i t a z i n o r h c n y s l a t n o z i r o h d n a l a...

Страница 61: ... Resume by Ring An input signal on the serial Ring Indicator RI line in other words an incoming call on the modem awakens the system from a soft off state IRQ8 Break Suspend You can Enable or Disable monitoring of IRQ8 the Real Time Clock so it does not awaken the system from Suspend mode ReloadGlobalTimerEvents When Enabled an event occurring on each device listed below restarts the global timer ...

Страница 62: ...ned to PCI ISA PnP IRQ 5 assigned to PCI ISA PnP IRQ 7 assigned to PCI ISA PnP IRQ 9 assigned to PCI ISA PnP IRQ 10 assigned to PCI ISA PnP IRQ 11 assigned to PCI ISA PnP IRQ 12 assigned to PCI ISA PnP IRQ 14 assigned to PCI ISA PnP IRQ 15 assigned to PCI ISA PnP DMA 0 assigned to PCI ISA PnP DMA 1 assigned to PCI ISA PnP DMA 3 assigned to PCI ISA PnP DMA 5 assigned to PCI ISA PnP DMA 6 assigned t...

Страница 63: ...the interrupt Legacy ISA Devices compliant with the original PCAT bus specification requiring a specific interrupt such as IRQ4 for serial port 1 PCI ISA PnP Devices compliant with the Plug and Play standard whether designed for PCI or ISA bus architecture DMAnAssigned to When resources are controlled manually assign each system DMA channel as one of the following types depending on the type of de...

Страница 64: ... PCI IDE interface in the chipset has two channels it requires two interrupt services The primary and secondary IDE INT fields default to values appropriate for two PCI IDE channels with the primary PCI IDE channel having a lower interrupt than the secondary UsedMembaseaddr Select a base address for the memory area used by any peripheral that requires high memory UsedMemLength Select a length for ...

Страница 65: ...DE Secondary Slave UDMA Auto On Chip Primary PCI IDE Enabled On Chip Secondary PCI IDE Enabled USB Keyboard Support Disabled KBC Input Clock 8 MHz Onboard FDC Controller Enabled Onboard Serial Port 1 Auto Onboard Serial Port 2 Auto UR2 Mode Standard IRRX Mode Select IRMODE Onboard Parallel Port 3BC IRQ7 ESC Quit Select Item F1 Help PU PD Modify F5 Old Values Shift F2 Color F6 Load BIOS Defaults F7...

Страница 66: ... IDE devices that the internal PCI IDE interface supports the system automatically determines the optimal data transfer rate for each IDE device On ChipPCIIDE Primary Secondary This chipset contains a PCI IDE interface with support for two IDE channels Select Enabled to activate the primary and or secondary onboard IDE interface Select Disabled to deactivate this interface if you install a primary...

Страница 67: ...ort IrDA1 1 IrDA specification 1 1 compliant serial infrared port ASK IR Amplitude shift keyed infrared port Duplex Select Select the value required if an IR device is connected to the IR port Full duplex mode permits simultaneous two direction transmission Half duplex mode permits transmission in one direction only at a time TxD RxDActive Consult your IR peripheral documentation to select the cor...

Страница 68: ...ystem Current CPU FAN 1 2 3 Speed These fields display the current speed of up to seven voltage input lines if your computer contains a monitoring system IV0 IN6 V These fields display the current voltage of up to seven voltage input lines if your computer contains a monitoring system Supervisor Password When you select this function a message appears at the center of the screen ENTERPASSWORD Type...

Страница 69: ...S This will clear out any stray settings from your old BIOS which may have been carried over from the flashing process Most problems encountered after flashing a BIOS will be solved by this simple procedure see Hardware CMOS Password Reset page 30 To reprogram the system BIOS the CPU must be running in real mode FMW will not run if the CPU is operating in a protected or virtual mode This means tha...

Страница 70: ...FMW utility To start FMW change to the Flash directory if you are not already in it Type awdflash at the DOS command line and press the Enter key The FMW utility screen will appear Type in the whole file name e g A61AW10 BIN and confirm that you want to program the BIOS The utility will then Blank Erase and Program the flash memory on the mainboard with the new BIOS file You should choose Yes to s...

Страница 71: ...he flash memory on the mainboard your system may not be able to boot If this happens it will require service by your system vendor Follow the instructions in this section precisely to avoid such an inconvenience BIOS BIOS All manuals and user guides at all guides com a l l g u i d e s c o m ...

Страница 72: ...tinue or press DEL to enter Setup Beep Currently the only beep code indicates that a video error has occurred and the BIOS cannot initialize the video screen to display any additional information This beep code consists of a single long beep followed by two short beeps BIOS ROM checksum error System halted The checksum of the BIOS code in the BIOS chip is incorrect indicating the BIOS code may hav...

Страница 73: ...ll memory test Floppydisk s fail Cannot find or initialize the floppy drive controller or the drive Make sure the controller is installed correctly If no floppy drives are installed be sure the Diskette Drive selection in Setup is set to NONE orAUTO HARD DISK initializing Pleasewaitamoment Some hard drives require extra time to initialize HARDDISKINSTALLFAILURE Cannot find or initialize the hard d...

Страница 74: ...faults designed for the most stable minimal performance system operations Press TAB to show POST screen System OEMs may replace the EliteBIOS POST display with their own propri etary display Including this message in the OEM display permits the operator to switch between the OEM display and the default POST display Primary master hard disk fail POST detects an error in the primary master IDE hard ...

Страница 75: ...S1894 Tigercub 100 75 SYSTEM This page has been intentionally left blank All manuals and user guides at all guides com ...

Страница 76: ...ing Celeron OPTION1 Two different types of retention modules are included in the motherboard package For older versions of Pentium II use the retention module shown in Figure 1 For newer versions of Pentium II CPUs including Celeron use the retention module shown in Figure 2 Screws for the retention modules are provided Figure 1 Figure 2 Appendix 1 CPU Retention Module Options All manuals and user...

Страница 77: ...l retention module is included in the motheboard package This type of retention module adapts to both old and new Pentium II CPUs see Figure 3 Screws for the retention modules are provided Figure 3 All manuals and user guides at all guides com ...

Страница 78: ...supports data transmission during both the rising and falling ends of the clock cycle yielding an effective speed of 133MHz AT boards are generally smaller and cheaper ATAPI ATAttachment Packet Interface also known as IDE orATA is a drive implementation that includes the disk controller on the device itself It allows CD ROMs and tape drives to be configured as master or slave devices just like har...

Страница 79: ...ata pathway The term is used especially to refer to the connection between the processor and system memory and between the processor and PCI or ISA local buses Bus mastering allows peripheral devices and IDEs to access the system memory without going through the CPU similar to DMA channels A cache is a temporary storage area for data that will be needed often by an application Using a cache lowers...

Страница 80: ...mory Access channels are similar to IRQs DMAchannels allow hardware devices like sound cards or keyboards to access the main memory without involving the CPU This frees up CPU resources for other tasks As with IRQs it is vital that you do not double up devices on a single line Plug and Play devices will take care of this for you In Doze mode only the CPU s speed is slowed DRAMDynamic RAM is a wide...

Страница 81: ...YNC controls the horizontal properties of the monitor IC Integrated Circuit is the formal name for the computer chip IDE Integrated Device or Drive Electronics is a simple self contained hard drive interface It can handle drives up to 8 4GB in size Almost all IDEs sold now are in fact Enhanced IDEs EIDEs IDE INT IDE Interrupt is a hardware interrupt signal that goes to the IDE I O Input Output is ...

Страница 82: ...posed to a network bus which connects multiple systems The PCI PIO PCI Programmable Input Output modes are the data transfer modes used by IDE drives These modes use the CPU for data transfer DMA channels do not PCI refers to the type of bus used by these modes to communicate with the CPU PCI to PCI bridge allows you to connect multiple PCI devices onto one PCI slot Pipeline burst SRAM is a fast s...

Страница 83: ... system SDRAM Synchronous Dynamic RAM is so called because it can keep two sets of memory addresses open simultaneously By transferring data alter nately from one set of addresses and then the other SDRAM cuts down on the delays associated with non synchronous RAM which must close one address bank before opening the next The serial port is so called because it transmits the eight bits of a byte of...

Страница 84: ...ces VGA Video Graphics Array is the PC video display standard V SYNC controls the vertical properties of the monitor WOL Wake on LAN is a feature which operates according to specifications allowing designers to build network adapters capable of listening to network activity even when the computer is off Special wake up packets sent by another computer causes the adapter to signal the computer to p...

Страница 85: ...t different from that of the receiver Consult the dealer or an experienced radio television technician for help Notice for Canada This apparatus complies with the Class B limits for radio interference as specified in the Canadian Department of Communications Radio Interference Regulations Cet appareil est conforme aux normes de Classe B d interference radio tel que spécifié par le Ministére Canadi...

Отзывы: