http://www.tyan.com
17
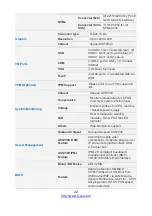
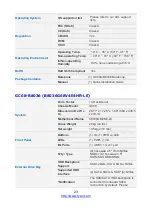
1.3 Features
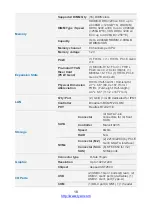
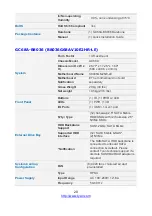
GC68A-B8036 (B8036G68AE12HR)
System
Form Factor
1U Rackmount
Chassis Model
GC68A
Dimension (D x W x H)
26.77" x 17.26" x 1.69" (680 x 438.5
x 43mm)
Motherboard Name
S8036GM2NE
Gross Weight
20 kg (44 lbs)
Net weight
10.5kg (23.5 lbs)
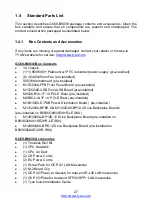
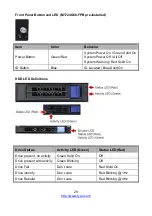
Front Panel
Buttons
(1) ID, (1) PWR w/ LED
LEDs
(1) PWR, (1) ID
I/O Ports
(1) USB 3.1 Gen1 port
External Drive Bay
Q'ty / Type
(12) hot-swap 2.5" NVMe SSDs
with (4) hot-swap 2.5" SATA 6Gb/s
HDD/SSDs
HDD Backplane
Support
SAS 12Gb/s, SATA 6Gb/s, NVMe
Supported HDD
Interface
(4) SATA 6Gb/s & SAS*,
(12) NVMe
*Notification
The SAS/SATA HDD backplane is
connected to onboard SATA
connection by default. Please
contact Tyan technical support if a
discrete SAS HBA/RAID adapter is
required.
System Cooling
Configuration
FAN
(6) 4028 fans + tailored air duct
pre-installed
Power Supply
Type
RPSU
Input Range
AC 100~240V/ 12~6A
Frequency
50-60 Hz
Output Watts
850 Watts
Efficiency
80 plus Platinum
Redundancy
1+1
Processor
Q'ty / Socket Type
(1) AMD Socket SP3
Supported CPU Series
(1) AMD EPYC™ 7002 Series
Processor
Configurable Thermal
Design Power (cTDP)
Wattage
Max up to 240W
Содержание GC68-B8036
Страница 1: ...1 http www tyan com GC68 B8036 GC68A B8036 Service Engineer s Manual ...
Страница 2: ...2 http www tyan com ...
Страница 33: ...http www tyan com 33 1 5 5 Chassis Dimensions ...
Страница 34: ...http www tyan com 34 1 5 6 Block Diagram S8036 ...
Страница 35: ...http www tyan com 35 1 5 7 Board Image S8036 NOTE Please refer to Tyan S8036 User Guide for more MB details ...
Страница 36: ...http www tyan com 36 NOTE ...
Страница 42: ...http www tyan com 42 4 Use a screw driver to fasten the rear top cover ...
Страница 47: ...http www tyan com 47 Memory Population table ...
Страница 53: ...http www tyan com 53 5 Insert the drive tray into the chassis and close the lever ...
Страница 55: ...http www tyan com 55 4 Insert the drive tray into the chassis and close the lever ...
Страница 60: ...http www tyan com 60 4 Insert the M 2 card into the slot Pull the latch to lock the M 2 card ...
Страница 64: ...http www tyan com 64 Front ...
Страница 66: ...http www tyan com 66 3 Fasten the chassis ear to the front surface of chassis ...
Страница 68: ...http www tyan com 68 NOTE ...
Страница 90: ...http www tyan com 90 2 Unscrew the motherboard to lift it up for replacement ...
Страница 100: ...http www tyan com 100 BIOS Temp Sensor Name Explanation ...


