http://www.tyan.com
45
NOTE:
During installation, observe the following:
1. Make sure to push the carrier frame with package
towards the end of the rail frame until it clicks into place.
2. Do not drop the carrier frame or touch the package
pad to avoid component damage.
6. Close the force frame. Then use a T20 Torx screwdriver to tighten the screws to
secure the force frame in a sequential order (1 ->2->3).
7. Place a heatsink on top of the processor. Use a T20 Torx screwdriver to tighten
four screws in a diagonal sequence to secure the heat sink.
Содержание GC68-B8036
Страница 1: ...1 http www tyan com GC68 B8036 GC68A B8036 Service Engineer s Manual ...
Страница 2: ...2 http www tyan com ...
Страница 33: ...http www tyan com 33 1 5 5 Chassis Dimensions ...
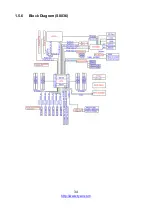
Страница 34: ...http www tyan com 34 1 5 6 Block Diagram S8036 ...
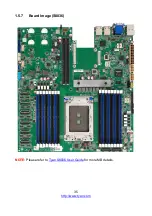
Страница 35: ...http www tyan com 35 1 5 7 Board Image S8036 NOTE Please refer to Tyan S8036 User Guide for more MB details ...
Страница 36: ...http www tyan com 36 NOTE ...
Страница 42: ...http www tyan com 42 4 Use a screw driver to fasten the rear top cover ...
Страница 47: ...http www tyan com 47 Memory Population table ...
Страница 53: ...http www tyan com 53 5 Insert the drive tray into the chassis and close the lever ...
Страница 55: ...http www tyan com 55 4 Insert the drive tray into the chassis and close the lever ...
Страница 60: ...http www tyan com 60 4 Insert the M 2 card into the slot Pull the latch to lock the M 2 card ...
Страница 64: ...http www tyan com 64 Front ...
Страница 66: ...http www tyan com 66 3 Fasten the chassis ear to the front surface of chassis ...
Страница 68: ...http www tyan com 68 NOTE ...
Страница 90: ...http www tyan com 90 2 Unscrew the motherboard to lift it up for replacement ...
Страница 100: ...http www tyan com 100 BIOS Temp Sensor Name Explanation ...


