


http://www.tyan.com
103
Appendix V: FRU Parts Table
GC68-B8036/GC68A-B8036 FRU Parts
Item
Model Number
Part Number
Picture
Description
Power
Supply
FRU-PS-0360 471100000414
850 W,DELTA,DPS-850AB-5 C
FAN FRU-TS-0270
422T60300001
12V, 31000 RPM,40*40*28mm,4 PIN
(HEADER2*4)
Heatsink
FRU-TH-0310
343T60900003
1U-PASSIVE HEATSINK,w/screw
Airduct FRU-TA-0210 346T60300006
Airduct for CPU
PCBA
FRU-RC-1190 411T61600001
M8036-R16-1F riser card
FRU-RC-1200 411T61600004
M8036-L16-1F riser card
Slide Rail
Kit
FRU-AS-0210 452T60300002
Toolless rail kit, w/o lock in
Cable
FRU-CS-0330
332810000514
A/C Power Cord, L=1800mm, US type
FRU-CS-1090
332810000281
A/C Power Cord, L=1830mm, EU type
FRU-CS-1600 422T61600019
Mini-SAS HD to 4*SATA cable for
B8036G68V4E4HR-LE &
B8036G68AV10E2HR-LE
FRU-CS-1610 422T61600013
350
/260mm, SlimSAS 8i 74P to 2*OCuLink
4X 42P cable for B8036G68V4E4HR-LE
FRU-CS-1620 422T61600015
500/
420mm, SlimSAS 8i 74P to 2*OCuLink
4X 42P cable for B8036G68V4E4HR-LE
FRU-CS-1350 422T61600003
630mm, SlimSAS 8i 74P to SlimSAS 8i
74P cable for B8036G68AV10E2HR-LE &
B8036G68AE12HR
FRU-CS-1630 422T61600017
320mm, SlimSAS 8i 74P to 2*Mini-SAS HD
36P cable for B8036G68AV10E2HR-LE
Содержание GC68-B8036
Страница 1: ...1 http www tyan com GC68 B8036 GC68A B8036 Service Engineer s Manual ...
Страница 2: ...2 http www tyan com ...
Страница 33: ...http www tyan com 33 1 5 5 Chassis Dimensions ...
Страница 34: ...http www tyan com 34 1 5 6 Block Diagram S8036 ...
Страница 35: ...http www tyan com 35 1 5 7 Board Image S8036 NOTE Please refer to Tyan S8036 User Guide for more MB details ...
Страница 36: ...http www tyan com 36 NOTE ...
Страница 42: ...http www tyan com 42 4 Use a screw driver to fasten the rear top cover ...
Страница 47: ...http www tyan com 47 Memory Population table ...
Страница 53: ...http www tyan com 53 5 Insert the drive tray into the chassis and close the lever ...
Страница 55: ...http www tyan com 55 4 Insert the drive tray into the chassis and close the lever ...
Страница 60: ...http www tyan com 60 4 Insert the M 2 card into the slot Pull the latch to lock the M 2 card ...
Страница 64: ...http www tyan com 64 Front ...
Страница 66: ...http www tyan com 66 3 Fasten the chassis ear to the front surface of chassis ...
Страница 68: ...http www tyan com 68 NOTE ...
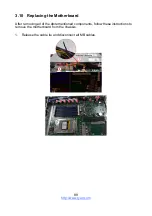
Страница 90: ...http www tyan com 90 2 Unscrew the motherboard to lift it up for replacement ...
Страница 100: ...http www tyan com 100 BIOS Temp Sensor Name Explanation ...