


http://www.tyan.com
13
Table of Contents
Chapter 1: Overview....................................................................... 15
1.1 About the TYAN GC68-B8036 ............................................... 15
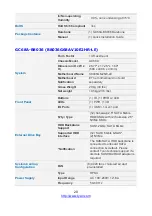
1.2 Product Models ....................................................................... 16
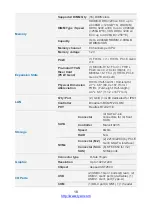
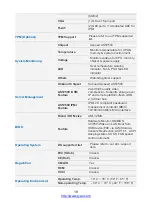
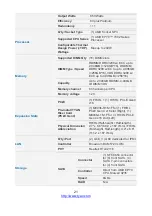
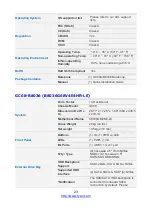
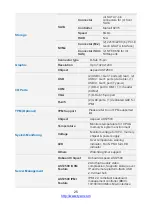
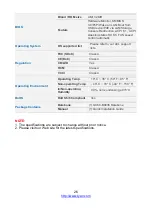
1.3 Features .................................................................................. 17
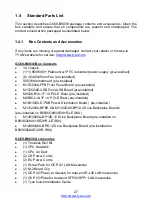
1.4 Standard Parts List ................................................................. 27
1.4.1 Box Contents and Accessories ....................................... 27
1.5 About the Product ................................................................... 28
1.5.1 System Front View .......................................................... 28
1.5.2 System Rear View ........................................................... 30
1.5.3 PSU and LAN LED Indications ........................................ 31
1.5.4 System Top View ............................................................. 32
1.5.5 Chassis Dimensions ........................................................ 33
1.5.6 Block Diagram (S8036) ................................................... 34
1.5.7 Board Image (S8036) ...................................................... 35
Chapter 2: Setting Up ..................................................................... 37
2.0.1 Before you Begin ............................................................. 37
2.0.2 Work Area ........................................................................ 37
2.0.3 Tools ................................................................................ 37
2.0.4 Precautions ...................................................................... 38
2.1 Installing Motherboard Components ...................................... 39
2.1.1 Removing the Chassis Cover .......................................... 39
2.1.2 Replacing the Chassis Cover .......................................... 41
2.1.3 Installing the CPU and Heat sink ..................................... 43
2.1.4 Installing the Memory ...................................................... 46
2.1.5 Installing the Expansion Card .......................................... 49
2.1.6 Installing the 2.5” Hard Drive ........................................... 51
2.1.7 Installing the Slim 2.5” Hard Drives ................................. 54
2.1.8 Installing the 3.5” Hard Drives ......................................... 56
2.1.9 Installing the Micro SD Card ............................................ 58
2.1.9 Installing the M.2 Latch .................................................... 59
2.2 Rack Mounting ........................................................................ 61
2.2.1 Installing the Server in a Rack ......................................... 61
2.2.2 Installing Slide Rails to the Rack ..................................... 62
2.2.3 Rack mounting the Server ............................................... 65
2.2.4 Removing the Server from Rack ..................................... 67
Chapter 3: Replacing Pre-Installed Components ........................ 69
3.1 Introduction ............................................................................. 69
3.2 Disassembly Flowchart ........................................................... 69
3.3 Removing the Cover ............................................................... 70
Содержание GC68-B8036
Страница 1: ...1 http www tyan com GC68 B8036 GC68A B8036 Service Engineer s Manual ...
Страница 2: ...2 http www tyan com ...
Страница 33: ...http www tyan com 33 1 5 5 Chassis Dimensions ...
Страница 34: ...http www tyan com 34 1 5 6 Block Diagram S8036 ...
Страница 35: ...http www tyan com 35 1 5 7 Board Image S8036 NOTE Please refer to Tyan S8036 User Guide for more MB details ...
Страница 36: ...http www tyan com 36 NOTE ...
Страница 42: ...http www tyan com 42 4 Use a screw driver to fasten the rear top cover ...
Страница 47: ...http www tyan com 47 Memory Population table ...
Страница 53: ...http www tyan com 53 5 Insert the drive tray into the chassis and close the lever ...
Страница 55: ...http www tyan com 55 4 Insert the drive tray into the chassis and close the lever ...
Страница 60: ...http www tyan com 60 4 Insert the M 2 card into the slot Pull the latch to lock the M 2 card ...
Страница 64: ...http www tyan com 64 Front ...
Страница 66: ...http www tyan com 66 3 Fasten the chassis ear to the front surface of chassis ...
Страница 68: ...http www tyan com 68 NOTE ...
Страница 90: ...http www tyan com 90 2 Unscrew the motherboard to lift it up for replacement ...
Страница 100: ...http www tyan com 100 BIOS Temp Sensor Name Explanation ...