background image

http://www.tyan.com 


Removing a Hard Drive 


CAUTION

:


Most repairs to the Tyan MicroServer should only be performed by a professional 
service technician. Basic repairs and troubleshooting can be done if authorized in 
the product documentation or if directed by telephone or online support from 
Tyan. If damage has occurred due to repairs or service that is not approved by 
Tyan, the product warranty becomes invalid. Review all safety guidelines that are 
provided with the Tyan MicroServer. 


Prerequisite:


Power down the system. 


Disconnect all cables and peripherals from the compute blade(s). 

Remove the compute blade. Refer to 

Removing a Compute Blade.


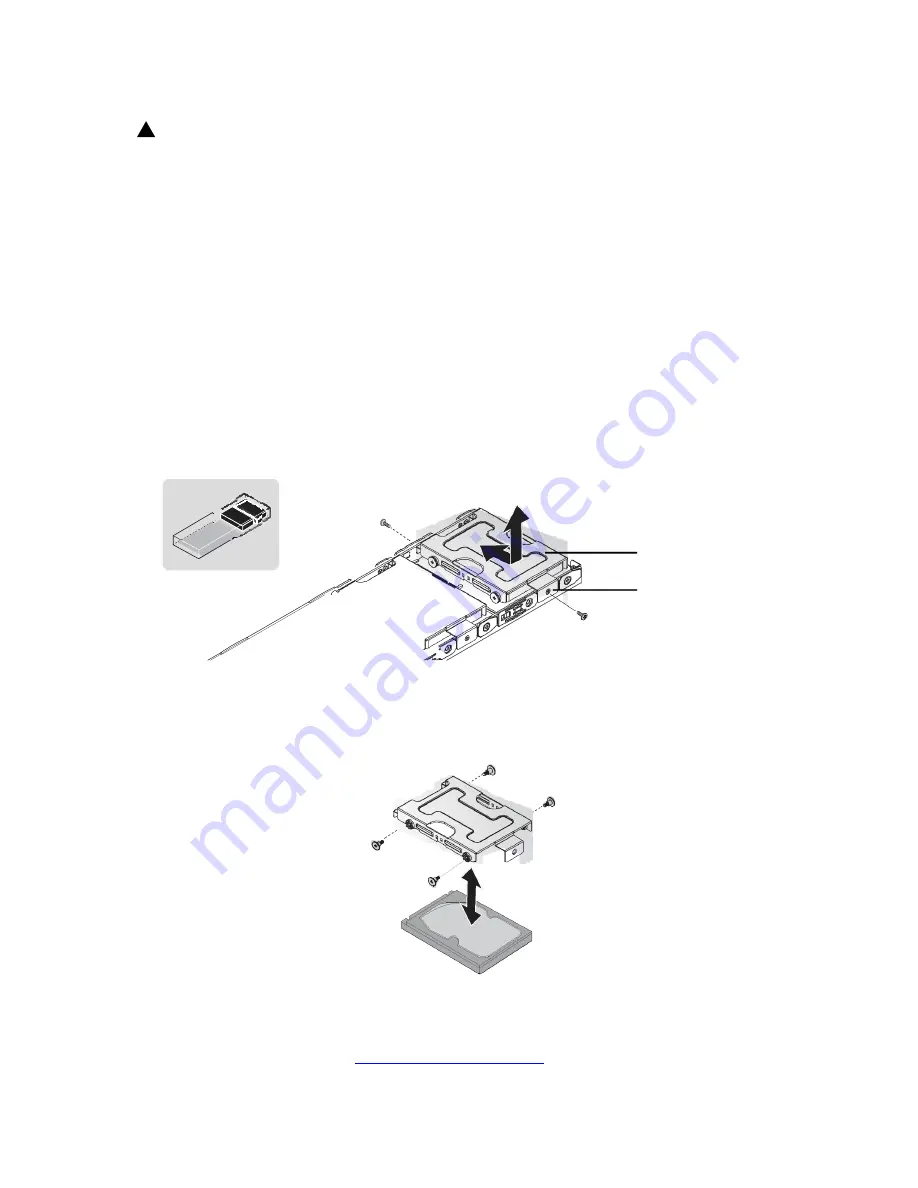
1.    Remove two (2) screws from the hard drive bracket. (Figure 4-7) 
2.    Slide and disconnect the hard drive bracket until the hard drive is disconnected from the 

connector. 

3.    Lift and remove the hard drive bracket. 


Hard


Drive


Bracket 


Bracket Flange


Figure 4-7.  Removing a Hard Drive Module


4.    Remove four (4) screws from the hard drive bracket. (Figure 4-8) 
5.    Remove the hard drive bracket from the hard drive module. 


Figure 4-8.  Removing a Hard Drive Bracket


Содержание FM65-B5519

Страница 1: ...http www tyan com Tyan MicroServer Series FM65 B5519 4U SERVER 18 NODES User s Manual...

Страница 2: ...ms any express or implied warranty relating to sale and or use of TYAN products including liability or warranties relating to fitness for a particular purpose or merchantability MiTAC retains the righ...

Страница 3: ...rview 17 3 5 FM65 B5519 Blade 17 3 5 1 Front View 17 3 5 2 Internal View 18 3 5 3 Compute Blade LED Behavior 19 3 6 Mid Plane 20 3 7 Pass through M1902F65 CMMPT Overview 21 3 7 1 Pass through M1902F65...

Страница 4: ...Blank 36 6 4 2 Installing a Compute Blade Blank 36 6 4 3 Compute Blade Modules 37 6 4 4 Removing a Compute Blade 37 6 4 5 Installing a Compute Blade 37 6 4 6 System Memory 38 6 5 Hard Drives 41 6 6 P...

Страница 5: ...le 54 7 4 2 Installing a Fan Module 54 7 5 Opening and Closing the System 55 7 6 Pass through M1902F65 CMMPT Module 56 7 7 Removing Pass through M1902F65 CMMPT Module 56 7 8 Installing Pass through M1...

Страница 6: ...nvironments as well as tomorrow s The Tyan MicroServer uses the latest chassis designs for solid mechanical enclosures and robust features The Tyan MicroServer delivers the power and flexibility to me...

Страница 7: ...Supports ACPI 2 0 Supports boot from USB device Power on mode control for AC power loss recovery Internal Connector 1 One SATA connector for 2 5 SATA SATAII hard drive on the motherboard 1 One SATA c...

Страница 8: ...2C switch for I2C Bus extender 4 Power connector PDB Blade connection 18 PCI E x 8 connector H W Monitor 4 System temperature sensor with SMBUS Form Factor W108 x L358 4 mm PDB Board M1608F65 PDB Powe...

Страница 9: ...f Power Supplies Power Present status Power Status on or off Cooling fans FAN speed control monitor FAN failed alert Networking switches option Reset Ethernet Switch Gigabit Switch Management UI Links...

Страница 10: ...off H W Healthy Monitor System Healthy monitor Temperature sensors and voltages System Event Log IPMI 2 0 MANAGEMENT Through LAN or I2C iKVM Serial Over LAN SOL Virtual Media Over LAN Email report Ch...

Страница 11: ...ents FM65 Chassis Kit 1 4U Chassis 1 Pass through CMM module 8 Fan Modules 3 Power Supply Modules 1 Power Distribution Board M1608F65 PDB 1 Mid Plane Board M1247F65 BP Compute Blade Single Kit 6 Compu...

Страница 12: ...r near a heating device Cover the unit when not in use Components and circuit boards can be damaged by static electricity discharge Follow the guidelines below to avoid damage to the system or bodily...

Страница 13: ...tive of the latest system revision available at the time of publishing The system you receive may not look exactly like the illustrations described later Work Area All maintenance and or troubleshooti...

Страница 14: ...repairs or services that are not approved by Tyan the product warranty becomes invalid Review all safety guidelines that are provided with the Tyan MicroServer The Tyan MicroServer contains component...

Страница 15: ...2 Front View Table 2 1 System Front View Modules ID Description 1 Compute Blade x18 2 Pass through M1902F65 CMMPT 3 2 System Rear View 1 2 Figure 2 3 Rear View Table 2 2 System Rear View Modules ID De...

Страница 16: ...tyan com 3 3 System Internal View 2 1 Figure 2 4 Internal View Table 2 3 System Internal View Modules ID Description 1 Mid Plane M1247F65 BP 18x PCI e x 8 connector 2 Power Distribution Board PDB M160...

Страница 17: ...Intel Cougar Point PCH Common Features Compact compute blade 118 88 mm X 263 52 mm 4 68 in x 10 37 inch AST2150 iBMC 4 DDR3 VLP UDIMM slots up to 32 GB 2 Internal 2 5 hard drive bays with connected b...

Страница 18: ...http www tyan com 3 5 2 Internal View Figure 2 6 FM65 B5519 Blade Internal View...

Страница 19: ...oth compute blade models Table 2 4 Compute Blade LED Behavior Field Color Behavior Blinking Green Access HDD Activity Off System normal ID Solid blue Active Solid Red Alert System Status Off Normal ID...

Страница 20: ...w Table 2 5 Mid Plane Front View ID Description 1 PCI E x8 connectors x18 2 PCI E x16 connectors x2 1 3 2 Figure 2 8 Mid Plane Rear View Table 2 6 Mid Plane Rear View ID Description 1 2 x 6 PIN Power...

Страница 21: ...wer Off Blade Power Stagger Start up Blade Reset Blade Graceful Shutdown Blade Identify LED on off Power Supplies Power Present status Power Status on or off Cooling fans FAN Speed Control Monitor FAN...

Страница 22: ...IOB5 V BCK Either Red or Green LED is on not both Must Warning LED System fan fail Red Solid on VPAVSYN C VSYNC GPIOH5 Fan fail Abnormal fan speed Must Warning LED PSU fail Red Solid on VPAVSYN C VSYN...

Страница 23: ...eview ESD requirements and take safety precautions Before installing the system into a rack install any optional components into the system Stabilize the rack before installing the system if necessary...

Страница 24: ...ace the rear mounting bracket on the rear cabinet column of the rack NOTE 4 Secure the outer rail to the rack with the screws and washers to the front and rear of the rack NOTE The outer rails contain...

Страница 25: ...left and right side of the inner rail on the chassis with the outer rails on the rack 3 Insert the rear side of the chassis into the rack until the inner rails and outer rails lock into place 4 Secur...

Страница 26: ...http www tyan com...

Страница 27: ...DHCP server recommended 1 Power up the MicroServer All MicroServer blades are powered on by the system through the BMC 2 Connect a monitor and keyboard to an active compute blade See FM65 B5519 Blade...

Страница 28: ...is a configuration error between the CMM BMC and compute blade node It may be necessary to wait for a short period to allow for network settings to take place before beginning troubleshooting steps 5...

Страница 29: ...n System Information Displays firmware and AuxFirmware revision as well as build time information List FRU Displays available field replacement units FRU in the MicroServer Further information for eac...

Страница 30: ...er and network settings to configure and setup the MicroServer system Figure 3 5 Configurtation Console Menu Table 3 4 Configuration Item Description Alerts Select to configure or test an existing ale...

Страница 31: ...P server SSL Certificate Select to upload an SSL certificate Remote Control The Remote Control menu provides information about the remote management and power status of the MicroServer system Figure 3...

Страница 32: ...tenance Console Menu Table 3 6 Maintenance Item Description Firmware Update Select to enter the system s Update Mode The Update Mode allows for the updating the firmware A system reset will follow aft...

Страница 33: ...GroupBMC Item Description GroupBMC List Add delete or scan GroupBMC lists NodeBMC List Select existing GroupBMC lists to manage respective nodes Group Login User Select to designate user groups for gr...

Страница 34: ...ains how to replace components relating to the compute blade module including the blade blank system memory hard drive heat sink processor bridge board and system board 6 2 Disassembly Flowchart The f...

Страница 35: ...Identification Before installing front components into the chassis review the compute blade enumeration for each component Compute Blade Numbering 16 17 18 13 14 15 10 11 12 7 8 9 4 5 6 1 2 3 Power Su...

Страница 36: ...purposes when a compute blade is removed it should be immediately replaced with another compute blade for proper cooling and air circulation to occur 6 4 1 Removing a Compute Blade Blank Prerequisite...

Страница 37: ...ompute blade is removed it should be immediately replaced with another compute blade for proper cooling and air circulation to occur 6 4 4 Removing a Compute Blade Prerequisite Disconnect all cables a...

Страница 38: ...de for Optimal performance of S5519GM2N UDIMM with ECC population One DIMM per Channel Two DIMM per Channel DIMM B1 J2 X X DIMM B0 J3 X X DIMM A1 J4 X X Single Rank Memory DIMM A0 J5 X X DIMM B1 J2 X...

Страница 39: ...e compute blade into the chassis See Installing a Compute Blade Memory Module Notch Locking Latch Socket Guide Socket Figure 4 4 Installing a Memory Module Removing a Memory Module CAUTION Most repair...

Страница 40: ...ot even after the system is powered down Prerequisite Power down the system Disconnect all cables and peripherals from the compute blade s Remove the compute blade Refer to Removing a Compute Blade Fi...

Страница 41: ...racket with the hard drive Figure 4 5 3 Secure the hard drive to the hard drive bracket with four 4 screws Figure 4 5 Installing a Hard Drive Bracket 4 Position and align the bracket flange with the c...

Страница 42: ...at are provided with the Tyan MicroServer Prerequisite Power down the system Disconnect all cables and peripherals from the compute blade s Remove the compute blade Refer to Removing a Compute Blade 1...

Страница 43: ...upport from Tyan If damage has occurred due to repairs or service that is not approved by Tyan the product warranty becomes invalid Review all safety guidelines that are provided with the Tyan MicroSe...

Страница 44: ...tyan com 3 Remove the processor from the socket Locking Lever Processor Connector 1 Indicator Connector 1 Indicator Socket Corner Tab Top Plate Processor Socket Figure 4 9 Releasing the Processor Lock...

Страница 45: ...o do so may result in permanent damage to the system board or the processor 2 Remove the socket cover from the socket 3 Unpack the new processor and remove any protective material 4 Align the processo...

Страница 46: ...2 Align the heat sink over the system board and retaining screw holes Figure 4 11 3 Tighten the captive screws on the heat sink in a diagonally opposite pattern Heat Sink Figure 4 10 Installing the H...

Страница 47: ...red down Prerequisite Power down the system Disconnect all cables and peripherals from the compute blade s Remove the compute blade Refer to Removing a Compute Blade 1 Loosen four 4 captive screws on...

Страница 48: ...e system Disconnect all cables and peripherals from the compute blade s Remove the compute blade Refer to Removing a Compute Blade Remove the hard drive Refer to Removing a Hard Drive 1 Remove four 4...

Страница 49: ...product warranty becomes invalid Review all safety guidelines that are provided with the Tyan MicroServer Prerequisite Power down the system Disconnect all cables and peripherals from the compute bla...

Страница 50: ...he front with the front of the blade housing 2 Slide the front of the system board into the housing 3 Lower the system board into the housing making sure the screw holes on the system board align with...

Страница 51: ...er explains how to replace components relating to the chassis components including the power supply module fan module top cover and Pass through CMM module 7 2 Disassembly Flowchart The following flow...

Страница 52: ...0 mm 7 72 x 2 89 x 1 57 inch The following table provides information about the LED lights on the power supply module Table 5 2 LED Status Bicolor Power Supply Condition Green LED Amber LED No AC powe...

Страница 53: ...roServer CAUTION Make sure that the power cable is disconnected from the power supply module PSU before attempting to remove the PSU 1 Disconnect the power cable from the power supply module socket Fi...

Страница 54: ...yan the product warranty becomes invalid Review all safety guidelines that are provided with the Tyan MicroServer Prerequisite Power down the system 7 4 1 Removing a Fan Module 1 Press and hold the re...

Страница 55: ...safety guidelines that are provided with the Tyan MicroServer CAUTION The top cover must be installed to maintain proper system cooling Prerequisite Power down the system Opening the Top Cover 1 Remo...

Страница 56: ...the Pass through CMM module removed it should be immediately replaced with another Pass through CMM module for proper cooling and air circulation to occur Prerequisite Power down the system Disconnec...

Страница 57: ...purposes when the Pass through CMM module removed it should be immediately replaced with another Pass through CMM module for proper cooling and air circulation to occur Prerequisite Power down the sys...

Страница 58: ...http www tyan com...

Страница 59: ...h the Gigabit LAN port and management port slots on the front of the Pass through M1902F65 CMMPT blade Figure 5 6 2 Lower the system board onto the Pass through M1902F65 CMMPT blade 3 Install and secu...

Страница 60: ...ections with downloadable Linux drivers and comprehensive compatibility reports for chassis memory and much more With all these convenient resources just a few keystrokes away users can easily find th...

Страница 61: ...ous position Place removed covers and other parts in a safe place away from personnel while servicing the system Do not wear jewelry chains metal frame eyeglasses or metal fasteners for your clothing...

Страница 62: ...power off the wall box that supplies power to the system and to lock the wall box in the off position Never assume that power is disconnected from a circuit Check that the power cord is disconnected S...

Отзывы: