background image

In order to continue serving our customers 

and providing the best products, our 

product information including our user 

manuals may receive updates from time 

to time. Please check our website for the 

latest user manuals and product materials. 

Version 4.0  6/05/20

Содержание TL114

Страница 1: ... our customers and providing the best products our product information including our user manuals may receive updates from time to time Please check our website for the latest user manuals and product materials Version 4 0 6 05 20 ...

Страница 2: ...www turbolock com Customer Service 855 850 8031 ...

Страница 3: ...re Installation 12 4 2 Main Installation 16 Section 5 Using the Lock 18 Section 6 Keypad Passcodes 18 6 1 Changing the Admin Passcode 18 6 2 Adding Keypad Passcodes 19 6 3 Delete a Single Passcode 19 6 4 Delete All Passcodes 20 6 5 Passcode Disguise 20 Section 7 Using the Mute Function 21 7 1 Activating Mute Mode 21 7 2 Deactivating Mute Mode 21 Section 8 Resetting the Lock 22 Section 9 Specificat...

Страница 4: ... be needed during the call Please record this information below Date of Purchase Place of Purchase 1 2 Safety Warnings When reading this manual note these icons Notes with this icon MUST be read understood and obeyed to prevent injury or damage Notes with this icon include relevant information General Precautions The lock shall only be used as described in this manual Verify that all parts of the ...

Страница 5: ...al This product must not be disposed of by incineration landfilling or mixing with household trash Improper disposal of the battery contained within this product may result in the battery heating up rupturing or igniting which may cause serious injury The substances contained inside the battery present chemical risks to the environment The recommended disposal for any TURBOLOCK TL114 at its end of...

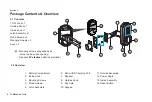
Страница 6: ...y 12 Power Cable 13 Inside Assembly 14 Reset Button 6 TURBOLOCK TL114 Section 2 Package Contents Overview 2 1 Contents TL114 Lock x 1 Outside Knob x 1 Inside Knob x 1 Latch Assembly x 1 Wood Screws x 6 Mounting Screws x 2 Keys x 3 Mounting screws may already be inside the lock upon opening Requires 9V alkaline batteries included 2 2 Overview 2 1 4 3 5 13 7 8 6 14 9 10 11 12 ...

Страница 7: ... can also use one of the included physical keys to open the lock directly Using the Admin Passcode Use the keypad to enter the Admin Passcode and then press to unlock the door For added security the Admin Passcode must be changed from the manufacturer s default after installation and initial testing See Section 6 Using the Emergency Power Port Supply power via the Emergency Power Port on the botto...

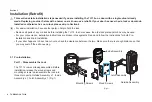
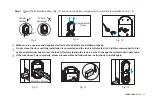
Страница 8: ...he old strike plate and or box may be used For your convenience installation instructions are broken into segments Read and follow the instructions for both Pre Installation and Main Installation If your door happens to have two cut outs check the clearance between the two Make sure there is enough distance so that you may seal off the extra opening 3 1 Pre Installation Part 1 Disassemble the Lock...

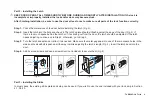
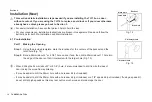
Страница 9: ...the latch or if it s sticking out from the door the latch should be adjusted If the latch needs adjusting continue on to Step 3 otherwise go to Step 4 Step 3 Turn the latch and extend or retract it as needed Make sure the metal peg pops into one of the two square holes in the side and the deadbolt is pushed all the way in while adjusting the latch s length Fig 4 Insert the latch back into the door...

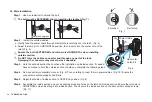
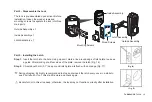
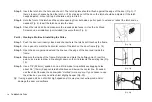
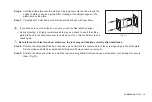
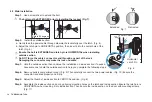
Страница 10: ...r may make the lock unusable Step 3 Hold the outside section then continue the installation on inside section If needed have someone to hold the outside section to help you complete the following steps Step 4 Remove battery compartment cover Fig 9 Then carefully connect the two power cables Fig 10 Ensure the connector is seated properly and firmly Step 5 Adjust the thumb of inside section to VERTI...

Страница 11: ...he door until the installation is completed and the lock is fully tested It s highly recommended to first use the default passcode to test the lock After fully testing the lock be sure to change the default admin passcode If the lock doesn t work properly please disassemble and follow above instructions to install again Compartment Cover Fig 9 Fig 10 BATTERY Mounting Screws Thumb Vertical Thumb Ho...

Страница 12: ...the provided template mark the locations for the centers of the backset and the latch hole Fig 14 Step 2 Bore a 54mm about 2 or 2 1 8 hole on door face then drill a 25mm about 1 hole into the edge of the door so that it intersects with the larger hole Fig 15 When drilling the 54mm about 2 or 2 1 8 hole it s recommended to drill from both sides of door to stop the wood from splintering It may be ea...

Страница 13: ...mark a line around edge of latch plate to use as a guide After marking at all four sides of the plate remove the latch Fig 16 Step 2 Chisel about 3mm 0 1 deep or until latch plate sits flush with door edge Fig 17 During chiseling it s highly recommended to stop and reinsert the latch every once in a while to see if it sits flush If not chisel a little more and check again Be careful not to chisel ...

Страница 14: ...h the door until nearly closed and check where the latch s bolt touches the frame Step 2 Use a pencil to mark the horizontal center of the latch on the door frame Fig 18 Step 3 Open the door again and extend the line over the edge of the door and inside the frame Step 4 Measure the inside of the frame Determine and mark the halfway point From this point use a ruler to draw a line straight down so ...

Страница 15: ...mended to stop and check to see if the strike plate sits flush in the doorframe over the strike box If not chisel a little more and check again Be careful not to chisel too deep otherwise the lock may not function correctly after installation Step 8 Position the strike and strike box then use a pencil to mark the center points of the screw openings in the strike plate Set the strike and strike box...

Страница 16: ...r may make the lock unusable Step 3 Hold the outside section then continue the installation on inside section If needed have someone to hold the outside section to help you complete the following steps Step 4 Remove battery compartment cover Fig 9 Then carefully connect the two power cables Fig 10 Ensure the connector is seated properly and firmly Step 5 Adjust the thumb of inside section to VERTI...

Страница 17: ...he door until the installation is completed and the lock is fully tested It s highly recommended to first use the default passcode to test the lock After fully testing the lock be sure to change the default admin passcode If the lock doesn t work properly please disassemble and follow above instructions to install again Compartment Cover Fig 9 Fig 10 Thumb Vertical Thumb Horizontal Fig 8 BATTERY F...

Страница 18: ... highly recommended that you change the Admin Passcode from the manufacturer default Step 1 Press the on the keypad and enter the current Admin Passcode then press Voice navigation will guide you through the process To set up an Admin Passcode please press 1 Step 2 Enter 1 then press Step 3 Enter the new Admin Passcode then press After the voice confirmation Success the new Admin Passcode is saved...

Страница 19: ...t up a user passcodes please press 2 Step 2 Enter 2 then press Follow the voice prompt Please enter the new user passcode Step 3 Enter a new keypad passcode and then press After the voice confirmation Success the new passcode has been saved You can create multiple passcodes up to 9 total in Step 3 so long as the keypad backlight remains on If the keypad backlight turns off you must go back to Step...

Страница 20: ...ess 4 Step 3 Enter 4 then press before the keypad turns off Step 4 After the voice confirmation All user passcodes successfully deleted the keypad will turn off All passcodes are now deleted Step 4 Test all previous keypad passcodes They should now be unusable 6 5 Passcode Disguise This function is an added security feature aimed at preventing passcode theft With Passcode Disguise you may enter 12...

Страница 21: ...Voice navigation will guide you through the process To activate mute function please press 6 Step 2 Press 6 and then After the voice confirmation Mute mode activated the TL114 will be muted and will remain so until the feature is turned off 7 2 Deactivating Mute Mode Step 1 Press on the keypad and enter the current Admin Passcode Then press again Voice navigation will guide you through the process...

Страница 22: ...Voice navigation will guide you through the process To restore the default factory setting please press 5 Step 2 Press 5 followed by before the lock s backlight turns off The TL114 will confirm Restore factory settings then flash three times After the voice confirmation Success the TL114 is now reset Option 2 Step 1 Remove the cover from the battery compartment at the back of the lock Step 2 Press...

Страница 23: ...al Keys 3 Keypad Codes 9 user 1 admin Passcode Length 6 digits Pressing Cycle times 200 000 Micro USB 1 x USB mobile power bank Usage Temp 4 F 140 F 20 C 60 C Door requirements 2 16 5 5cm diameter hole 1 38 2 16 3 5cm 5 5cm thickness Warranty 1 Year Limited Section 10 Maintenance Proper cleaning and maintenance of your lock ensures it will continue to work as it should For most cleaning purposes u...

Страница 24: ...ng Problem Possible Cause Solution s Why can t I open the door Too much time has passed Try passcode again Remember to turn the handle to open the door while the lock s backlight is still on Your access has been restricted If you received a key from the lock s admin your access may have a restricted schedule Check with your admin regarding these details Why does the lock jam The door doesn t close...

Страница 25: ...steps found in the QSG or in the UM section 3 2 4 2 Main Installation The latch pin was not horizontal while inserting the square hole in latch The inside knob was not vertical after the latch pin was inserted to the inside assembly I appear to be locked out Not even my admin passcode works If a passcode has been entered wrong 5x in a row regardless of the entry method the lock will go into a 5 mi...

Страница 26: ... has expired Damage occurred during or in relation to non routine and or unauthorized disassembly Failure to provide a valid proof of purchase when requesting service or repair Damage occurred as a result of natural disaster etc Damage occurred due to unexpected factors or man made reasons including mis operation fluid found in any openings improper insertion or pulling hauling bumping improper vo...

Страница 27: ...s during the warranty period and under normal use conditions WP does not warrant uninterrupted or error free operation of this Product This Warranty does not cover any damage due to a transportation b storage c improper use d failure to follow the product instructions or to perform any preventive maintenance e modifications f unauthorized repair g normal wear and tear or h external causes such as ...

Страница 28: ...COPYRIGHT 2020 TURBOLOCK ALL RIGHTS RESERVED ...

Отзывы: