true-i SMART HOME SYSTEM Скачать руководство пользователя страница 7


Page 4 of 37


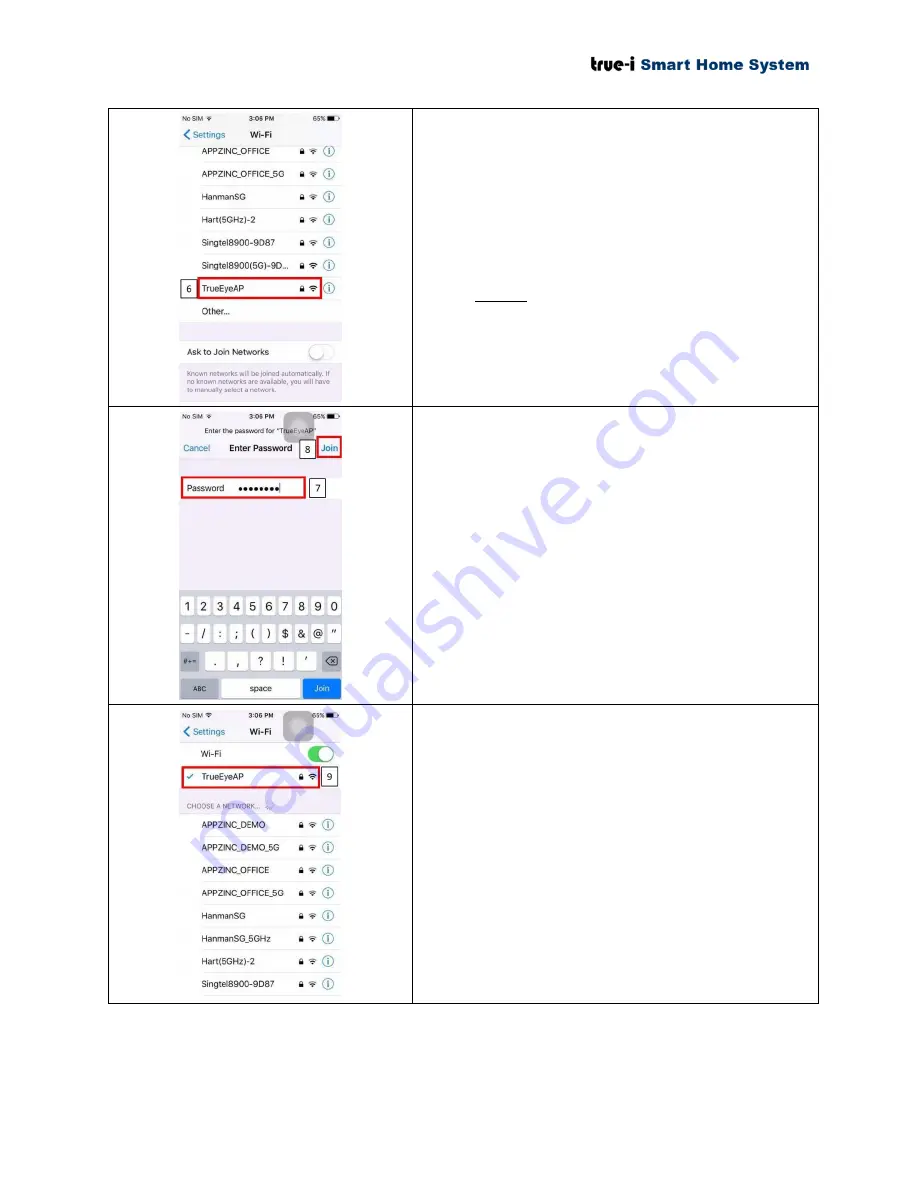
Once the gateway is in AP mode, look for gateway 
default SSID to connect. The gateway default SSID is 
“TrueEyeAP” as shown in the picture. 


6)


Click “TrueEyeAP” to connect from the 
user’s mobile phone. 


Please take note that “TrueEyeAP” SSID is 
ONLY allowed to connect to one mobile 
device each time the user connects.


7)


Type the manufacturer default password 
“12345678” for connecting to “TrueEyeAP” 
SSID.  


This manufacturer password cannot be changed.  


8)


Click “Join” to connect to “TrueEyeAP” 
SSID.


9)


The user can see as shown in the picture if the 
user’s mobile phone is being connected to 
“TrueEyeAP”.  


In the case of the connection is 
unsuccessful, please kindly check if there is 
any other mobile phone that is connected to 
“TrueEyeAP”. If it is difficult to find the 
mobile, please restart the gateway and try 
connecting again after the gateway is being 
restarted.


Содержание SMART HOME SYSTEM

Страница 1: ...TRUE I SMART HOME SYSTEM USER MANUAL www true i com...

Страница 2: ...at True i gateway 8 4 1 Inclusion of door lock controller module HMDM 100 8 4 2 Inclusion of AC IR Extender 9 4 3 Factory reset of IR Extender 10 4 4 Inclusion of door window Contact Sensor 11 4 5 Inc...

Страница 3: ...omizing Coming Home and Leaving Home option 24 6 1 Customizing Coming Home option 24 6 2 Customizing Leaving Home option 26 7 How to configure Scene page 28 7 1 Configuration in Android mobile applica...

Страница 4: ...from Play Store 2 Key in trueeye in the search box at Play Store 3 You can find TrueEye SmartHome Click and download accordingly 1 2 Downloading TrueEye Smart Home mobile application on Apple iOS 1 G...

Страница 5: ...ID to check if ID is available 4 Choose the user prefer password and confirm the password 5 Key in the True i gateway serial number The user MUST click Check Serial Number to check whether the gatewa...

Страница 6: ...RESET button according to the direction as shown in the figure with red arrow line Please take note that the user has to feel the PUSH button on the device Please take note that the user has to press...

Страница 7: ...the manufacturer default password 12345678 for connecting to TrueEyeAP SSID This manufacturer password cannot be changed 8 Click Join to connect to TrueEyeAP SSID 9 The user can see as shown in the p...

Страница 8: ...ording to the instruction in 3 2 Internet connection setup Please take note that Router SSID and Router Password is case sensitive For Serial Number it will be case sensitive and please omit the dash...

Страница 9: ...Not compatible with 5 GHz frequency band The device will ask the user to restart the gateway after clicking SAVE button Please restart the gateway for changes to take effect of Wi Fi configuration Onc...

Страница 10: ...onnected to Internet RED light ON GREEN light blinking once a second Gateway is connected to Internet No SD Card RED light ON GREEN light blinking twice a second Gateway is not connected to Internet R...

Страница 11: ...on and click on Setting as shown in the picture 4 To include add the component device click ADD as shown in the picture Note Please wait until the loading is completed while doing inclusion exclusion...

Страница 12: ...se Wi Fi connection during inclusion 5 Open TrueEye Smart Home mobile application and click on Setting as shown in the picture 6 To include add the component device click ADD as shown in the picture N...

Страница 13: ...s on IR extender The LED will flash twice until reset process is completed Once IR extender is being factory reset you need to include the IR extender to the gateway again and learn the code again Not...

Страница 14: ...he picture 4 To include add the component device click ADD as shown in the picture Note Please wait until the loading is completed while doing inclusion exclusion of devices and please do not exit the...

Страница 15: ...ure Note Please wait until the loading is completed while doing inclusion exclusion of devices and please do not exit the application 5 To include the device use a paperclip or sim card extractor and...

Страница 16: ...ent device click ADD as shown in the picture Note Please wait until the loading is completed while doing inclusion exclusion of devices and please do not to exit the application 4 To include the devic...

Страница 17: ...To activate leaving home coming home settings click on the respective icon Setting can be done under Customize option between Event and Scene Arm Home To arm with alarm when you are outside of the ho...

Страница 18: ...actions E g closing the door will off the lights To create a new scenario click the button on the top right Device will prompt user to select conditioning device Door lock binary sensor etc Select the...

Страница 19: ...ding on the gateway location 6 To turn on sound notification click ON button 7 To turn on voice click ON button 8 To receive push notification click ON button 9 To enter the setup page click SETUP but...

Страница 20: ...nnected with ON position Grey means connected with OFF position Orange with exclamation sign means not connected To rename the light switch press and hold the text area the text box will pop up as sho...

Страница 21: ...ual personal mobile phone Please take note that changing Name for device customize option except changing Scene Name in mobile app is only reflecting on individual personal mobile phone To remove door...

Страница 22: ...l page Various controls for air conditioner aircon can be accessed in the aircon control page as shown in the picture To adjust the temperature click or icon To set the speed of aircon fan click LOW M...

Страница 23: ...button respectively Click SAVE icon at the upper right corner as shown in the picture after setting the sensor To check status of connected sensors see the sensor icon Orange means connected but senso...

Страница 24: ...icon as described in the Aircon control page the total number of installed IR extenders will be appeared as shown in the picture Please take note that for the IR extenders that is already switched to...

Страница 25: ...hat for the IR extenders that is already switched to Aircon control page cannot be seen in Remocon control page When the user presses No 8 icon as described in the Remocon control page the pop up mess...

Страница 26: ...ntroller to the middle of IR extender as shown in the picture and click ON OFF button as shown in the picture The user will see RED LED is flashing at IR extender for about 2 seconds if learning code...

Страница 27: ...s at Home page of the TrueEye Smart Home mobile application 1 Click Coming Home icon for configuration on Coming Home option 2 Click the icon as shown in the picture for selecting the options to choos...

Страница 28: ...example 6 Click the icon to choose for selecting the second option for this example 7 Choose Switch node 52 in this example 8 Click Done button after selection 9 Click ON button according to this exa...

Страница 29: ...e Smart Home mobile application 11 Click Leaving Home icon for configuration on Leaving Home option 12 Click the icon as shown in the picture for selecting the options to choose for customization In t...

Страница 30: ...ample 16 Click the icon to choose for selecting the second option for this example 17 Choose Switch node 52 in this example 18 Click Done button after selection 19 Click OFF button according to this e...

Страница 31: ...ate simple conditional statements This option is also known as IFTTT If This Then That option 1 Click sign for new Scene configuration 2 There will be a pop up box to enter new Scene Name Please type...

Страница 32: ...trigger both in ARM mode and UN ARM mode Orange Condition will trigger only in ARM mode Grey Condition will trigger only in UN ARM mode 8 Click the button to choose for the second sequence to follow e...

Страница 33: ...ould be in ON position 11 Click the button to choose for the third sequence to follow 12 In this scenario Multiswitch 1 node 3 will be chosen The user can choose any node for the desired option 13 Cli...

Страница 34: ...choose any node for the desired option 16 Click the chosen Multiswitch 2 node 3 in ON position 17 Click the button to choose for the fifth sequence to follow 18 In this scenario Switch node 31 will be...

Страница 35: ...e to follow This example shows that when the door is opened i e when the door contact sensor is triggered in open position the four lights will be switched ON The user can create the desired condition...

Страница 36: ...tional statements This option is also known as IFTTT If This Then That option 21 Click sign for new Scene configuration 22 There will be a pop up box to enter new Scene Name Please type the desired na...

Страница 37: ...ARM and UN ARM mode Orange the condition will be triggered only in ARM mode Grey the condition will be triggered only in UN ARM mode 29 Click the button to choose for the second sequence to follow e g...

Страница 38: ...e door the smart plug will be ON 34 In this scenario Switch node 52 will be chosen for the third sequence The user can choose any node for the desired option 35 Click Done button after selection 36 Cl...

Страница 39: ...ional sequence to follow This example shows that when the door is unlocked the smart plug will be switched ON after 5 seconds delay The user can create the desired conditional sequence to follow depen...

Страница 40: ...your email Note If forget user ID contact Hanman International Pte Ltd at 65 6564 4704 8 2 Deactivating user account 1 Click DELETE ACCOUNT for deactivating the account It will lead to the webpage to...

Отзывы: