background image


BASIC OPERATION GUIDE

xxi

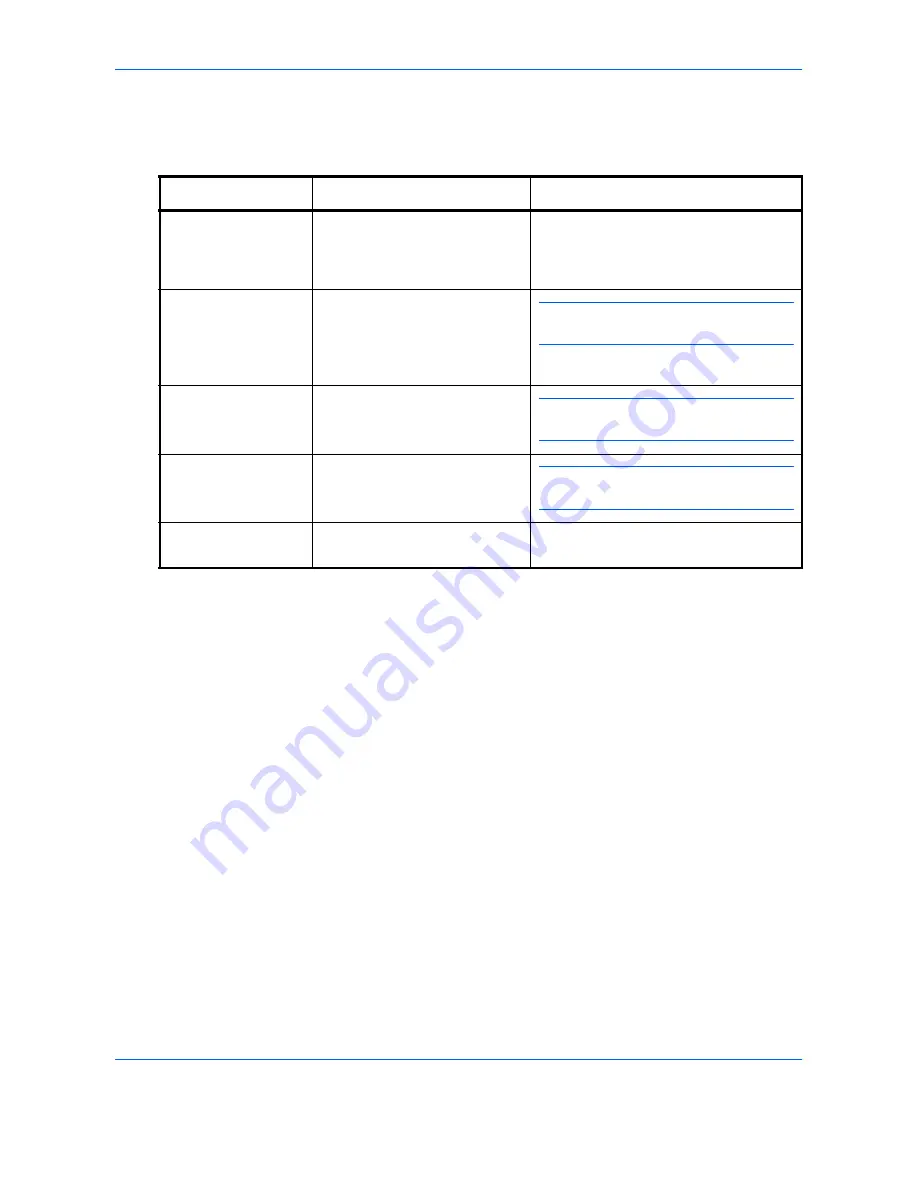
Conventions

This manual uses the following conventions

.

Convention

Description

Example

Italic Typeface

Used to emphasise a key word, 
phrase or message. In addition, 
references to other publications 
are displayed in italic typeface.

Completed

 message displays and the 

Copy Basic

 screen returns.

Notes

Used to provide additional or 
useful information about a 
function or feature. Can also 
contain references to other 
publications.

NOTE: 

For information about storing the 

pin, refer to step 10.

Important

Use to provide important 
information.

IMPORTANT: 

Ensure paper is not 

folded, curled, or damaged.

Caution

Cautions are statements that 
suggest 

mechanical

 damage as 

a result of an action.

CAUTION: 

Do not pull the cassette out 

when holding the front of the machine.

Warning

Used to alert users to the 
possibility of 

personal

 injury.

WARNING: 

High voltage is present 

in the charger section.

Содержание CLP 4416

Страница 1: ...Instruction Handbook Basic CLP 4416 4524 Colour Printer ...

Страница 2: ......

Страница 3: ...Left of the Printer 2 3 Internal Components 2 4 Components at the Rear of the Printer 2 5 3 Printing Operation Loading Printer Driver 3 2 Printing from Application Software 3 3 4 Maintenance General Information 4 2 Toner Container Replacement 4 3 Cleaning the Printer 4 8 Replacing the Waste Toner Box 4 15 5 Troubleshooting General Guidelines 5 2 Print Quality Problems 5 3 Error Messages 5 7 Cleari...

Страница 4: ...Contents ii BASIC OPERATION GUIDE ...

Страница 5: ...le of the page printer are protected by copyright All rights are reserved Copying or other reproduction of all or part of this guide any copyrightable subject matter without the prior written consent of Kyocera Mita Corporation is prohibited Any copies made of all or part of this guide any copyrightable subject must contain the same copyright notice as the material from which the copying is done R...

Страница 6: ...atible PCL 6 language emulation PeerlessPrintXL is a trademark of The Peerless Group Redondo Beach CA 90278 U S A This product was developed using the Tornado Real Time Operating System and Tools from Wind River Systems This product contains UFST and MicroType from Agfa Monotype Corporation ...

Страница 7: ...s the original and all whole or partial copies of it including modified copies or portions merged into other programs IBM retains title to the Programs IBM owns or has licensed from the owner copyrights in the Programs 1 License Under this license you may use the Programs only with the device on which they are installed and transfer possession of the Programs and the device to another party If you...

Страница 8: ...veloper s limitations of remedies are not cumulative Such developer is an intended beneficiary of this Section Some jurisdictions do not allow these limitations or exclusions so they may not apply to you 4 General You may terminate your license at any time IBM may terminate your license if you fail to comply with the terms and conditions of this license In either event you must destroy all your co...

Страница 9: ...s except that you may make one backup copy You agree that any such copy shall contain the same proprietary notices as those appearing on the original 5 This License shall continue until the last use of the Software and Typefaces unless sooner terminated This License may be terminated by Agfa Japan if you fail to comply with the terms of this License and such failure is not remedied within thirty 3...

Страница 10: ...7 7013 subdivision b 3 ii or subparagraph c 1 ii as appropriate Further use duplication or disclosure is subject to restrictions applicable to restricted rights software as set forth in FAR 52 227 19 c 2 14 YOU ACKNOWLEDGE THAT YOU HAVE READ THIS AGREEMENT UNDERSTAND IT AND AGREE TO BE BOUND BY ITS TERMS AND CONDITIONS NEITHER PARTY SHALL BE BOUND BY ANY STATEMENT OR REPRESENTATION NOT CONTAINED I...

Страница 11: ...ure to power off the printer before connecting or disconnecting an interface cable For protection against static electricity discharge to the printer s internal electronics through the interface connector s cover any interface connector that is not in use with the protective cap supplied ...

Страница 12: ...ration The printers generate ozone gas O3 which may concentrate in the place of installation and cause an unpleasant smell To minimize the concentration of ozone gas to less than 0 1 ppm we recommend you not to install the printer in a confined area where ventilation is blocked For Europe Asia and other countries except U S A and Canada ...

Страница 13: ...8 Norderstedt Germany Declares that the product Product name Color Page Printer Model number CLP 4416 4524 as tested with enhancement optional units Duplex unit DU 300 DU 301 Paper Feeder PF 60 Conforms to the following product specifications EN 55 022 1998 Class B EN 61 000 3 2 2000 EN 61 000 3 3 1995 EN 55 024 1998 EN 60 950 2000 ...

Страница 14: ...e following technical documentation in anticipation of the inspection that may be conducted by the authorities concerned User s instruction that conforms to the applicable specifications Technical drawings Descriptions of procedures that guarantee conformity Other technical information ...

Страница 15: ...of the ENERGY STAR Program is to reduce environmental pollution by encouraging the manufacture and sale of equipment that uses energy more efficiently This printer is equipped with a sleep timer function that conforms with the standards of the ENERGY STAR Program This function makes it possible to reduce the amount of electrical power consumed by the printer For maximum power savings turn off the ...

Страница 16: ... efficient use of energy This product has a high efficiency profile and meets the criteria for receiving the GEEA Label GEEA criteria CLP 4416 CLP 4524 Initial Auto Sleep Setting 15 minutes 30 minutes 15 minutes 30 minutes Power Consumption Power off Auto Sleep 0W 1W 16W 30W 0W 1W 21W 30W ...

Страница 17: ...ound the side cover to allow air to be properly ventilated from the printer Other Precautions Adverse environmental conditions may affect the safe operation and performance of the printer Install in an air conditioned room recommended room temperature around 23 C humidity around 60 RH and avoid the following locations when selecting a site for the printer Avoid locations near a window or with expo...

Страница 18: ... present a danger of fire or electrical shock Plug the power cord securely into the outlet If metallic objects come in contact with the prongs on the plug it may cause a fire or electric shock Always connect the printer to an outlet with a ground connection to avoid the danger of fire or electrical shock in case of an electric short If an earth connection is not possible contact your service repre...

Страница 19: ...ons Connect the power plug to the closest outlet possible to the printer Handling of Plastic Bags WARNING Keep the plastic bags that are used with the printer away from children The plastic may cling to their nose and mouth causing suffocation ...

Страница 20: ...y Next remove the power plug from the outlet to avoid the danger of fire or electrical shock Then contact your service representative Do not remove or connect the power plug with wet hands as there is a danger of electrical shock Always contact your service representative for maintenance or repair of internal parts Do not pull the power cord when removing it from the outlet If the power cord is pu...

Страница 21: ...ircuit boards They could be damaged by static electricity Do not attempt to perform any operations not explained in this handbook If the printer will not be used for an extended period of time remove the paper from the cassette return it to its original package and reseal it CAUTION Use of controls or adjustments or performance of procedures other than those specified herein may result in hazardou...

Страница 22: ...s manual Guides you through topics concerning the operations and maintenance of the printer The following documents are stored in the CD ROM as PDF documents Advanced Operation Guide Guides you through topics concerning loading paper using the operator panel as well as describing the options available and the specifications for the physical interface KX Printer Drivers Operation Guide Describes ho...

Страница 23: ...al or useful information about a function or feature Can also contain references to other publications NOTE For information about storing the pin refer to step 10 Important Use to provide important information IMPORTANT Ensure paper is not folded curled or damaged Caution Cautions are statements that suggest mechanical damage as a result of an action CAUTION Do not pull the cassette out when holdi...

Страница 24: ...xxii BASIC OPERATION GUIDE ...

Страница 25: ...IC OPERATION GUIDE 1 1 1 Installation This chapter contains explanations on the following topics Unpacking the printer 1 2 Installing the Toner Container and Waste Toner Box 1 4 Making the connections 1 7 ...

Страница 26: ...pack the printer and all its included components 2 Remove the packing cover and all packing tapes European Pacific countries U S A Canada Be sure to hold the right and left sides of the printer when carrying it as shown in the illustration Packing tape Packing cover ...

Страница 27: ...ation Guide Basic Operation Guide this guide CD ROMs 3 Magenta toner container 4 Cyan toner container 5 Yellow toner container 6 Black toner container 7 Waste toner boxes one is a spare 8 Power cord 4 Install the toner container and waste toner box see Installing the Toner Container and Waste Toner Box on page 1 4 ...

Страница 28: ...e facing downward and shake the new toner container 5 or 6 times as shown in the figure in order to distribute the toner evenly inside the container Do not forcefully push in on the center of the toner container or touch the toner supply opening with your hands or fingers during this procedure 4 Set the new toner container in the printer with the markings facing upward as shown in the figure below...

Страница 29: ...o place 6 Apply light pressure to the toner container and push the blue lock lever on the toner container back towards the locked symbol as far as it will go To install the other color toner containers use the same procedure as above 7 Close the top cover 8 Open the left cover 9 Open the cap of the waste toner box Lock lever Cap ...

Страница 30: ...s shown in the figure by setting the bottom of the box into the receptacle and then pushing down on the box until it snaps firmly into place 11 Make sure that the waste toner box is correctly inserted and close the left cover 12 Connect up the printer see Making the connections on page 1 7 ...

Страница 31: ...ower cord to a power outlet 3 Turn on the printer s power switch located on the left side of the printer 4 Set the color registration NOTE Set the color registration according to the procedures described in the Advanced Operation Guide Using the Operator Panel section under Other Modes Parallel Interface USB Interface Network Interface Ethernet Power Cord Connector ...

Страница 32: ...Installation 1 8 BASIC OPERATION GUIDE ...

Страница 33: ...d their functions Try to be familiar with the names and functions of these parts for correct use and optimal performance This chapter contains explanations on the following topics Components at the Front of the Printer 2 2 Components at the Left of the Printer 2 3 Internal Components 2 4 Components at the Rear of the Printer 2 5 ...

Страница 34: ...operating status 2 Top Cover When open this cover gives you access to the internal component for replacing toner containers 3 MP Multi Purpose Tray The MP tray holds up to 100 sheets of paper 80 g m Transparencies envelopes etc must be fed using this tray 4 Paper Cassette The cassette holds up to 500 sheets of paper from A5 to Legal sizes 80 g m 1 2 4 3 ...

Страница 35: ...x or cleaning the main charger units 4 Waste Toner Box This plastic box collects waste toner for later disposal The box has a cap which is used to seal the box opening when being disposed of 5 Main Charger Units on the Drum Units The main charger units are electrical components included in each toner container and are used to transfer toner onto the drum unit Whenever you replace a toner container...

Страница 36: ...ntainer holds cyan C toner You must replace the container when the toner runs out 3 Yellow Toner Container This container holds yellow Y toner You must replace the container when the toner runs out 4 Black Toner Container This container holds black K toner You must replace the container when the toner runs out 5 Paper Transfer Unit The paper transfer unit feeds paper from the cassette for printing...

Страница 37: ...Operation Guide 3 Power Cord Connector This connector accepts the power cord supplied with the printer 4 USB Interface Connector This connector is a USB interface that conforms to the Hi Speed USB Use a USB cable between this connector and the USB port on a computer 5 Network indicators These indicators light according to the communication status with the network Right 10BASE T 100BASE TX indicato...

Страница 38: ...e serial interface board kit For details see the Options section of the Advanced Operation Guide 7 Parallel Interface Connector This connector is for a standard Centronics parallel interface cable from the computer Connect this connector to the computer s parallel port 8 Network Interface Connector Connects to the network via a 10BASE T 100BASE TX network cable ...

Страница 39: ...BASIC OPERATION GUIDE 3 1 3 Printing Operation This chapter contains explanations on the following topics Loading Printer Driver 3 2 Printing from Application Software 3 3 ...

Страница 40: ... Windows NOTE If the Welcome to the Found New Hardware Wizard dialog box displays select Cancel 2 Insert the CD ROM supplied with the printer into the optical drive of the PC 3 The installation program launches NOTE If the installation program fails to launch use Windows Explorer to access the CD ROM and select Setup exe 4 Perform the procedures displayed on the installation program to install the...

Страница 41: ... select Print The Print dialog box displays 3 Click the drop down list of printer names All the printers installed in Windows are listed Click the name of the machine 4 Use Number of copies to enter the number of prints required Up to 999 copies can be entered For Microsoft Word we recommend that you click Options and specify Use printer settings for the Default tray 5 To start printing click OK N...

Страница 42: ...Printing Operation 3 4 BASIC OPERATION GUIDE ...

Страница 43: ...OPERATION GUIDE 4 1 4 Maintenance This chapter contains explanations on the following topics General Information 4 2 Toner Container Replacement 4 3 Cleaning the Printer 4 8 Replacing the Waste Toner Box 4 15 ...

Страница 44: ...ribes basic maintenance tasks you can perform on the printer You can replace the following component according to the printer s display Toner Kits Waste Toner Box Also the following parts need periodic cleaning Paper Transfer Unit Main Charger Units Advanced Beam Array Lenses ...

Страница 45: ...bar for each color which roughly represents how much toner is left in the toner container Starter Toner Containers The toner containers packed with the new printer are starter toner containers The black starter toner container lasts an average of 4 000 monochrome pages The cyan magenta and yellow starter toner containers last an average of 4 000 color images for each Toner Kits It is strongly reco...

Страница 46: ...u must press GO and make the printer ready In either case replace the toner container see Toner Container Replacement on page 4 3 Replacing the Toner Container NOTE During toner container replacement temporarily put storage media and computer supplies such as floppy disks away from around the toner container This is to avoid damaging media by the magnetism of toner This section explains how to rep...

Страница 47: ...UIDE 4 5 1 Open the top cover 2 Pull the blue lock lever on the toner container forward towards the unlocked symbol 3 Carefully remove the old toner container from the printer Top Cover Black K Yellow Y Cyan C Magenta M Lock Lever ...

Страница 48: ...ter according to the local code or regulations for waste disposal 5 Take the new toner container out of the toner kit 6 Shake the new toner container 5 or 6 times as shown in the figure in order to distribute the toner evenly inside the container 7 Set the new toner container in the printer as shown in the figure below Plastic Bag ...

Страница 49: ... container to install it firmly in place 9 Pull the blue lock lever on the toner container back towards the locked symbol as far as it will go 10 Use the same procedure to replace the other color toner containers 11 Close the top cover Proceed to the next section Lock Lever ...

Страница 50: ...urred printouts are produced clean the advanced beam array lenses Cleaning the Main Charger Unit The main charger units need to be cleaned periodically as they get contaminated after long usage Each main charger unit comprises two main parts the wire and the grid which should be cleaned separately as explained below There are 4 main charger units one for each toner container When performing the cl...

Страница 51: ...s 2 to 3 times After cleaning make sure you restore the wire cleaner knob to its home position NOTE If the wire cleaner knob is not restored to its home position a band will print along the length of the page 3 Next clean the main charger grid Take the grid cleaner out of the toner kit Take the grid cleaner out of the protective bag and remove the cap Left Cover Wire Cleaner Knob Cap Grid Cleaner ...

Страница 52: ...r contains water Clean the grid quickly so that the pad may not dry off 4 Lift up slightly on the main charger unit and pull it out a short distance as shown in the figure below 5 Attach the grid cleaner to the printer with the pad facing up Main Charger Unit Grid Cleaner ...

Страница 53: ...e printer and discard it The grid cleaner cannot be reused Use the same procedure to clean the main charger units for the other toner containers Proceed to the next section and clean the advanced beam array lenses Cleaning the Advanced Beam Array Lenses If lines etc appear on printed copies the printouts appear dirty or faint or blurred printouts are produced clean the advanced beam array lenses T...

Страница 54: ...Push the lens cleaner knob back in completely After cleaning make sure you restore the lens cleaner knob to its home position NOTE If the lens cleaner knob is not restored to its home position the corresponding color will be printed over the whole page Use the same procedure to clean the lenses on the main charger unit of the other toner containers Lens Cleaner Knob ...

Страница 55: ...oblems such as soiling of the reverse side of printed pages may occur if the paper transfer unit becomes dirty To clean the paper transfer unit you must use the cleaning cloth included in the toner kit 1 While pulling the green paper transfer unit release lever pull out the paper transfer unit Paper Transfer Unit Release Lever Paper Transfer Unit ...

Страница 56: ...er and the paper ramp using the wiper cloth included in the toner kit NOTE Be careful not to touch the black transfer roller during cleaning as this may adversely affect print quality 3 Push the paper transfer unit back in completely Paper Ramp Transfer Roller Black Registration Roller Metal ...

Страница 57: ...d with the toner kit The printer will not operate without replacing the waste toner box 1 Open the left cover 2 While holding the waste toner box press the lock lever and then gently remove the waste toner box NOTE Remove the waste toner box as gently as possible so as not to scatter the toner inside Do not let the opening of the waste toner box face downward Left Cover Lock Lever ...

Страница 58: ...rom the printer 4 To prevent toner from spilling put the old waste toner box in the plastic bag contained in the toner kit and discard it later according to the local code or regulations for waste disposal 5 Open the cap of the new waste toner box Cap Old Waste Toner Box Plastic Bag Cap New Waste Toner Box ...

Страница 59: ...is set correctly it will snap into place 7 Make sure that the waste toner box is correctly inserted and close the left cover After replacing the toner containers and the waste toner box clean the main charger units and the paper transfer unit For instructions see Cleaning the Printer on page 4 8 New Waste Toner Box ...

Страница 60: ...Maintenance 4 18 BASIC OPERATION GUIDE ...

Страница 61: ...oubleshooting This chapter contains explanations on the following topics General Guidelines 5 2 Print Quality Problems 5 3 Error Messages 5 7 Clearing Paper Jams 5 14 If a problem cannot be corrected contact your service technician ...

Страница 62: ...the computer under Windows 98 via the parallel port rename device driver file drvwppqt vxd This file may be located in Windows System Iosubsys or Arcada System folder For technical details visit Microsoft web site for the device driver Symptom Check Items Corrective Action Print quality is not good See Print Quality Problems on page 5 3 Paper is jammed See Clearing Paper Jams on page 5 14 Nothing ...

Страница 63: ...ainers Open the printer top cover and check that the toner containers are correctly installed in the printer For more information on installing the toner containers see Toner Container Replacement on page 4 3 Check that the application software is correctly operated Full single color printout Check the charger unit Open the left cover and check that the charger unit is correctly installed Dropouts...

Страница 64: ...m appears 5 Press ENTER twice 6 The message display shows Please wait After approx 3 minutes the display returns to Ready Faint or blurred printing Clean the main charger units Open the left cover Slowly pull the green wire cleaner knob to each of the main charger units in and out a few times For full details see Cleaning the Main Charger Unit on page 4 8 Clean the advanced beam array lenses Open ...

Страница 65: ...ain charger units in and out a few times For full details see Cleaning the Main Charger Unit on page 4 8 Check the charger units installation Open the left cover and check that the charger units are correctly installed and seated as far as it will go see Cleaning the Printer on page 4 8 Conduct color calibration either by switching the printer off then on or using the printer operator panel For fu...

Страница 66: ...in the paper paths such as the paper cassette etc Check the transfer roller If the transfer roller is dirty with toner try printing several pages Printing incomplete or out of position Check that the application software is correctly operated See Tips on page 5 2 Skewed color printout Conduct color registration using the printer operator panel For full details see the Using the Operator Panel sect...

Страница 67: ...vice The printer does not operate when this message is displayed The total number of pages printed is also indicated e g 0123456 Cassette not loaded The corresponding paper cassette is not installed Install the cassette The cassette number can be 1 topmost to 4 bottom Check waste toner box This message warns following two cases Install the new waste toner box The waste toner box is not installed T...

Страница 68: ... the Installation Guide of the hard disk Format error Memory card The memory card inserted in the printer is not formatted and therefore cannot be read or written To format a memory card follow the procedure in Using the Operator Panel section of the Advanced Operation Guide Hard disk err Press GO A hard disk error has occurred Look at the error code given in place of and refer to Storage Error Co...

Страница 69: ...e source for paper feeding After selecting a paper source and pressing MENU Paper Handling appears By pressing the U the paper type settings menu appears After setting the correct paper type press ENTER and printing starts For details see Using the Operator Panel section of the Advanced Operation Guide Load MP Tray A4 PLAIN There is no paper cassette installed in the printer that matches the paper...

Страница 70: ...g by pressing CANCEL If Auto Error Clear is set to On printing will be automatically resumed after a preset period of time For details on Auto Error Clear refer to Using the Operator Panel section of the Advanced Operation Guide RAM disk error Press GO A RAM disk error has occurred Look at the error code given in place of and refer to Storage Error Codes on page 5 12 To ignore the RAM disk error p...

Страница 71: ...running low due to too many numbers of fonts and macros downloaded Try deleting unnecessary fonts and macros Messages separated by are displayed alternately After this error has happened page protect mode will be automatically turned on To maintain optimum use of memory during printing we recommend you manually turn off page protect mode See the Using the Operator Panel section of the Advanced Ope...

Страница 72: ...d then format 85 VMB Alias error The alias setting was lost or the virtual tray corresponding to the alias does not exist Set the alias again 97 The number of permanent code jobs that can be stored reached the limit value and no more can be saved Either delete some unnecessary jobs etc or increase the limit 98 An unreadable page was found in a job The job is damaged 99 A print job for the specifie...

Страница 73: ...ormat error Try turning the power off and on again 02 RAM disk mode is Off Turn RAM disk mode On from the operator panel 04 No disk space Purge unnecessary files 05 Specified file is not on disk 06 Insufficient printer memory to support the RAM disk system Expand printer memory ...

Страница 74: ...e start printing Possible Paper Jam Locations The figure below explains the printer s paper paths including the options The locations where paper jams might occur are also shown here with each location explained in the table below Paper jams can occur in more than one component on the paper paths Paper jam message Paper jam location Description Reference page Paper jam Printer A Paper is jammed at...

Страница 75: ...tion Guide The printer may have problems if paper jams recur after the paper was replaced Whether or not the jammed pages are reproduced normally after printing is resumed depends on the location of the paper jam Utilizing Online Help Messages Online help messages are available in the printer s message display to provide simple instructions for clearing jams Press when the paper jam message has ap...

Страница 76: ...cassette or inside the printer Remove the jammed paper using the procedure given below 1 Pull out the paper cassette and remove the jammed paper 2 While pulling the green paper transfer unit release lever pull out the paper transfer unit Paper Transfer Unit Release Lever Paper Transfer Unit ...

Страница 77: ...wn in B remove the paper by pulling the edge 4 Open the rear cover and then the fuser cover and remove the jammed paper NOTE If the optional face up tray is installed on the printer remove that tray first before attempting to remove the jammed paper Registration Roller Registration Roller A B Paper Transfer Unit Release Lever Paper Transfer Unit ...

Страница 78: ...y Remove jammed paper carefully 5 Push the paper transfer unit back in and close the fuser cover and rear cover Paper jam MP Tray Paper is jammed at the MP tray Remove the jammed paper using the procedure given below 1 Remove the paper jammed at the MP tray 2 Open and close the paper transfer unit the paper jam error will be reset Fuser Cover Rear Cover ...

Страница 79: ...m EF Paper is jammed at the optional envelope feeder Remove the jammed paper using the same procedure as for a jam at the MP Tray Then open and close the paper transfer unit For details refer to the User s Manual for the envelope feeder Paper jam Duplexer Paper is jammed inside the rear cover of the optional duplexer or at the duplexer drawer Refer to the Operation Guide for the duplexer and remov...

Страница 80: ...Troubleshooting 5 20 BASIC OPERATION GUIDE ...

Страница 81: ... 2 x 11 Letter Oficio II Statement Executive A6 B6 ISO B5 Env Monarch Envelope 10 Envelope 9 Envelope 6 Envelope DL Envelope C5 16K Hagaki Oufuku Hagaki Youkei 2 Youkei 4 and Custom Paper Types Cassette MP Tray Plain preprinted bond recycled rough letterhead color prepunched high quality and custom Plain transparency preprinted labels bond recycled vellum rough letterhead color prepunched envelope...

Страница 82: ...NT4 0 Apple Macintosh OS 9 Apple Macintosh OS X Controller PowerPC750CXr 400MHz PowerPC750FX 600MHz Memory Standard Maximum 128MB 1024MB 512MB x 2 Interface Standard Option USB Hi Speed USB Parallel IEEE1284 Network 10BASE T 100BASE TX KUIO LV slot IB 11 Serial IB 20 10BASE2 10BASE T 100BASE TX IB 21E 10BASE T 100BASE TX IB 22 IEEE802 11b Wireless Operation Environment Temperature Relative Humidit...

Страница 83: ...th ISO7779 Bystander Position sound pressure level at the front During printing LpA 53dB A During standby LpA 36dB A During sleep mode immeasurably low During printing LpA 55dB A During standby LpA 36dB A During sleep mode immeasurably low Item Description CLP 4416 CLP 4524 ...

Страница 84: ...Specifications 6 4 BASIC OPERATION GUIDE ...

Страница 85: ...A1 ...

Страница 86: ...UTAX GmbH Ohechaussee 235 22848 Norderstedt Germany ...

Отзывы: