background image

6

EN

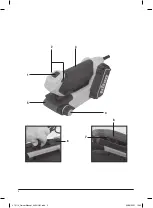
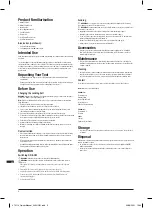
Product Familiarisation

1.  ON/OFF Switch
2.  ON/OFF Switch Lock
3.  Main Handle
4.  Micro Adjustment Knob
5.  Front Belt Roller
6.  Drive Roller
7.  Belt Tension Release Lever 
8.  Belt Direction Indicator

Accessories (not shown):

•  1 x Dust Extraction Adaptor
•  3 x Sanding Belts (80, 100, and 120 grit

Intended Use

Palm belt sander for intricate, light to medium duty sanding on soft and hard woods and similar 
materials.

The tool must ONLY be used for its intended purpose. Any use other than those mentioned in 
this manual will be considered a case of misuse. The operator, and not the manufacturer, shall 
be liable for any damage or injury resulting from such cases of misuse. The manufacturer shall 
not be liable for any modifications made to the tool, nor for any damage resulting from such 
modifications.

Unpacking Your Tool

•  Carefully unpack and inspect your tool. Fully familiarise yourself with all its features  

and functions

•  Ensure that all parts of the tool are present and in good condition. If any parts are missing or 

damaged, have such parts replaced before attempting to use this tool

Before Use

Changing the sanding belt

WARNING: 

Always ensure that the tool is switched off and the plug is removed from the power 

point before fitting or removing sanding belts. 

Note: 

A range of sanding belts from Triton, in a choice of grits, are available for use with this 

Palm Belt Sander.
1.  Ensure the sander is disconnected from the power supply
2.  Lift the Belt Tension Release Lever (7) to release tension on the belt
3.  Choose a new belt according to intended task, e.g. low grit rating produces faster stock 

removal, high grit rating for smoother finish

4.  Check that the replacement belt has a good join and is not frayed at the edges
5.  Position the new belt over the rollers, with the rotation arrows on the inside of the belt pointing 

in the same direction as the Belt Direction Indicator (8) on the sander.

6.  Push the Belt Tension Release Lever down to tension the belt
7.  Hold the sander upside down and plug into the mains
8.  With the belt running, use the Micro Adjustment Knob (4) to align the belt to the centre of 

the plate

Dust extraction

•  It is recommended that the sander is connected to a vacuum cleaner or dust extractor, using 

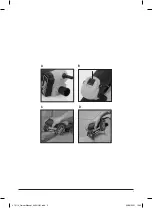
the dust extraction port (Image A). This will significantly reduce the dust in the air around 
the work area

•  If vacuum dust extraction is not available in your work area, a dust bag can be fitted to the 

dust extraction port. 

•  A suitable breathing mask should be worn when operating this machine. All wood and paint 

dust is hazardous to health and may also be toxic.

Operation

Switching ON & OFF

  WARNING:

 Always hold the sander securely by the Main Handle (3).

  WARNING:

 Ensure the sander is not in contact with the surface when the machine is 

switched on.

1.  Slide the ON/OFF Switch (1) all the way forward into the ON position and hold in position 

(Image B)

2.  Press the ON/OFF Switch Lock (2) from either side, all the way in (Image B)
3.  Release the pressure on the ON/OFF Switch, which now remains locked in the ON position
4.  To switch the tool OFF, slide the ON/OFF Switch forward until the ON/OFF Switch Lock 

automatically disengages

5.  Release the ON/OFF Switch

Sanding

  WARNING:

 Do not apply too much pressure on the sander. Pushing down too hard may 

cause damage or reduce the life of the product.

  WARNING: 

Keep hands away from the belt, as it will continue to move for a short time after 

the machine is switched off.
•  Apply light pressure when the sander is brought into contact with the workpiece
•  Allow the sander to reach full speed before moving it across the workpiece
•  To remove paint or smooth very rough wood, sand across the grain at 45° in two directions 

and then finish parallel with the grain (Image C)

•  Use the Front Belt Roller (5) only to sand corners or irregular shapes (Image D)
•  Lift the sander clear of the workpiece before switching OFF

Accessories

•  A range of accessories, including a variety of different grade sanding sheets, is available  

from your Triton dealer. Spare parts can be purchased from your Triton dealer or online at 
www.toolsparesonline.com

Maintenance

•  This tool is manufactured using class-leading components and makes use of the latest in 

intelligent circuitry that protects the tool and its components. In normal use it should provide 
a long working life

Cleaning

•  Keep your machine clean at all times. Dirt and dust will cause internal parts to wear quickly, 

and shorten the machine’s service life. Clean the body of your machine with a soft brush or 
dry cloth. If available, use clean, dry, compressed air to blow through the ventilation holes

Contact

For technical or repair service advice, please contact the helpline on (+44) 1935 382 222
 

Web:

 tritontools.com/en-GB/Support


UK Address:

Toolstream Ltd.
Boundary Way
Lufton Trading Estate
Yeovil, Somerset
BA22 8HZ, United Kingdom

EU Address:

Toolstream B.V.
De Keten
00004
5651 GJ
Eindhoven, Netherlands

Storage

•  Store this tool and its accessories after use in its case, in a dry, secure place out of the reach 

of children

Disposal

Always adhere to national regulations when disposing of power tools that are no longer functional 
and are not viable for repair.
•  Do not dispose of power tools, or other waste electrical and electronic equipment (WEEE), 

with household waste

•  Contact your local waste disposal authority for information on the correct way to dispose of 

power tools

475114_OwnerManual_04AUG21.indd   6

475114_OwnerManual_04AUG21.indd   6

04/08/2021   13:04

04/08/2021   13:04

Содержание TCMBS

Страница 1: ...t consignes de s curit Sicherheits und Bedienungsanleitung Istruzioni per l uso e la sicurezza Instrucciones de uso y de seguridad Instru es de Opera o e Seguran a Instrukcja obs ugi i bezpiecze stwa...

Страница 2: ...2 2 3 2 6 7 8 4 5 1 475114_OwnerManual_04AUG21 indd 2 475114_OwnerManual_04AUG21 indd 2 04 08 2021 13 02 04 08 2021 13 02...

Страница 3: ...3 B A D C 475114_OwnerManual_04AUG21 indd 3 475114_OwnerManual_04AUG21 indd 3 04 08 2021 13 03 04 08 2021 13 03...

Страница 4: ...working conditions A poorly maintained incorrectly assembled or misused tool may produce increased levels of noise and vibration www osha europa eu provides information on sound and vibration levels i...

Страница 5: ...of starting the power tool accidentally d Store idle power tools out of the reach of children and do not allow persons unfamiliar with the power tool or these instructions to operate the power tool P...

Страница 6: ...ld the sander securely by the Main Handle 3 WARNING Ensure the sander is not in contact with the surface when the machine is switched on 1 Slide the ON OFF Switch 1 all the way forward into the ON pos...

Страница 7: ...de professional or hire use c repairs attempted by anyone other than our authorised repair centres or d damage caused by foreign objects substances or accident Guarantee To register your guarantee vis...

Страница 8: ...mogen Langdurige blootstelling kan aanleiding geven tot een chronische conditie Beperk indien nodig de blootstellingstijd aan trillingen en gebruik steeds trillingsdempende handschoenen Gebruik het ge...

Страница 9: ...en veiliger op een passende snelheid b Gebruik het elektrische gereedschap niet als de schakelaar van het apparaat niet in en uitschakelt Elektrisch gereedschap dat niet bediend kan worden met de sch...

Страница 10: ...cu m stofontginning niet mogelijk is kunt u een stof zak op de stofpoort adapter monteren afb A Het dragen van een geschikt stofmasker tijdens het gebruik van de machine is ten sterkste aangeraden Hou...

Страница 11: ...Aankoopgegevens Datum van aankoop ___ ___ ____ Model TCMBS Bewaar uw aankoopbon als aankoopbewijs rt pr Triton Precision Power Tools garandeert de koper van dit product dat indien een onderdeel defec...

Страница 12: ...pr hension De longues expositions peuvent galement provoquer ces sympt mes de fa on chronique Si n cessaire limitez le temps d exposition aux vibrations et portez des gants anti vibrations N utilisez...

Страница 13: ...l et son utilisation Les consignes de s curit ne doivent en aucun cas tre ignor es Une action inconsid r e qui ne durerait ne serait ce qu une fraction de seconde pourrait entra ner un accident impliq...

Страница 14: ...anulom trie faible permettre un enl vement de mati re plus rapide alors que les bandes granulom trie lev e permettent d obtenir une finition de qualit 4 V rifiez que le joint de la bande est solide et...

Страница 15: ...rmer de la proc dure suivre pour recycler les outils lectriques Garantie Pour valider votre garantie rendez vous sur notre site internet tritontools com et saisissez vos coordonn es Pense b te Date d...

Страница 16: ...nn zu chronischen Beschwerden f hren Begrenzen Sie falls n tig die Exposition zu Vibrationen und tragen Sie vibrationsmindernde Handschuhe Verwenden Sie dieses Werkzeug nicht mit kalten H nden da Vibr...

Страница 17: ...lektrowerkzeug das sich nicht mehr ein oder ausschalten l sst ist gef hrlich und muss repariert werden c Ziehen Sie den Stecker aus der Steckdose und oder entfernen Sie den Akku bevor Sie Ger teeinste...

Страница 18: ...t das Schleifband gespannt wird 7 Halten Sie den Bandschleifer umgekehrt und schlie en Sie ihn an das Stromnetz an 8 Lassen Sie den Bandschleifer laufen und richten Sie das Band mithilfe der Bandlaufe...

Страница 19: ...beraten Triton garantiert dem K ufer dieses Produkts dass Triton wenn sich Teile dieses Produkts innerhalb von 3 Jahren ab Originalkaufdatum infolge fehlerhafter Materialien oder Arbeitsausf hrung als...

Страница 20: ...to intorpidimento formicolio e riduzione della capacit di presa Una lunga esposizione pu portare ad una condizione cronica Se necessario limitare la durata di esposizione alle vibrazioni e utilizzare...

Страница 21: ...mma di potenza indicata b Non usare l elettroutensile se l interruttore di accensione non si accende e si spegne Gli elettroutensili con un interruttore di accensione difettoso sono pericolosi e devon...

Страница 22: ...ione della cinghia 6 in gi per trattenere la cintura 7 Tenere la levigatrice a testa in gi e collegare alla rete elettrica 8 Con la cintura in esecuzione utilizzare la micro manopola di regolazione 3...

Страница 23: ...to dei rifiuti e per informazioni sul modo corretto di disporre di elettroutensili o batterie Garanzia Per la registrazione della garanzia visitare il sito web tritontools com e inserire i propri dett...

Страница 24: ...cnicos se refieren al uso normal de la herramienta en condiciones normales Una herramienta defectuosa mal montada o desgastada puede incrementar los niveles de ruido y vibraci n Para m s informaci n...

Страница 25: ...ienta el ctrica de forma adecuada Utilice su herramienta de forma correcta para cada aplicaci n b No use esta herramienta el ctrica cuando el interruptor de encendido apagado est averiado Cualquier he...

Страница 26: ...na aspiradora o extractor de polvo mediante el uso de la salida de extracci n del polvo imagen A Esto reducir significativamente la presencia de polvo acumulada en el aire del rea de trabajo Si por al...

Страница 27: ..._ ____ Modelo TCMBS Conserve su recibo como prueba de compra art pr Las herramientas Triton disponen de un per odo de garant a de 3 a os Para obtener esta garant a deber registrar el producto online e...

Страница 28: ...res consideram o uso normal da ferramenta sob condi es de trabalho normais Uma ferramenta montada mantida ou usada incorretamente poder produzir n veis de ru do e de vibra o superiores O site www osha...

Страница 29: ...Use a ferramenta correta para sua aplica o A ferramenta correta far o trabalho melhor e com mais seguran a com a produtividade para a qual foi projetada b N o use a ferramenta el trica se o interrupt...

Страница 30: ...te o p no ar em torno da rea de trabalho Caso n o possua um aspirador de p dispon vel para o trabalho poder ser acoplado um saco de p no bocal de coleta de p Deve se usar uma m scara de p adequada par...

Страница 31: ...es duos para saber o modo correto de descartar ferramentas el tricas Garantia Para registrar sua garantia visite nosso site em tritontools com e cadastre suas informa es Registro de compra Data de com...

Страница 32: ...lone s zgodnie z norm EN60745 lub podobnymi normami mi dzynarodowymi Warto ci te reprezentuj korzystanie z urz dzenia w normalnych warunkach roboczych Niedba a konserwacja nieprawid owy monta lub niep...

Страница 33: ...a do obr bki materia w zawieraj cych azbest Skonsultowa si z wykwalifikowanym specjalist w przypadku braku Og lne instrukcje dotycz ce bezpiecze stwa OSTRZE NIE Przeczytaj wszystkie ostrze enia i inst...

Страница 34: ...pakuj i sprawd narz dzie Zapoznaj si ze wszystkimi mechanizmami i funkcjami Upewnij si e narz dzie zawiera wszystkie cz ci i s one w dobrym stanie Je li brakuje pewnych cz ci lub s one uszkodzone nale...

Страница 35: ...a w bezpiecznym suchym miejscu niedost pnym dla dzieci oraz w za czonym pokrowcu Utylizacja Nale y zawsze przestrzega przepis w krajowych dotycz cych utylizacji elektronarz dzi kt re nie s ju funkcjon...

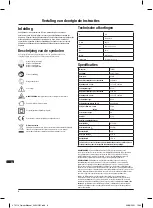
Страница 36: ...230 50 450 340 1115ft min 135 x 255 x105 64 x 406 32 38 3 2 1 LPA 87 6 LWA 96 K 3 ah 5 1 2 K 1 5 2 Triton II V A n0 1 Triton 475114_OwnerManual_04AUG21 indd 36 475114_OwnerManual_04AUG21 indd 36 04 08...

Страница 37: ...37 EN E PT E 37 RU EN60745 www osha europa eu 1 a 2 a 3 a 4 a 5 a 475114_OwnerManual_04AUG21 indd 37 475114_OwnerManual_04AUG21 indd 37 04 08 2021 13 06 04 08 2021 13 06...

Страница 38: ...8 RU 30 a FFP2 b c d e f 1960 g h i j k l m n o p 1 2 3 4 5 6 7 8 1 3 80 100 120 Triton 1 2 7 3 4 5 8 6 7 8 4 475114_OwnerManual_04AUG21 indd 38 475114_OwnerManual_04AUG21 indd 38 04 08 2021 13 06 04...

Страница 39: ...1935 382 222 tritontools com ru RU Support Toolstream Ltd Boundary Way Lufton Trading Estate Yeovil Somerset BA22 8HZ United Kingdom EC Toolstream B V De Keten 00004 5651 GJ Eindhoven 475114_OwnerManu...

Страница 40: ...475114_OwnerManual_04AUG21 indd 40 475114_OwnerManual_04AUG21 indd 40 04 08 2021 13 06 04 08 2021 13 06...

Отзывы: