background image

3

Switched Rack PDU Features

•  Network interface enables remote power monitoring and individual outlet control.
•  Individually controllable outlets allow remote rebooting of locked-up network devices.
•  Digital amp meter for on-site load monitoring.
•  Optional EnviroSense2 modules (E2MT, E2MTDO, E2MTDI, E2MTHDI) allow for a variety of 

environmental monitoring and control options.

•  Toolless button-mount installation in Tripp Lite SmartRack and many third-party enclosures.

Mounting the PDU

Note: 

The illustrations may differ somewhat from your PDU model. Regardless of configuration, the user must 

determine the fitness of hardware and procedures before mounting. The PDU and included hardware are 
designed for common rack and rack enclosure types and may not be appropriate for all applications. Exact 
mounting configurations may vary. Screws for attaching the mounting brackets and cord retention shelf to the 
PDU are included. Use only the screws supplied by the manufacturer, or their exact equivalent (#6-32, ¼" 

flat head).

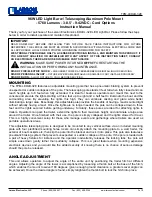
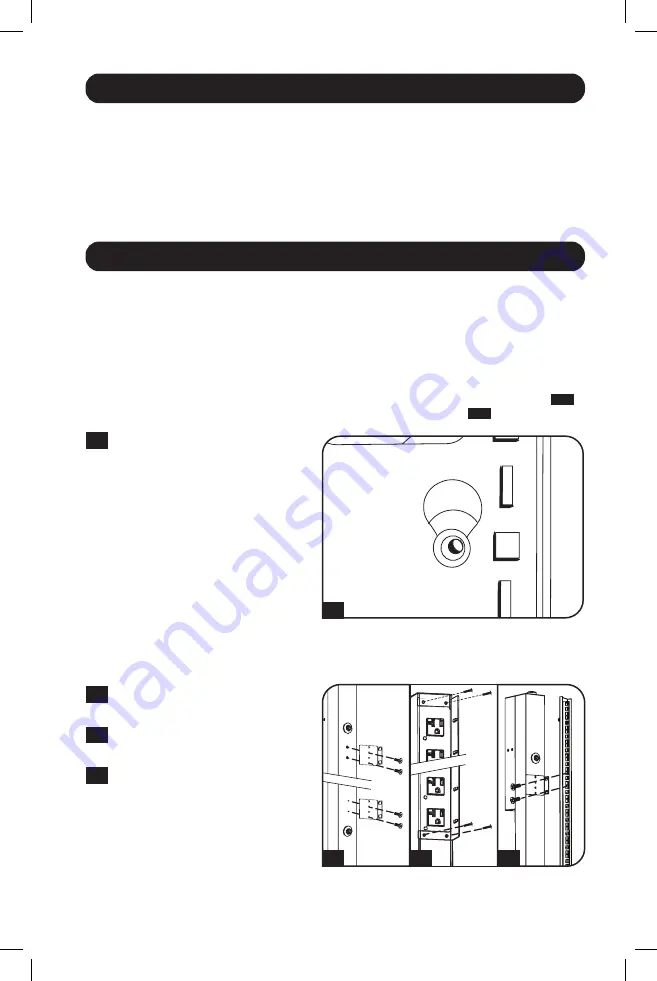
If installing the PDU in a rack that has button-mount slots, you only need to perform step 

1-1

If your rack enclosure does not have button-mount slots, proceed to step 

1-2

.

Installation

1-1

 To install the PDU in a rack equipped 

with button-mount slots, insert the 

mounting buttons on the rear of the 

PDU into the button-mount slots on 
the rack and slide the PDU down until 
the mounting buttons engage the 

narrow section of the button-mount 
slots.


Note: 

To install the PDU with its outlets  

facing the rear of the rack, use the 
included PDUMVROTATEBRKT accessory. 
This V-shaped bracket provides a mounting 

button on one leg of the V and a button- 
mount slot on the other, effectively 
repositioning the mounting buttons. See 

Features

 section for image.

1-2

 Attach the mounting brackets to the 

PDU.

1-3


(Optional)

 Attach the cord retention 

bracket(s) to the PDU.

1-4

 Attach the PDU to a vertical rail in  

your rack or rack enclosure. Use the 
included mounting hardware to attach 
the mounting brackets to the rail.

1-2

1-1

1-3

1-4

21-03-416-933666.indb   3

21-03-416-933666.indb   3

4/7/2021   12:21:28 PM

4/7/2021   12:21:28 PM

Содержание AG-0008

Страница 1: ...NT Register your product for quicker service and ultimate peace of mind You could also win an ISOBAR6ULTRA surge protector a 100 value www tripplite com warranty 1111 W 35th Street Chicago IL 60609 US...

Страница 2: ...e installation in accordance with the plug equipment rating Connect the PDU to an outlet that is in accordance with your local building codes and that is adequately protected against excess currents s...

Страница 3: ...ufacturer or their exact equivalent 6 32 flat head If installing the PDU in a rack that has button mount slots you only need to perform step 1 1 If your rack enclosure does not have button mount slots...

Страница 4: ...t lock input plug to a straight blade input plug Attach the input plug adapter A to the input plug B if you wish to plug the PDU into a compatible straight blade outlet 2 3 Connect the input plug to a...

Страница 5: ...oE Power over Ethernet applications The interface will attempt to obtain an IP address via DHCP This may take as long as several minutes depending on your network environment 3 2 Determine IP Address...

Страница 6: ...d to be entered 4 2 Configure Terminal Emulation Program Set your terminal emulation program to use the COM port with its corresponding USB port 4 3 Select Option 3 IPv4 setting or Option 4 IPv6 setti...

Страница 7: ...ill display The default user name is localadmin and the password is localadmin After you enter the user name and password the PowerAlert Device Manager Overview page will appear in the browser window...

Страница 8: ...for two seconds to rotate the LED display for ease of reading in vertical installations with the input cord at the top or bottom of the PDU 30 amp models feature a Select Rotate Switch C and a dedica...

Страница 9: ...iple outlet banks have a circuit breaker for each bank Circuit breakers are only used to protect output load banks Cord Retention Bracket Provides secure attachment points for connected equipment cord...

Страница 10: ...e on the faceplate above the RJ45 Configuration Port Press once to reset the Network Interface Press and hold for 15 seconds to reset the Network Interface to factory default settings Note PDU loads w...

Страница 11: ...o not contact or return the product to the dealer Instead visit www tripplite com support 3 If the problem requires service visit www tripplite com support and click the Product Returns link From here...

Страница 12: ...y specific application PRODUCT REGISTRATION Visit www tripplite com warranty today to register your new Tripp Lite product You ll be automatically entered into a drawing for a chance to win a FREE Tri...

Страница 13: ...cter sticas de la PDU monitoreada para Rack 14 Caracter sticas alternas de la PDU para Rack 15 Instalaci n 15 Caracter sticas 20 Configuraci n y operaci n 23 Servicio t cnico 23 Garant a 24 English 1...

Страница 14: ...pecificaci n de la clavija o del equipo Conecte el PDU a un tomacorriente que est de acuerdo a los c digos locales de construcci n y que est correctamente protegido contra corrientes excesivas cortoci...

Страница 15: ...n un rack equipado con ranuras de montaje de bot n inserte los botones de montaje en la parte trasera de la PDU dentro de las ranuras de montaje de bot n sobre el rack y deslice la PDU hacia abajo has...

Страница 16: ...ue convierte la clavija de entrada de media vuelta a una clavija de entrada de pala recta Conecte el adaptador de la clavija de entrada A a la clavija de entrada B si desea enchufar el PDU a una toma...

Страница 17: ...et al puerto de Ethernet RJ45 en la Interfaz de Red del PDU Nota Este puerto no admite aplicaciones de PoE Energ a sobre la Ethernet La interfaz intentar obtener una direcci n IP mediante DHCP Esto pu...

Страница 18: ...resar 4 2 Configure el Programa de Emulaci n de Terminal Configure su programa de emulaci n de terminal para utilizar el puerto COM con su puerto USB correspondiente 4 3 Seleccione Opci n 3 Par metro...

Страница 19: ...rAlert El nombre de usuario Predeterminado es localadmin y la contrase a es localadmin Despu s de introducir el nombre de usuario y la contrase a la p gina Visi n General del Administrador de disposit...

Страница 20: ...PDU dos caracteres por vez Oprima por dos segundos para girar la pantalla LCD para facilitar la lectura en instalaciones verticales con el cable de alimentaci n en la parte superior o inferior del PDU...

Страница 21: ...iples tomacorrientes tienen un interruptor de circuito para cada banco Los interruptores de circuito se usan solamente para proteger los bancos de carga de salida Soportes para Retenci n de Cable Prop...

Страница 22: ...de Configuraci n RJ45 Oprima una vez para restaurar la Interfaz de Red Oprima y sostenga por 15 segundos para restaurar la Interfaz de Red a la configuraci n predeterminada de f brica Nota Las cargas...

Страница 23: ...ue ni devuelva el producto al mayorista En cambio visite www tripplite com support 3 Si el problema exige servicio t cnico visite www tripplite com support y haga clic en el enlace Devoluciones de pro...

Страница 24: ...n limitaciones sobre la duraci n de una garant a impl cita y algunos estados no permiten la exclusi n o limitaci n de da os incidentales o consecuentes de modo que las limitaciones o exclusiones menci...

Страница 25: ...t de distribution d alimentation PDU en baie command e par interrupteur Format barrette de connexion 0U Vertical 1111 W 35th Street Chicago IL 60609 USA www tripplite com support Copyright 2016 Tripp...

Страница 26: ...PDU dans une prise non mise la masse ou des rallonges lectriques ou des adaptateurs qui liminent la connexion la masse S assurer de fournir un dispositif de d connexion local pour tous les mod les qui...

Страница 27: ...l unit sont incluses N utilisez que les vis fournies par le fabricant ou leur quivalent exact 6 32 de 1 4 po t te plate Si la PDU est install e dans un b ti comportant des fentes pour boutons de mont...

Страница 28: ...s disposent d un adaptateur de fiche d entr e qui convertit la fiche d entr e verrouillage rotatif en fiche d entr e lames droites Brancher l adaptateur de fiche d entr e A la fiche d entr e B si vous...

Страница 29: ...45 sur l interface r seau de la PDU Remarque Ce port ne prend pas en charge les applications d alimentation par Ethernet PoE L interfaceva tenter d obtenir une adresse IP via DHCP Cela peut prendre pl...

Страница 30: ...e terminal configurer le programme d mulation de terminal pour utiliser le port COM avec son port USB correspondant 4 3 S lectionner l option 3 IPv4 setting param tre IPv4 ou l option 4 IPv6 settings...

Страница 31: ...d faut est localadmin et le mot de passe est localadmin Apr s avoir saisi le nom d utilisateur et le mot de passe la page d tat de Aper u du gestionnaire de p riph riques PowerAlert va s afficher dans...

Страница 32: ...entr e 3 p les IEC 309 Disponible uniquement sur certains mod les Prises Varient selon les mod les Lors d un fonctionnement normal les prises distribuent du courant CA l quipement connect Certains mod...

Страница 33: ...e la barre 2 allum la charge sur la barre de charge est affich e Pressez le commutateur Select Rotate S lection Rotation pendant deux secondes pour pivoter l affichage DEL pour en faciliter la lecture...

Страница 34: ...J45 Appuyer une fois pour r initialiser l interface r seau Appuyer sur le bouton et le maintenir enfonc pendant 15 secondes pour r tablir l interface r seau de la PDU sa configuration d usine par d fa...

Страница 35: ...s 2 Si le probl me persiste ne pas communiquer ou renvoyer le produit au vendeur la place visitez www tripplite com support 3 Si le probl me n cessite une r paration visitez www tripplite com support...

Страница 36: ...U CONS CUTIFS Certains tats ne permettent pas la limitation de la dur e d une garantie implicite et certains tats ne permettent pas la limitation ou l exclusion de dommages accessoires ou cons cutifs...

Отзывы: