background image

WHILE OPERATING

Wear safety glasses or goggles that meet current ANSI Z87.1
standards and are marked as such. Wear ear/hearing protection
when operating this unit. Wear a face or dust mask if the
operation is dusty.

Wear heavy long pants, boots, gloves and a long sleeve shirt. Do
not wear loose clothing, jewelry, short pants, sandals or go
barefoot. Secure hair above shoulder level.

The cutting head shield must always be in place while operating
the unit. Do not operate the unit without both trimming lines
extended and the proper line installed. Do not extend the
trimming line beyond the length of the shield.

Make sure the attachment is not in contact with anything before
starting the unit.

Use the unit only in daylight or good artificial light.

Use the right tool. Only use this tool for its intended purpose.

Always hold the unit with both hands when operating. Keep a
firm grip on both handles or grips.

3

SAFETY WARNINGS FOR ELECTRIC UNITS

CORD SETS: Make sure your cord set is in good condition.
When using a cord set, be sure to use a cord that is heavy
enough to carry the current that your unit will draw. An
undersized cord set will cause a drop in line voltage resulting in
loss of power and overheating. See the operator’s manual for
the unit that will power this attachment for the recommended
cord size.

Inspect all extension cords and the unit power connection
periodically. Look closely for deterioration, cuts or cracks in the
insulation. Also inspect the connections for damage. Replace
the cords if any defects or damage appear.

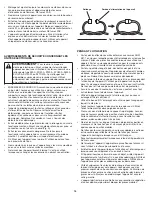
Prevent disconnection of the power head from the extension
cord during operation by using a plug-receptacle retaining strap,
connector, or by making a knot (Fig. A).

Avoid dangerous environments. Never operate your unit in damp
or wet conditions. Moisture is a shock hazard.

Do not use the unit in the rain. Do not use in or around water.

Do not handle the plug or unit with wet hands or standing on
any wet surfaces.

Do not leave the unit plugged in when not in use, changing
attachments or while being serviced.

WARNING:

To reduce the risk of electrical shock, use

only extension cords approved for outdoor use, such as an
extension cord of cord type SW-A, SOW-A, STW-A, STOW-
A, SJW-A, SJOW-A, SJTW-W or SJTOW-A. Extension
cords are available from your local retailer. Use only round-
jacketed extension cords approved for outdoor use.

Fig. A

Unit Power Cord

Extension Cord

OTHER SAFETY WARNINGS

All service, other than the maintenance procedures described in
this manual, should be performed by an authorized service dealer.

Before inspecting, servicing, cleaning, storing, transporting or
replacing any parts on the unit:

1. Stop the unit.
2. Make sure all moving parts have stopped. 
3. Allow the unit to cool.
4. For gas-powered units, disconnect the spark plug wire. For

electric-powered units, disconnect the unit from the power
source.

Never store the unit with fuel in the tank, inside a building where
fumes may reach an open flame (pilot lights, etc.) or sparks
(switches, electrical motors, etc.).

Be sure to secure the unit while transporting.

Store the unit in a dry place, secured or at a height to prevent
unauthorized use or damage. Keep out of the reach of children.

Never douse or squirt the unit with water or any other liquid.
Keep handles dry, clean and free from debris. Clean after each
use, see 

Cleaning and Storage

instructions.

Keep these instructions. Refer to them often and use them to
instruct other users. If you loan this unit to others, also loan
them these instructions.

SAVE THESE INSTRUCTIONS

Do not overreach. Always keep proper footing and balance. Take
extra care when working on steep slopes or inclines.

Keep hands, face, and feet away from all moving parts. Do not
touch or try to stop moving parts.

Do not operate the unit faster than the speed needed to do the job.
Do not run the unit at high speed when not in use.

Use extreme caution when reversing or pulling the unit towards you.

Do not force the unit. It will do a better, safer job when used at
the intended rate.

Always stop the unit when operation is delayed or when walking
from one location to another.

If you strike or become entangled with a foreign object, stop the
unit immediately and check for damage. Do not operate before
repairing damage. Do not operate the unit with loose or
damaged parts.

Use only original equipment manufacturer (OEM) replacement
parts and accessories for this unit. These are available from your
authorized service dealer. Use of any other parts or accessories
could lead to serious injury to the user, or damage to the unit,
and void the warranty.

Keep the unit clean. Carefully remove vegetation and other
debris that could block moving parts.

If the unit starts to vibrate abnormally, stop the unit immediately.
Inspect the unit for the cause of the vibration. Vibration is
generally an indicator of trouble.

Содержание CS720

Страница 1: ...r s Manual DO NOT RETURN THIS UNIT TO THE RETAILER PROOF OF PURCHASE WILL BE REQUIRED FOR WARRANTY SERVICE For assistance regarding the assembly controls operation or maintenance of the unit please ca...

Страница 2: ...an well ventilated outdoor area where there are no sparks or flames DO NOT smoke Never operate the unit without the fuel cap securely in place Avoid creating a source of ignition for spilled fuel Wipe...

Страница 3: ...jacketed extension cords approved for outdoor use Fig A Unit Power Cord Extension Cord OTHER SAFETY WARNINGS All service other than the maintenance procedures described in this manual should be perfo...

Страница 4: ...can result in serious injury to the operator and or bystanders WEAR EYE AND HEARING PROTECTION WARNING Thrown objects and loud noise can cause severe eye injury and hearing loss Wear eye protection m...

Страница 5: ...rees fences etc SPECIFICATIONS All specifications are based on the latest product information available at the time of printing We reserve the right to make changes at any time without notice Approxim...

Страница 6: ...eld counterclockwise to align the hole on the cutting head shield with the hole on the mount bracket Fig 1 4 Insert the square bolt into the hole underneath the cutting head shield Fig 2 Push the squa...

Страница 7: ...ise to tighten Fig 3 NOTE Do not tighten the nut Fig 4 For decorative edging with a string trimmer attachment lock the release button into the 90 edging hole Fig 3 Removing the Attachment 1 Turn the k...

Страница 8: ...htly bent Hold the handle with the left hand Keep the left arm straight Hold the unit at waist level Keep the cutting head parallel to the ground so that it easily contacts the grass without the need...

Страница 9: ...types of trimming line may cause the engine to overheat or fail NOTE Always use the correct line length when installing trimming line The line may not release properly if the line is too long Part 1 R...

Страница 10: ...1 Cut one 6 foot 1 8 m length of new split line trimming line Split each end about 6 inches 150 mm 2 Using one split end insert one line into the top hole and the other line into the bottom hole in th...

Страница 11: ...clean the unit and inspect it for any loose or damaged parts Repair or replace damaged parts and tighten loose screws nuts or bolts The cutting head is bound with grass Clean the cutting head The cutt...

Страница 12: ...ossessions and territories except those sold through MTD s authorized channels of export distribution MTD reserves the right to change or improve the design of any MTD Product without assuming any obl...

Страница 13: ...PAS CET APPAREIL CHEZ LE REVENDEUR UNE PREUVE D ACHAT SERA EXIG E POUR AVOIR RECOURS LA GARANTIE Pour obtenir de l aide concernant l assemblage les commandes l utilisation ou l entretien de cet appar...

Страница 14: ...ons m ritent que vous les lisiez attentivement et les compreniez bien eux seuls les avertissements de s curit n liminent aucun danger Les consignes ou avertissements de s curit ne remplacent pas les m...

Страница 15: ...ppareil et annuler votre garantie L appareil doit rester propre Retirez avec pr caution la v g tation et autres d bris qui pourraient bloquer les pi ces mobiles AVERTISSEMENTS DE S CURIT CONCERNANT LE...

Страница 16: ...isation pour une information compl te sur la s curit l assemblage l utilisation l entretien et les r parations N entreposez jamais l appareil ayant encore du carburant dans le r servoir l int rieur d...

Страница 17: ...cl tures etc SP CIFICATIONS L ensemble des sp cifications est bas sur les toutes derni res informations disponibles sur le produit l impression de ce manuel Nous nous r servons le droit d apporter des...

Страница 18: ...pour aligner le trou de l cran de protection de la t te de coupe avec celui du support de montage Fig 1 4 Ins rez le boulon t te carr e dans le trou sous l cran de protection de la t te de coupe Fig...

Страница 19: ...le serrer Fig 3 REMARQUE Ne pas serrer l crou Fig 4 Pour une bordure d corative r alis e avec un accessoire taille bordures verrouiller le bouton de d clenchement dans l orifice de bordure 90 Fig 3 D...

Страница 20: ...e avec la main gauche Gardez le bras gauche bien droit Tenez l appareil hauteur de votre taille Gardez la t te de coupe parall le au sol de sorte qu elle entre facilement en contact avec l herbe sans...

Страница 21: ...fe du moteur ou endommager le moteur REMARQUE Utilisez toujours la bonne longueur de ligne lorsque vous installez la ligne de coupe La ligne risque de ne pas se d rouler correctement si elle est trop...

Страница 22: ...int rieur Enroulement d un fil Split Line 1 Coupez 1 8 m 6 pieds de fil Split Line neuf S parez chaque extr mit en deux sur environ 150 mm 6 po 2 En utilisant une extr mit fendue ins rez un fil dans...

Страница 23: ...e m ticuleusement pour v rifier s il n y a pas de pi ces d tach es ou endommag es R parez ou remplacez les pi ces endommag es et serrez tous les boulons crous et vis desserr s La t te de coupe est eng...

Страница 24: ...seau agr de distribution l exportation de MTD MTD se r serve le droit de modifier ou d am liorer la conception de ses produits sans pour autant assumer l obligation de modifier tout produit de fabrica...

Страница 25: ...GIR COMPROBANTE DE COMPRA PARA LAS REPARACIONES Y EL MANTENIMIENTO QUE CUBRE LA GARANT A Por ayuda en relaci n con el montaje los controles el funcionamiento o el mantenimiento de la unidad llame al D...

Страница 26: ...as de cualquier forma No opere la unidad si hay piezas flojas o da adas Inspeccione cuidadosamente el rea antes de encender la unidad Elimine todos los escombros y los objetos duros o filosos tales co...

Страница 27: ...e vegetaci n u otros residuos que puedan bloquear las piezas m viles Si la unidad comienza a vibrar anormalmente det ngala de inmediato Inspeccione la unidad para encontrar la causa de la vibraci n Ge...

Страница 28: ...seguridad No hacerlo puede ocasionar lesiones graves al operador y o a las personas presentes USE PROTECCI N PARA LOS OJOS Y O DOS ADVERTENCIA Los objetos lanzados y el ruido fuerte pueden ocasionar...

Страница 29: ...NES Todas las especificaciones se basan en la informaci n del producto m s reciente disponible en el momento de la impresi n Nos reservamos el derecho de hacer cambios en cualquier momento sin previo...

Страница 30: ...loj para alinear el orificio del protector del cabezal de corte con el orificio en el soporte de montaje Fig 1 4 Inserte el perno cuadrado en el orificio bajo el protector del cabezal de corte Fig 2 P...

Страница 31: ...a ajustar Fig 3 NOTA No ajuste demasiado la tuerca Fig 4 Para un reborde decorativo con un accesorio de recorte trabe el bot n de liberaci n en el orificio de recorte de bordes de 90 Fig 3 Extracci n...

Страница 32: ...con la mano izquierda Mantenga el brazo izquierdo recto Sujete la unidad a la altura de la cintura Sostenga el cabezal de corte paralelo al suelo de modo que haga contacto con la hierba f cilmente si...

Страница 33: ...r a provocar recalentamiento o falla del motor NOTA Use siempre la longitud de l nea correcta al instalar la l nea de corte Es posible que la l nea no se suelte como es debido si es demasiado larga Pa...

Страница 34: ...Line Separe cada extreme aproximadamente 6 pulgadas 150 mm 2 Con uno de los extremos divididos inserte un hilo dentro del orificio superior y otro hilo dentro del orificio inferior del carrete interi...

Страница 35: ...macenamiento a largo plazo Limpie bien la unidad y compruebe que no haya piezas sueltas o da adas Repare o reemplace las piezas da adas y apriete los tornillos tuercas o pernos flojos El cabezal de co...

Страница 36: ...36 NOTES...

Страница 37: ...37 NOTES...

Страница 38: ...38 NOTES...

Страница 39: ...39 NOTES...

Страница 40: ...rritorios excepto para aquellos vendidos a trav s de los canales autorizados de distribuci n de exportaciones de MTD MTD se reserva el derecho a cambiar o mejorar el dise o de cualquier Producto MTD s...

Отзывы: