8
OPERATION
ADJUSTING THE TRIMMING LINE LENGTH
This unit is equipped with a Bump Head. Trimming line can be
released from the cutting head without stopping the engine.
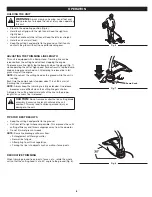
To release more line, lightly tap the bump knob on the ground (Fig. 7)
while operating the unit at high speed. For best results, tap the bump
knob on bare ground or hard soil. Attempting to release line in tall
grass may stall the engine.
NOTE:
Do not rest the cutting head on the ground while the unit is
running.
Each time the bump knob is tapped, about 1 inch (25.4 mm) of
trimming line is released.
NOTE:
Always keep the trimming line fully extended. Line release
becomes more difficult when the cutting line gets shorter.
A blade in the cutting head shield will cut the line to the proper
length if any excess line is released.
HOLDING THE UNIT
•
Stand in the operating position (Fig. 6).
•
Hold the shaft grip with the right hand. Keep the right arm
slightly bent.
•
Hold the handle with the left hand. Keep the left arm straight.
•
Hold the unit at waist level.
•
Keep the cutting head parallel to the ground so that it easily
contacts the grass without the need for bending over.
WARNING:
Always wear eye, hearing, hand, foot and
body protection to reduce the risk of injury when operating
this unit.
CAUTION:
Do not remove or alter the line cutting blade
assembly. Excessive line length will make the unit
overheat. This may lead to serious personal injury or
damage to the unit.
TIPS FOR BEST RESULTS
•
Keep the cutting head parallel to the ground.
•
Cut from left to right whenever possible. This improves the unit's
cutting efficiency and throws clippings away from the operator.
•
Do not trim wet grass or weeds.
NOTE:
Some line breakage will occur from:
• Entanglement with foreign matter
• Normal line fatigue
• Attempting to cut thick vegetation
• Forcing the line into objects such as walls or fence posts
DECORATIVE TRIMMING
When trimming around trees, posts, fences, etc., rotate the whole
unit so that the cutting head is at a 30° angle to the ground (Fig. 8).
Fig. 6
Fig. 7
Fig. 8
Bump Knob
Содержание CS720
Страница 36: ...36 NOTES...
Страница 37: ...37 NOTES...
Страница 38: ...38 NOTES...
Страница 39: ...39 NOTES...

