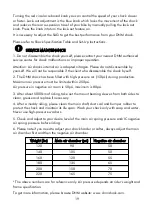
TrikExplor 320E Скачать руководство пользователя страница 13

13

Attention

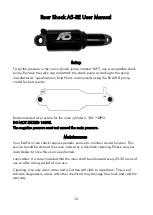
This is a high performance product. It will give you reliable service if it is installed
properly and regularly maintained by an authorized ExaForm service center. Please
read through these instructions fully and follow them carefully before you install your
new rear shock.

Warning

ExaForm rear shocks must be regularly maintained by an authorized ExaForm service
center. Service center locations can be found at www.exa-form.com. Do not
disassemble your rear shock. Disassembly could cause damage and severe personally
injury as some of the contents are under pressure. Failure to follow these warnings and
instructions will immediately void your warranty.

Содержание 320E

Страница 1: ...TRIKE QUAD USER MANUAL ...

Страница 2: ...er Manual 20 33 Li ion Battery User Manual Rear Rack Type III 38 41 Li ion Battery User Manual Hailong Type 34 37 Li ion Battery Charger User Manual 42 43 Lighting System User Manual 44 46 Adjusting Your TrikExplor 5 6 How to Ride 6 7 Maintenance 7 8 Inspection 7 8 2 Read it before you take the first ride on your new TrikExplor and keep it for reference Warranty Policy 9 10 Legal Requirements 11 ...

Страница 3: ...se to the wheels Touching the wheels when they are moving can cause friction burns Before you ride your TrikExplor ensure that the wheels cannot touch the handlebars or your hands when the steering is in full lock Check List for Every Ride Before you ride your TrikExplor make sure it is in a safe operating condition If any part of your TrikExplor does not function correctly do not ride it until it...

Страница 4: ...her road users understand what you are going to do next by staying visible maintaining a clear position on the road and using clear hand signals Using a horn or bell will help other people know that you are near Cycling in Bad Weather Make sure other road users and pedestrians can see you Ensure your reflectors and lights are clean correctly positioned and not obstructed by clothing or accessories...

Страница 5: ... s done correctly It is important that your leg is not fully straightened when the crank is in the foremost position If the distance is too long it is difficult to overcome this dead point pedalling becomes uncomfortable and there is too much strain on the sinews of your feet and legs If the distance is too short you may suffer from knee pain Adjusting the handlebars While riding you should allow ...

Страница 6: ...lease refer shock user manual Adjusting the display Please display user manual How to Ride Entering and Exiting the TrikExplor Before sitting down on the TrikExplor make sure that it cannot roll away from you by using the parking brake Straddle the boom and begin lowering yourself into the seat while supporting yourself using the tires or the sides of the seat frame Do not to put weight on the han...

Страница 7: ...andlebar Shifting Your TrikExplor is equipped with trigger shifters There are two triggers on each shifter The big trigger is operated by your thumb The smaller trigger is operated by your index finger The right shifter changes the front gears and the left shifter changes the rear gears This is different with regular bicycles Maintenance Wear and Tear Items Items such as steering bushings brake pa...

Страница 8: ...you can make minor adjustments by turning the barrel adjusters near the ends of the cable housing Make small adjustments rechecking the functionality with each rotation so you do not overcompensate for the cable stretch We strongly recommend taking your trike to your local dealer or bike shop to make sure these adjustments are done correctly Brake and Shifter Cables How to Clean Your TrikExplor Wa...

Страница 9: ...l inspection check the trike and accessories for damage Brakes ensure the front brakes and parking brake if fitted work correctly Gears ensure the gear system works correctly Wheels and tires ensure the tyres are correctly inflated and wheels are fitted correctly Seat ensure the seat is secure and cannot move Mounting bolts ensure the bolts on main hinge seat steering and wheels are tight Reflecto...

Страница 10: ... purchase has to be sent to TrikExplor through your dealer This warranty does not have any influence on the rights of the purchaser according to this statutory rights This warranty applies only to the original purchaser The warranty starts with the date of purchase receipt of the dealer of a new bicycle The warranty is processed via the dealer who ordered the bicycle from us Warranty is only valid...

Страница 11: ... important areas you need to consider are lighting and helmet use Consult your local bike dealer for information about what is required in your area Please also remember that even if not required by law some equipment such as helmets and lights can increase your personal safety and should be carefully considered ...

Страница 12: ...nds using the KS AIR 8 pump model for best results Maintenance Your ExaForm rear shock requires periodic service to maintain consist function This service should be done at the same interval as a drivetrain cleaning Please see your local dealer to have this service performed Lubrication It is recommended that the main shaft be lubricated every 25 30 hours of use or after a long period of non use C...

Страница 13: ...them carefully before you install your new rear shock Warning ExaForm rear shocks must be regularly maintained by an authorized ExaForm service center Service center locations can be found at www exa form com Do not disassemble your rear shock Disassembly could cause damage and severe personally injury as some of the contents are under pressure Failure to follow these warnings and instructions wil...

Страница 14: ...AOY 36RC Air Shock User Manual Product Description Diagram Consumer Safety Warning Attention 14 ...

Страница 15: ...damper fast Compression adjuster direction rotation lock out direction rotation open up Main air chamber Supply air pressure according to pressure meter Negative air chamber Supply air pressure according to pressure meter 15 Specification A Total Length 165 2 190 2 200 2 B Route 35 2 50 2 55 2 ...

Страница 16: ...you will be doing It would be pointless to put a light weight air shock on a downhill bike just as it would be unsuitable to put a long travel shock on a light weight dual suspension bike 1 Establish the length of the shock you need by measuring from mounting eyelet to eyelet this requires accuracy so use a set of calipers or a metal ruler The distance from the center of the bolt at the head of th...

Страница 17: ...a medium amount of pressure as the aluminum spacers are a tolerance fit It is good to use Nylock nuts and some Loc tite fastening solution Once the shock is fastened gently sit on the bike and progressively apply more pressure easing the bike through its travel Providing there are no strange noises coming from the shock area you can be fairly confident the installation process has been a success 7...

Страница 18: ...any part of the shock Please return your shock to a DNM authorized dealer for service Use ONLY genuine DNM parts for shock To maximum performance of DNM shock in any different situation it is necessary to adjust the SAG The main reason of sag difference is all about the weight bike or own weight When you set up the sag please sit on the saddle properly Make sure all your weight is on the bike And ...

Страница 19: ...ble by yourself We will not be responsible if the client who disassemble the shock by self 2 The DNM shock has been filled with high pressure air 150psi during production Maximum air pressure must be limited within 250psi 160 180 200 3 After about 5000km of riding take out the mount bearing sleeves from both sides to clean grease and replace if necessary 4 After a muddy riding please clean the mai...

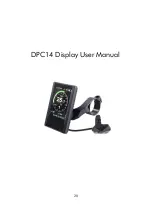
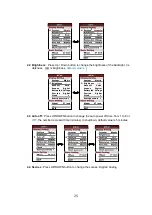
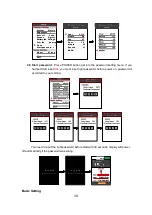
Страница 20: ...20 DPC14 Display User Manual ...

Страница 21: ...ording to customers habits Smart battery indicator Provide a reliable battery indicator 9 level Assist 3 level 5 level 9 level optional Mileage indicator Odometer Trip distance Clock Riding time Power Current indicator real time power indicator digital or analog or Current Error code indicator Software upgraded Software can be upgraded through UART USB charging port 5V 500mA 2 TFT screen instructi...

Страница 22: ...eed to input the right password before start 3 2 Assist level operating Short press UP DOWN button can change the assist level Top assist level is 9 0 for neutral Level quantities can be adjusted according to the customer requirements 38 9V RT SPEED 15 5 Km h ASSIST 1 POW TRIP 256 8 Km CLK 12 30 45 3 3 Speed Mileage mode switch Short press POWER button can change the speed and mileage mode AVG SPE...

Страница 23: ... hold UP button for 1 second can turn on off the headlight and the scree will switch to the corresponding mode The motor does not work when the battery voltage is low Display still can keep the headlight on for a while when E bike is in riding Daytime mode night mode 3 5 Walking mode 6km Press and hold DOWN button for 2 second can get into walking mode out of the mode ...

Страница 24: ...WER button press interval less than 0 3 second can get into setting menus press UP DOWN buttons to change the parameter setting press POWER button can switch to next item Double press POWER button will exit from menu Display will automatically quit menu when there is no operation for 30 seconds For safety reasons display can t get into MENU when riding Display will quit MENU when start riding The ...

Страница 25: ...ttery Ind Voltage Pow Ind Digital Clock Start password Auto off 5min Scenes Digital Battery Ind Voltage Pow Ind Digital Clock Start password Wheel 27 inch EXIT Wheel 27 inch EXIT 4 3 Auto off Press UP DOWN button to change the auto power off time from 1 to 9 or OFF the number represent time minutes to shutdown default value is 5 minutes 4 4 Scenes Press UP DOWN button to change the scenes Digital ...

Страница 26: ...battery System Metric Brightness Auto off 5min Scenes Analog Battery Ind Voltage Pow Ind Digital Clock Start password System Metric Brightness Auto off 5min Scenes Analog Battery Ind Percent Pow Ind Digital Clock Start password System Metric Brightness Auto off 5min Scenes Analog Battery Ind OFF Pow Ind Digital Clock Start password Wheel 27 inch EXIT Wheel 27 inch EXIT Wheel 27 inch EXIT ...

Страница 27: ...nd Analog Clock Start password System Metric Brightness Auto off OFF Scenes Digital Battery Ind Voltage Pow Ind Current Clock Start password Wheel EXIT 27 inch Wheel EXIT 27 inch 38 9V 38 9V 38 9V RT SPEED 15 5 Km h ASSIST 1 RT SPEED 15 5 Km h ASSIST 1 POW 389 W CUR 1 0 A TRIP 256 8Km TRIP 256 8 Km CLK 12 30 45 CLK 12 30 45 4 7 Clock Clock setting press POWER button get into the clock setting menu...

Страница 28: ... 16 Minute 53 Second 11 BACK 4 8 Start password Press POWER button get into the password setting menu If you had set Start input ON you must input right password before power on password is accorded to your setting You need to input the right password before start with 30 seconds display will power off automatically if the password was wrong 38 9V Basic Setting ...

Страница 29: ...This option is invalid for Bafang systems Press UP DOWN will change battery voltage setting optional value is 24V 36V 48V UBE UBE means user define value System Metric Brightness Auto off 5min Scenes Digital Wheel 26inch Battery 36V Advance setting Factory settings Informations EXIT 4 11 Advance setting Press POWER button can get into the advance setting menu default password is 1919 System Metric...

Страница 30: ...urrent limit are restricted by controller and motor 4 13 Assist levels This parameter can customize assist levels options are 3 5 9 UBE UBE represent factory default settings 4 14 Error code Display the last 10 times error code 4 15 Factory setting Press POWER button enter Restore Factory settings item set YES will restore all parameter to factory settings ...

Страница 31: ...to this item can show all information of battery including Voltage Current Avg Current Cycle times Capacity Remaining Capacity Full Charge Capacity Temperature Max Tempt Min Tempt Relate ChgSta Absolute ChgSta Max Uncharge Times Last Uncharge Times CorVolt 1 These information needs to be supported by battery communication Temperature 35 5 Max Tempt 0 9 Min Tempt 0 9 Relate ChgSta 99 Absolute ChgSt...

Страница 32: ...otor error Display 08H on speed position 0x09 Phase line of the motor error Display 09H on speed position 0x10 High temperature of controller Display 10H on speed position 0x11 Controller s temperature sensor error Display 11H on speed position 0x12 Current sensor error Display 12H on speed position 0x13 Battery s temperature sensor error Display 13H on speed position 0x14 Motor s temperature sens...

Страница 33: ...scriptions 1 Red wire Anode 24v 36v 48V 2 Blue wire Power cord to the controller 3 Black wire GND 4 Green wire RxD controller display 5 Yellow wire TxD display controller 7 Assist level instructions Assist level can be customized the highest level is 9 common used assist level see the table below ...

Страница 34: ...used to charge cell phone Charging Port Charging current can not be more than 5 Amps Power Switch Turn ON OFF the battery power power on o power off This manual contains important safety performance and service information Read it before you take the first ride on your new bicycle and keep it for reference 34 Introduction Li ion Battery User Manual Hailong Type ...

Страница 35: ...ures between 0 and 20 C Temperatures below 10 C and above 60 C should be avoided Fully charging or fully discharging results in higher loading of the battery The ideal charge status for lengthy periods of storage is approx 30 to 60 or two to three LEDs on the battery indicator Transport Always remove the battery pack from the bicycle before transporting the bicycle on a vehicle bike rack Winter us...

Страница 36: ... TrikExplor chargers When using chargers that are not supplied by TrikExpor the risk of fire cannot be excluded Protect the battery pack against heat e g temperature 60 C fire and immersing into water Danger of explosion Do not open the battery There is a risk of shortcircuiting Opening the battery voids any and all warranty claims Battery must not be subjected to mechanical shock There is a risk ...

Страница 37: ...ordance with the latest technology We comply with or exceed the requirements of all relevant safety standards When charged these lithiumion batteries contain a high level of energy If a fault occurs which may not be detectable from the outside in very rare cases and under unfavorable conditions lithium ion batteries can catch fire Keep the battery away from children ...

Страница 38: ...n the indicator will turn ON OFF Charging Port Charging current can not be more than 5 Amps Introduction Li ion Battery User Manual Rear Rack Type III This manual contains important safety performance and service information Read it before you take the first ride on your new bicycle and keep it for reference The manual can also be found online at www motrike com 38 ...

Страница 39: ...to three LEDs on the battery indicator Transport Always remove the battery pack from the bicycle before transporting the bicycle on a vehicle bike rack Winter use During winter use particularly below 0 C we recommend charging and storing the battery at room temperature before inserting the battery in the eBike immediately before riding it For longer journeys in the cold it is advisable to use ther...

Страница 40: ... the battery being damaged 40 WARNING Do not puncture or crush the battery pack Do not impact the battery pack or modify it in any way Do not use the battery pack if it shows visible damage Danger of fire or explosion which can cause death or serious injury The battery may give off fumes if it becomes damaged or is used incorrectly Ensure the area is well ventilated and seek medical attention shou...

Страница 41: ...ance with the latest technology We comply with or exceed the requirements of all relevant safety standards When charged these lithiumion batteries contain a high level of energy If a fault occurs which may not be detectable from the outside in very rare cases and under unfavorable conditions lithium ion batteries can catch fire Keep the battery away from children 41 ...

Страница 42: ...ooting Your Charger Green Charging completed Green Introduction Li ion Battery Charger User Manual This manual contains important safety performance and service information Read it before you take the first ride on your new bicycle and keep it for reference LED STATUS Red Battery not connected yet Charging Charge Cycle and LED Indicators for Li ion Battery 42 Check that the outlet your charger is ...

Страница 43: ...ging unit in a damp or wet environment 43 Avoid water penetration into the appliance If liquid has entered unplug the charger from the outlet and take it to your dealer for inspection Protect your charger from children To prevent injury use the charger that comes with your e bike Other battery types can explode when charged with the incorrect charger This can lead to personal injury and material d...

Страница 44: ...44 326E 320E F326E S320E 420E F420E H420E lighting system Lighting System User Manual ...

Страница 45: ...424E lighting system 45 ...

Страница 46: ...atteries 46 320E Solar T320E lighting system The tail light turns off automatically under static condition more than 30 seconds and turns on automatically when the trike is shaking Short press for less than 2 seconds when the light flashed 3 times the light goes into Auto Mode When the light flashed 5 times it goes into Off Mode ...

Отзывы: