


www.tricklestar.com
The best way to save energy is to stop wasting it.
TM
ZIGBEE
®
MULTI-SENSOR
PAIRING DirecTV
®
or Comcast
®
REMOTE CONTROL
Detects ZigBee RF4CE
*
RF, IR remote control signals and motion.
Includes a configurable countdown timer that will switch off the
TV and peripherals if no RF, IR or motion is detected.
Status LED flashes when RF, IR or motion is detected.
Patented sensing hardware and algorithm looks for RF and IR
commands first. It then looks for motion after a period where no
RF or IR commands are detected.
Supports high level CEC
*
commands via TAV-Link cable to the TV
and to the peripherals for soft switch off.
TAV-Link functionality allows “smart” TVs to store their data and
settings safely before powering down. TAV-Link also allows
gaming consoles to enter an energy-saving mode earlier and
without any corruption of data.
Supports RF4CE pairing with DirecTV
®
and Comcast
®
remote
controls (can pair up to 4 remotes).
Includes a soft chirp, piezo buzzer to warn of a pending shutdown
10 minutes prior to shutdown.
Manual on/off button.
*RF4CE (Radio Frequency for Consumer Electronics) is a radio frequency
protocol for audio and video device remote controls. It provides two-way,
high-speed communications which allow remote signals to transmit
through cabinets, obstacles, walls and floors.
*CEC (Consumer Electronics Control) is the control protocol found in HDMI.
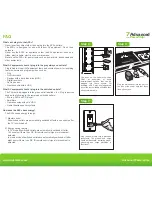
STEP 1
Quickly press the pinhole pairing button
located on the back of the multi-sensor to
trigger the pairing process.
A blue LED will flash for a period of 15
seconds - indicating the multi-sensor is in
pairing mode.
STEP 2
Place the RF4CE DirecTV or Comcast remote
near the sensor (within two inches) and press
the 0 key on the remote until the red LED
illuminates. Repeat with other RF4CE remote
controls (up to four).
The multi-sensor will exit pairing mode after
15 seconds if no RF button presses are
detected.
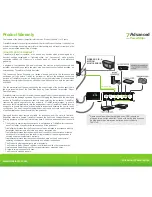
APPLICATION DIAGRAM
TAV-LINK
-
To configure the countdown timer, press
and hold the button for 10 seconds until
the red LED illuminates. Then press:
• Once for 30 minutes
• Twice for 60 minutes
• Three times for 120 minutes
LED will flash once for 30 minutes, twice
for 60 minutes (default setting) and three
times for 120 minutes.
Programming the
Countdown Timer
*
Game consoles without hard disk drives (HDD) should be
plugged into a switched outlet. Those with hard disk drives can
be plugged into an always-on outlet and controlled via
TAV-Link.
*
RF + IR
TV REMOTE
ZIGBEE RF, IR,
& MOTION
MULTI-SENSOR
(for CEC function)
ADVANCED
POW
TIER 2 ZIGBEE
®
MULTI-SENSOR


