


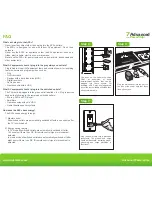


Operation - Music Mode
Press any button on AV receiver or
DVD/CD player remote control to turn
on the switched outlets.
Press power on all music related
devices to switch them on.
Press and hold the pin-hole pairing
button for five seconds.
Blue LED will illuminate for one
second - indicating all paired remote
control addresses have been erased.
Place the RF remote control near the
sensor (within two inches) and press
the 0 key on the remote until the red
LED on the sensor illuminates. Repeat
with other RF remote controls (up to
four).
Operation -
Step 1
Step 1
Step 2
Step 1
If the TV is not switched on at any time
in between, all switched outlets will
turn off after eight hours.
If any RF/IR signal is detected, the
countdown timer period will
automatically reset for another eight
hours.
If the TV is switched on during music
mode, the Advanced Pow will
switch to TV mode.
Note
www.tricklestar.com
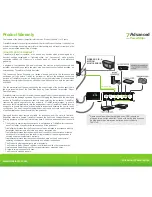
Advanced Pow
Advanced
Pow
Outlet
7
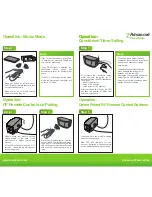
Operation -
Countdown Timer Setting
Operation -
RF Remote Control and Pairing
Operation -
Delete Paired RF Remote Control Address
Step 1
To configure the countdown timer,
press and hold the button for 10
seconds until the red LED illuminates.
Then press:
• Once for 30 minutes
• Twice for 60 minutes
• Three times for 120 minutes
After countdown timer is set, the LED
will flash the number of times that
timer has been set to.
The sensor has a default buzzer
notification that will sound three times
during the 10 minute countdown
timer period.
To disable the audible notification,
press and hold the button for 10
seconds until the red LED
illuminates, then press the button four
times. The red LED will flash four
times to confirm the countdown timer
buzzer has been disabled.
Note
Quickly press the pinhole pairing
button located on the back of the
multi-sensor to trigger the pairing
process.
A blue LED will flash for a period of 15
seconds - indicating the multi-sensor
is in pairing mode.


