II. RECEIPT INSPECTION
All Traulsen products are factory tested for
performance and are free from defects when
shipped. The utmost care has been taken in
crating this product to protect against damage
in transit. All interior fittings have been
carefully secured to prevent damage.
You should carefully inspect your Traulsen
unit to assure that no damage has occurred in
transit. If, however, damage is detected, you
should save all the crating materials and make
note on the carrier’s Bill Of Lading describing
this. A freight claim should be filed immediate-
ly. If damage is subsequently noted during
or immediately after installation, contact the
respective carrier and file a freight claim.
Under no condition may a damaged unit be
returned to Traulsen & Co. without first obtain-
ing written permission (return authorization).
III. INSTALLATION
III. a - LOCATION:
Select a proper location for your Traulsen
unit is very important.
Always:
- Install to assure that unit is level.
- Install to assure that unit is away from
extreme heat.
- Install to assure that unit is away from
a steamer.
- Install to assure that unit is NOT placed near
or under a ventilation duct or hood, (this will
disturb the airflow of the air curtain and will
hamper the performance of the unit).
- Install to assure that unit is 6” minimum
distance from back of unit to wall or
obstruction (ie; a wall).
- Install to assure that the door(s) may
open a minimum of 90 degrees.
Never:
- Install equipment in an area of
standing water
- Install near or under a ventilation
hood or duct return
- Install equipment in an area not conductive
to safe and proper operator use.
III. b - PACKAGING:
Traulsen Air Curtain units are shipped from the
factory on a wooden pallet and packaged in a
durable cardboard container. The carton is
attached to the wooden skid with the use of
large staples. These should first be removed to
avoid scratching the unit when lifting off the
-2-
III. INSTALLATION (con’t)
crate. Remove the wooden pallet and strapping
material, and the unit should be rolled off the
skid. Avoid laying the unit on its front, side or
back for removal of the pallet.
NOTE: Traulsen does not recommend laying
the unit down on its front, side or back.
However, if you must please be certain to
allow the unit to remain in an upright position
afterwards for 48 hours before plugging the
unit in or attempting to place the unit in to
service, to assure that the compressor oils
and refrigerant may settle.
III. c - CLEARANCE:
It is important for the proper operation and
longevity of your Traulsen unit that it have
adequate provisions for air supply to the
compressor. Allow approximately 6” - 12”
between the back grill of the unit and the
wall for proper air flow.
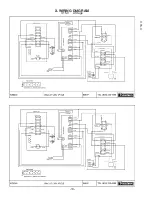
III. d - WIRING DIAGRAM:
Refer to the wiring diagram for any service
work performed on the unit. Should you
require one, please contact Traulsen Service
at (800) 825-8220, and provide the model
and serial number of the unit involved.
III. e - CORD & PLUG:
Traulsen Air Curtain models are supplied with
a cord & plug attached. It is shipped coiled at
the bottom of the cabinet, secured by a nylon
strip. For your safety and protection, all units
supplied with a cord and plug include a special
three-prong grounding plug on the service
cord. Select only a dedicated electrical outlet
with grounding plug for power source.
NOTE: Do not under any circumstances, cut
or remove the round grounding prong from
the plug, or use an extension cord.
III. f - POWER SUPPLY:
The supply voltage should be checked prior
to connection to be certain that proper voltage
for the cabinet wiring is available (refer to the
serial tag to determine correct unit voltage).
Make connections in accordance with local
electrical codes. Use qualified electricians.
Use of a separate, dedicated 20 amp circuit is
required. Size wiring to handle indicated load
and provide necessary overcurrent protector
in circuit (see amperage requirements on the
unit’s serial tag).
Содержание RAC37
Страница 11: ...10 X WIRING DIAGRAM V 15 0 2 Stage V 15 0...


