TRANE
R
• Resolving Shipping
damage
If damage is found or items are
missing:
1. Report all claims of shipping
damage to the delivering carrier
(transporter) immediately, and
schedule an inspection.
2. Make specific notations concerning
the damage on the freight bill.
3. Keep damaged material in the same
location as received. It is the
receiver’s responsibility to provide
reasonable evidence that damage
was not incurred after delivery.
4. Photograph damage if possible.
5. Do not move or discard damaged
freight packaging materials.
6. Notify the Trane sales representative
of the damage and arrange for
repair. Do not attempt and arrange
for repair. Do not attempt to repair
the unit without consulting the sales
representative. TRANE IS NOT
RESPONSIBLE FOR SHIPPING
DAMAGE.
• Storage Considerations
When storing a TRANE Quantum
TM
Air
Handler, for a period of time before
installation, it must be protected.
The
warranty will not cover damages to
the unit do to negligence during
storage.
Indoor storage is ideal and
requires only a few special pre-
cautions.
To protect the unit from damage due to
the elements and prevent it from
possibly becoming a contaminant
source for indoor air quality (IAQ)
Receiving
problems, the unit should be stored
indoors.
When outdoor storage is necessary,
several things must be done to prevent
damage.
• Outdoor Storage
1. Select a well-drained area,
preferably a concrete pad or
blacktop surface.
2. Place the unit(s) on a dry surface or
raised off the ground to assure
adequate air circulation beneath unit
and to assure that no portion of the
unit contacts standing water at any
time.
3. Allow proper clearance around the
unit to perform periodic inspection
and maintenance of the equipment
while in storage.
4. Keep the equipment in the original
shipping container for protection
and ease of handling.
5. Cover the unit securely with a
CANVAS
tarp.
6. Ensure that the canvas tarp is
secure.
7. Do not stack units.
8. Do not pile other material on the
units.
9. Loosen belt tension on drive belts.
4
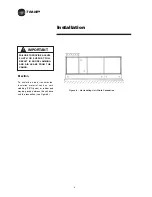
• Nameplate
All of TRANE Quantum
TM
Air Handler
are identified by a multiple-character
model number. lts use enables owner/
operator, installing contractors, and
service technicians to define the
operation, components and options for
a particular unit. Be sure to refer to the
information printed on the unit
nameplate (figure1) when ordering
replacement or requesting service.
• Delivery Check
All unit sections are securely fasten to
skids for shipping and handling
purpose.
Upon receipt of the unit(s), inspect for
damage that may have occurred during
shipment and any items, which were
ordered but did not arrive with the unit.
Complete the following checks:
1. Visually inspect the exterior unit
casing and all accessories for any
dents, punctures or shipping and
handling damage.
2. Cut all banding (if applicable) loose
from skid, but do not remove the
skids.
3. Check all access doors to confirm
that they are secured with latches.
4. Manually rotate the fan wheel to
ensure free movement of the shaft
and bearings
Inspect the fan housing for any
foreign objects.
5. Inspect the coil(s) for fin damage.
Figure 1
Содержание TRANE Quantum CLCPEuro
Страница 2: ...TRANE R...
Страница 6: ...TRANE R 2 CLCPXP Model Nomenclature...
Страница 7: ...TRANE R CLCPEURO Model Nomenclature 3...
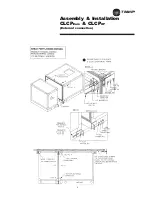
Страница 13: ...TRANE R Assembly Installation CLCPEuro CLCPXP External connection 9...
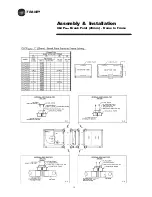
Страница 14: ...TRANE R Assembly Installation CLCPEuro Break Point 25mm Frame to Frame 10...
Страница 15: ...TRANE R 11 Assembly Installation CLCPEuro Break Point 25mm Panel to Frame...
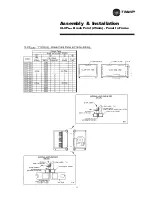
Страница 16: ...TRANE R 12 Assembly Installation CLCPEuro Break Point 2 50mm Frame to Frame...
Страница 17: ...TRANE R Assembly Installation CLCPEuro Break Point 2 50mm Panel to Frame 13...
Страница 18: ...TRANE R Assembly Installation CLCPEuro Paneling 14...
Страница 19: ...TRANE R Assembly Installation CLCP XP Break Point 15...
Страница 20: ...TRANE R Assembly Installation CLCP XP Break Point 16...
Страница 21: ...TRANE R 17 Assembly Installation CLCP...
Страница 22: ...TRANE R Assembly Installation CLCP 18...
Страница 36: ...TRANE R Maintenance 32 Figure 18 Belt Tension Measurement...
Страница 39: ...TRANE R 35 Trouble Analysis Pulley and Belt...
Страница 45: ...TRANE R Appendix B HDT Unit Weight CLCPXP 41...
Страница 46: ...TRANE R Appendix B HDT Unit Weight CLCPXP 42...
Страница 47: ...TRANE R Appendix B HDT Unit Weight CLCPXP 43...
Страница 48: ...TRANE R Appendix B VDT Unit Weight CLCPXP 44...
Страница 52: ...TRANE R Appendix D Filter and Quantity 48 Filter Dimension and Arrangement High Capacity Filter CLCP Euro only...
Страница 53: ...TRANE R Appendix D Filter and Quantity 49 Filter Dimension and Arrangement Final Filter HEPA...
Страница 57: ...TRANE R Typical Wiring Diagram Starter Star Delta 380 420V 3Phase 4Wires ELCB Standard 53...
Страница 58: ...TRANE R 54 Typical Wiring Diagram Starter Dol 380 420V 3Phase 4Wires ELCB Standard...
Страница 59: ...TRANE R 55 Typical Wiring Diagram Starter Dol 380 420V 3Phase 4Wires Standard...
Страница 60: ...TRANE R 56 Typical Wiring Diagram VFD Starter Dol Bypass Starter C W Door Switch 380 415 440 460V 3Phase 3Wires...
Страница 61: ...TRANE R 57 Typical Wiring Diagram Starter Dol 380 420V 3Phase 4Wires ELCB Enhance with Thermistor Relay...
Страница 62: ...TRANE R 58 Typical Wiring Diagram Starter Dol 380 420V 3Phase 4Wires Standard...
Страница 63: ...TRANE R 59 Typical Wiring Diagram Starter Dol 380 420V 3Phase 4Wires Enhance with Thermistor Relay...
Страница 64: ...TRANE R 60 Typical Wiring Diagram Starter Star Delta 380 420V 3Phase 4Wires Enhance with Thermistor Relay...
Страница 65: ...TRANE R 61 Typical Wiring Diagram Starter Star Delta 380 420V 3Phase 4Wires Standard...
Страница 68: ...TRANE R 64...
Страница 70: ...TRANE R 66...
Страница 71: ...TRANE R...


