TRANE
R
5.
6.
7.
8.
9.
10.
Assembly & Installation
Steam Coil Piping
Type A, AA Steam Coils
These are for central system, industrial
and process application with one row,
opposite-end connections. Maximum
standard operating limits:
Copper tubes: 100 psig and 400
o
F
Type AA coils feeds alternate tubes.
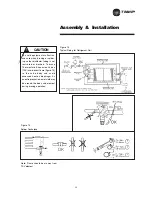
Refer to Figure 13 for typical steam coil
piping.
1. lnstall a 1/2 inch, 15 degree swing
check vacuum breaker in the
unused condensate return tapping
as close as possible to the coil.
2. Vent the vacuum breaker line to the
atmosphere or connect it to the
return main at the discharge side of
the steam trap.
Note: Vacuum breaker relief is
mandatory when the coil is controlled
by a modulating steam supply or a two-
position (ON-OFF) automatic steam
supply valve.
3. Run the return pipe at the full size of
the steam trap connection except for
the short nipple screwed directly
into the coil condensate connection.
Do not bush or reduce the coil return
tapping size.
4. Proper steam trap selection and
installation is necessary for
satisfactory coil performance and
service life. For installation, use the
following steps:
•
Select trap based on maximum
possible condensate rate.
•
Locate the steam trap discharge
at least 12 inches below the
condensate return tapping, this
provides sufficient hydrostatic
head pressure to overcome trap
losses and assure complete
condensate removal.
•
Float and thermostatic traps are
recommended because of gravity
drain and continuos discharge
operation.
•
Use float and thermostatic traps
are recommended because of
gravity drain and continuos
discharge operation.
•
Use float and thermostatic traps
with atmospheric pressure gravity
condensate return, with automatic
control or where the possibility of
low-pressure supply steam exists.
•
Use bucket traps ONLY when the
supply steams in unmodulated
and 25 psig or higher.
•
Always install strainers as close
as possible to the inlet side of the
trap. Do not modulate Type A, AA
coils. Use two position (ON-OFF)
steam supply controls.
Use a V-port modulating valve to
obtain gradual modulating action.
Do not modulate systems with
overhead or pressurized returns
unless the condensate is drained
by gravity to a receiver (vented to
the atmosphere) and returned to
the main by a condensate pump.
At start-up on units with fresh air
dampers, slowly turn the steam on
full at least 10 minutes before
opening the fresh air.
Pitch all supply and return steam
piping down minimum of 1-inch
per 10 feet in the direction of flow.
Do not drain the steam mains or
take-off through the coils. Drain the
mains ahead of the coils through
a steam trap to the return line.
Overhead return require 1 psig of
pressure at the steam trap
discharge for each 2 - feet
elevation to assure continuous
condensate removal.
AV - Automatic or manual air vent
GV - Gate valve
VB - Vacuum breaker
OV - Automatic two-position control valve
21
Figure 13
Typical Piping for Steam Coil
MV - Magnetic valve
FT - Float and thermostatic steam trap
ST - Strainer
CAUTION
!
Condensate must flow freely from
coil at all times to prevent physical
coil damage from water hammer,
unequal thermal stresses, freeze-up
and/or corrosion.
Complete the following recom-
mendations to prevent coil
damage.
CAUTION
!
Caution: Always open the steam
supply control valve slowly to
prevent possible coil damage.
Содержание TRANE Quantum CLCPEuro
Страница 2: ...TRANE R...
Страница 6: ...TRANE R 2 CLCPXP Model Nomenclature...
Страница 7: ...TRANE R CLCPEURO Model Nomenclature 3...
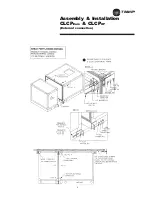
Страница 13: ...TRANE R Assembly Installation CLCPEuro CLCPXP External connection 9...
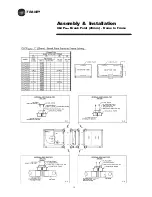
Страница 14: ...TRANE R Assembly Installation CLCPEuro Break Point 25mm Frame to Frame 10...
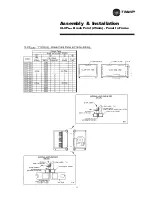
Страница 15: ...TRANE R 11 Assembly Installation CLCPEuro Break Point 25mm Panel to Frame...
Страница 16: ...TRANE R 12 Assembly Installation CLCPEuro Break Point 2 50mm Frame to Frame...
Страница 17: ...TRANE R Assembly Installation CLCPEuro Break Point 2 50mm Panel to Frame 13...
Страница 18: ...TRANE R Assembly Installation CLCPEuro Paneling 14...
Страница 19: ...TRANE R Assembly Installation CLCP XP Break Point 15...
Страница 20: ...TRANE R Assembly Installation CLCP XP Break Point 16...
Страница 21: ...TRANE R 17 Assembly Installation CLCP...
Страница 22: ...TRANE R Assembly Installation CLCP 18...
Страница 36: ...TRANE R Maintenance 32 Figure 18 Belt Tension Measurement...
Страница 39: ...TRANE R 35 Trouble Analysis Pulley and Belt...
Страница 45: ...TRANE R Appendix B HDT Unit Weight CLCPXP 41...
Страница 46: ...TRANE R Appendix B HDT Unit Weight CLCPXP 42...
Страница 47: ...TRANE R Appendix B HDT Unit Weight CLCPXP 43...
Страница 48: ...TRANE R Appendix B VDT Unit Weight CLCPXP 44...
Страница 52: ...TRANE R Appendix D Filter and Quantity 48 Filter Dimension and Arrangement High Capacity Filter CLCP Euro only...
Страница 53: ...TRANE R Appendix D Filter and Quantity 49 Filter Dimension and Arrangement Final Filter HEPA...
Страница 57: ...TRANE R Typical Wiring Diagram Starter Star Delta 380 420V 3Phase 4Wires ELCB Standard 53...
Страница 58: ...TRANE R 54 Typical Wiring Diagram Starter Dol 380 420V 3Phase 4Wires ELCB Standard...
Страница 59: ...TRANE R 55 Typical Wiring Diagram Starter Dol 380 420V 3Phase 4Wires Standard...
Страница 60: ...TRANE R 56 Typical Wiring Diagram VFD Starter Dol Bypass Starter C W Door Switch 380 415 440 460V 3Phase 3Wires...
Страница 61: ...TRANE R 57 Typical Wiring Diagram Starter Dol 380 420V 3Phase 4Wires ELCB Enhance with Thermistor Relay...
Страница 62: ...TRANE R 58 Typical Wiring Diagram Starter Dol 380 420V 3Phase 4Wires Standard...
Страница 63: ...TRANE R 59 Typical Wiring Diagram Starter Dol 380 420V 3Phase 4Wires Enhance with Thermistor Relay...
Страница 64: ...TRANE R 60 Typical Wiring Diagram Starter Star Delta 380 420V 3Phase 4Wires Enhance with Thermistor Relay...
Страница 65: ...TRANE R 61 Typical Wiring Diagram Starter Star Delta 380 420V 3Phase 4Wires Standard...
Страница 68: ...TRANE R 64...
Страница 70: ...TRANE R 66...
Страница 71: ...TRANE R...


