22
❏
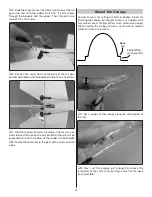
5. Slide the brackets over the tiller arm portion of the tail
gear wire and onto the rudder. Drill 1/16" [1.6 mm ] holes
through the brackets and the rudder. Then, thread in two
more M 2.5 x 15 screws.
❏
6. Position the collar down to the base of the tail gear
bracket and tighten with threadlocker and a 1.5 mm hex driver.
❏
7. View the tail gear from directly above. If necessary, use
pliers to bend the wire so the axle portion of the wire will be
perpendicular with the rudder so the model will roll straight.
❏
8. Fasten the tail wheel to the gear with a collar on both
sides.
Mount the Canopy
Curved scissors for cutting out RC car bodies is best for
trimming the canopy, but regular scissors or a hobby knife
may also be used. Cutting off too much material can apply
stress causing the canopy to crack, so it’s best to remove
material in small increments.
Base
Lip
Vertical Part
(cut here first)
❏
1. First, rough-cut the canopy along the vertical part of
the “lip”.
❏
2. Next, cut the canopy just enough to remove the
remainder of the vertical lip, leaving as much of the
base
lip
as possible.

